TL;DR: If you want to go straight to the tutorial click here.
Context
In a standard Hugo website images are images are stored in either static/images or resources/_gen/assets. This is adequate if Hugo is running on a local server but not when in production.
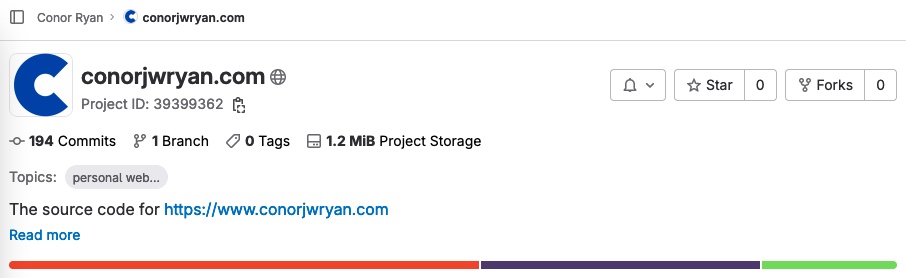
This site is using Cloudflare Pages, a JAMstack hosting platform, to deploy the website through integration with Gitlab. When I make changes to the site code and commit it to the repository Cloudflare automatically builds the site in seconds.
What’s The Problem With Images?
There is no inherent problem with images themselves. When dealing with code in repositories there is one thing that developers are concious about, repository size. When you involve images in your repository this drastically the increases the size therefore decreases the speed of repository. This has the knock-on impact of increasing the Hugo “build time”.
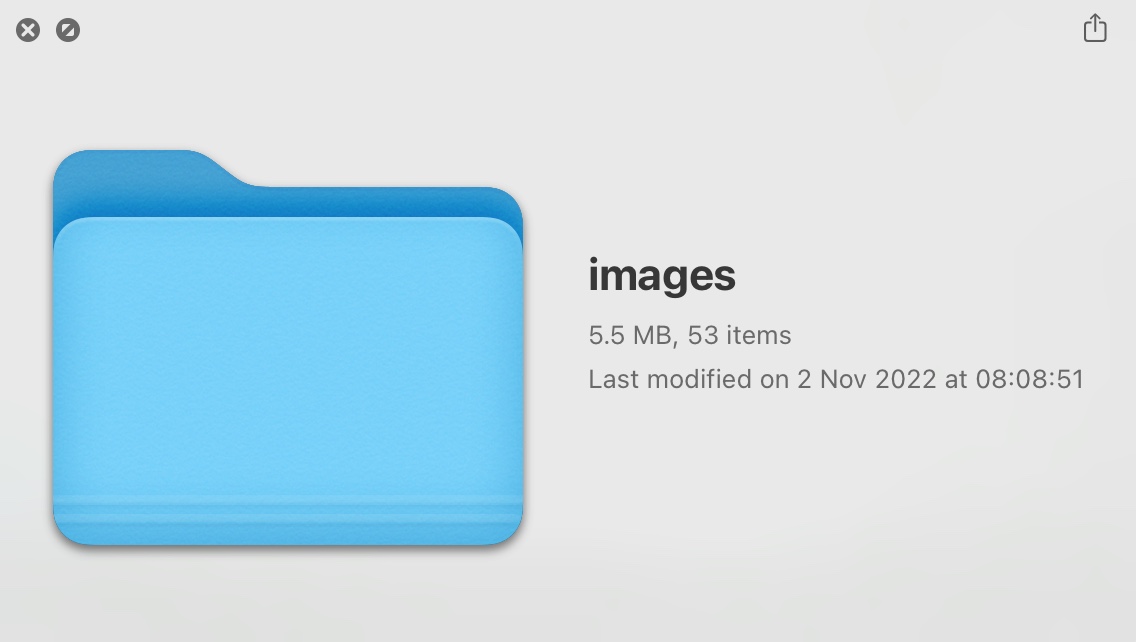
In my specific case, the code repository for this site is currently 1.2MB. In contrast my site image folder is currently 5.5MB, 4.6x the size of the code. If I were to add images in the repository the size would increase to 6.7MB. It would take twice as long to build my website. As I do more posts on this site, the number of images will increase. Separating the images from the code ensures my site builds remain as fast as possible.
Doesn’t Cloudflare Have An Image CDN?
Many JAMstack hosting platforms have some sort of CMS / image hosting offering. Cloudflare is no exception. Cloudflare has a product called Cloudflare Images which allows you to “store, resize, optimize and serve images at scale”.
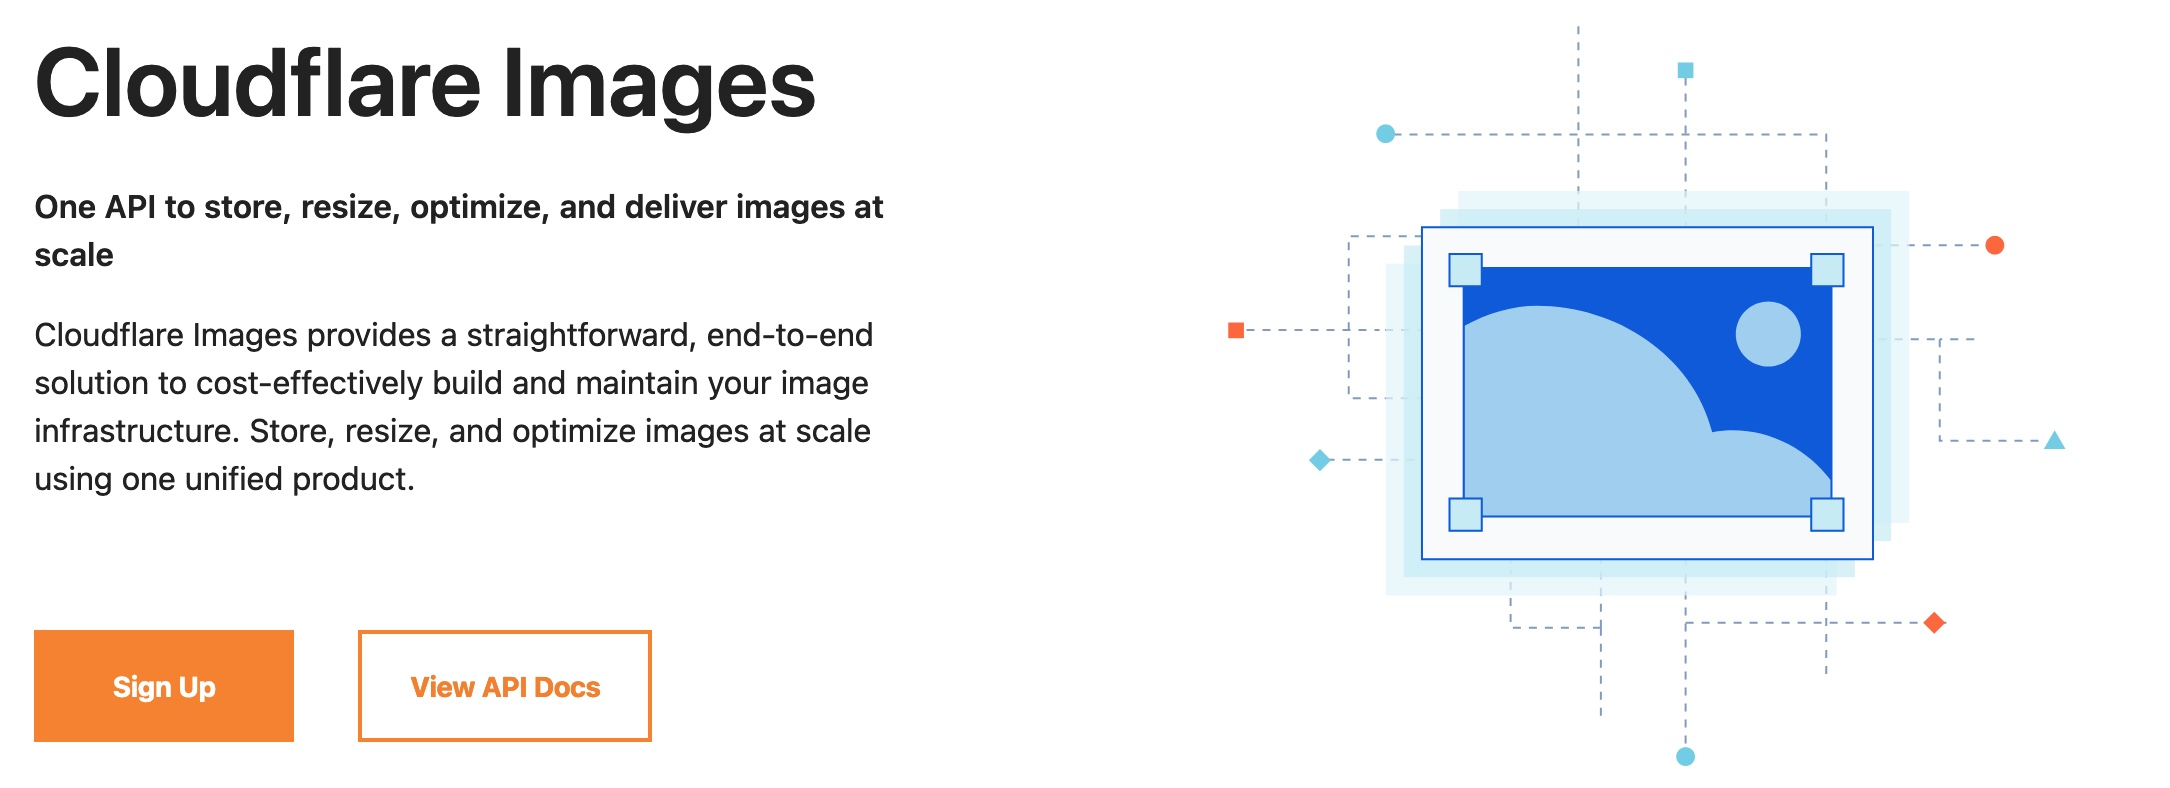
I can see myself paying for Cloudflare Images in the future as I have more posts (and thus more images). The ability of Cloudflare Images to store and optimise images does seem to be exactly what I want. However, it does start at $5. While that is not so much in the grand scheme of things I don’t think I’ll use it enough for it to be worth the investment.
Thankfully Cloudflare has an alternative Pay As You Go service which is more applicable for my hobby site. Cloudflare R2.
Cloudflare R2 Explained
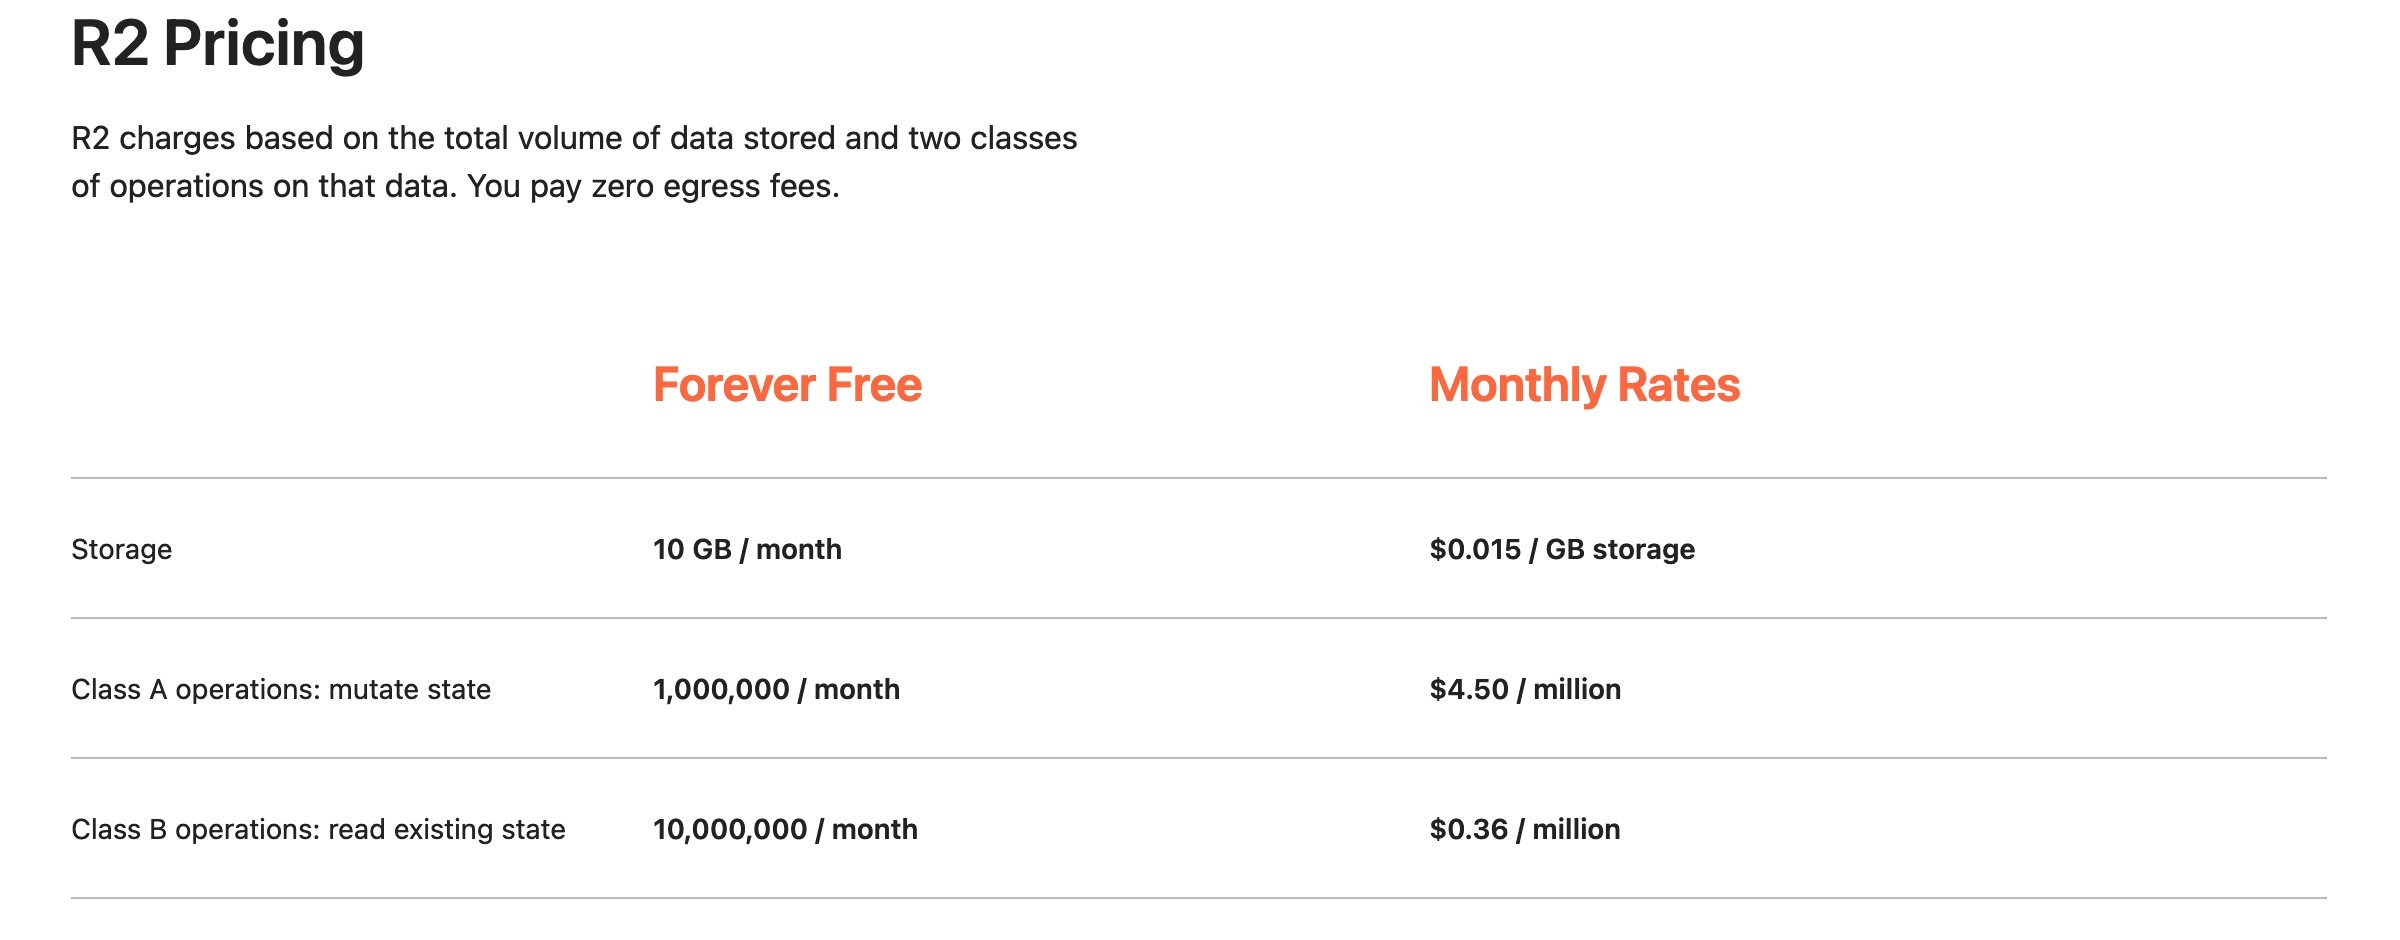
Cloudflare R2 is an S3-type cloud object storage service. These objects could be documents, files, images or even whole computer systems backups. These objects are stored in designated buckets and can be accessed either from the web or through the terminal. While Amazon created the S3 object storage system many other S3-compatible systems have appeared. The general rule of thumb is that you only pay for what you use. You pay for how much storage and for access to those objects. Click here to read more about S3 here
Cloudflare R2, released earlier this year, has the unique pricing structure, similar to other Cloudflare products, where users are given a set amount of “free” storage and S3 operations free.
Tutorial Overview
The plan is to use Cloudflare R2 as an external Image CDN (content delivery network) which we will then implement into our Hugo site. It will act as the image repository for the site, as Gitlab is the code repository. Due to the generous “free” allowance I will not be charged much (if anything) to host images through R2 on this small site.
The idea is that I will use a custom shortcode called img to inject a Hugo code snippet into the Content (written portion) of a post. When I want to add an image to a post I will reference the img shortcode and Hugo knows then to replace that img snippet with the HTML <image>/<img> tag referencing the public URL of the R2 bucket which contains the images.
|
|
Instead of writing these HTML tags every time I want to include an image in a post, I can simply use the img shortcode like this:
|
|
This will save time and can be used again and again. It means we don’t have to include html in markdown posts.
To do this we first need to set up our R2 bucket which will house our images.
Before We Begin
This tutorial assumes four things;
- You have a Cloudflare Account. If you don’t you can sign up for one
free(yes really free!). - That you already have a Hugo website and a hosting provider. If you don’t have one follow this tutorial on how to set one up with Cloudflare Pages.
- That you have “cloud storage browser” in order to view and upload to your R2 instance. (Cyberduck is
freeand works on MacOS and Windows). - That you have domain like
https://www.conorjwryan.comto host the CDN URL off (although this is not strictly required - it just looks nice).
I am using Cloudflare Pages to host this website but Pages is not required to use Cloudflare R2. This tutorial will work with any hosting provider.
Cloudflare R2, unlike other object storage providers has free alloted storage and operations per month. However, in order to access this free allowance it requires use of a debit/credit card to be associated with the Cloudflare Account.
R2 Setup
It’s worth noting that even though you get the free amount of storage and operations a month, setting up R2 requires a credit/debit card. If this is just a personal blog or a small business site it is very unlikely that you will have to pay anything.
Setting up R2 requires a Cloudflare Account (free) as well as a domain (your-company.com) added to the account. This will be the first thing asked after confirming your email. This will allow the R2 Bucket to be associated with a URL like cdn.conorjwryan.com instead of pub-56gr45eoj353er.r2.dev. If you don’t mind then you can skip this step. The tutorial assumes that you have added a domain to the account.
After initial setup of the Cloudflare Account, press R2 on the accounts dashboard. Agree to the terms stating the “Pay As You Go” rates (the same as above) and input your card information.
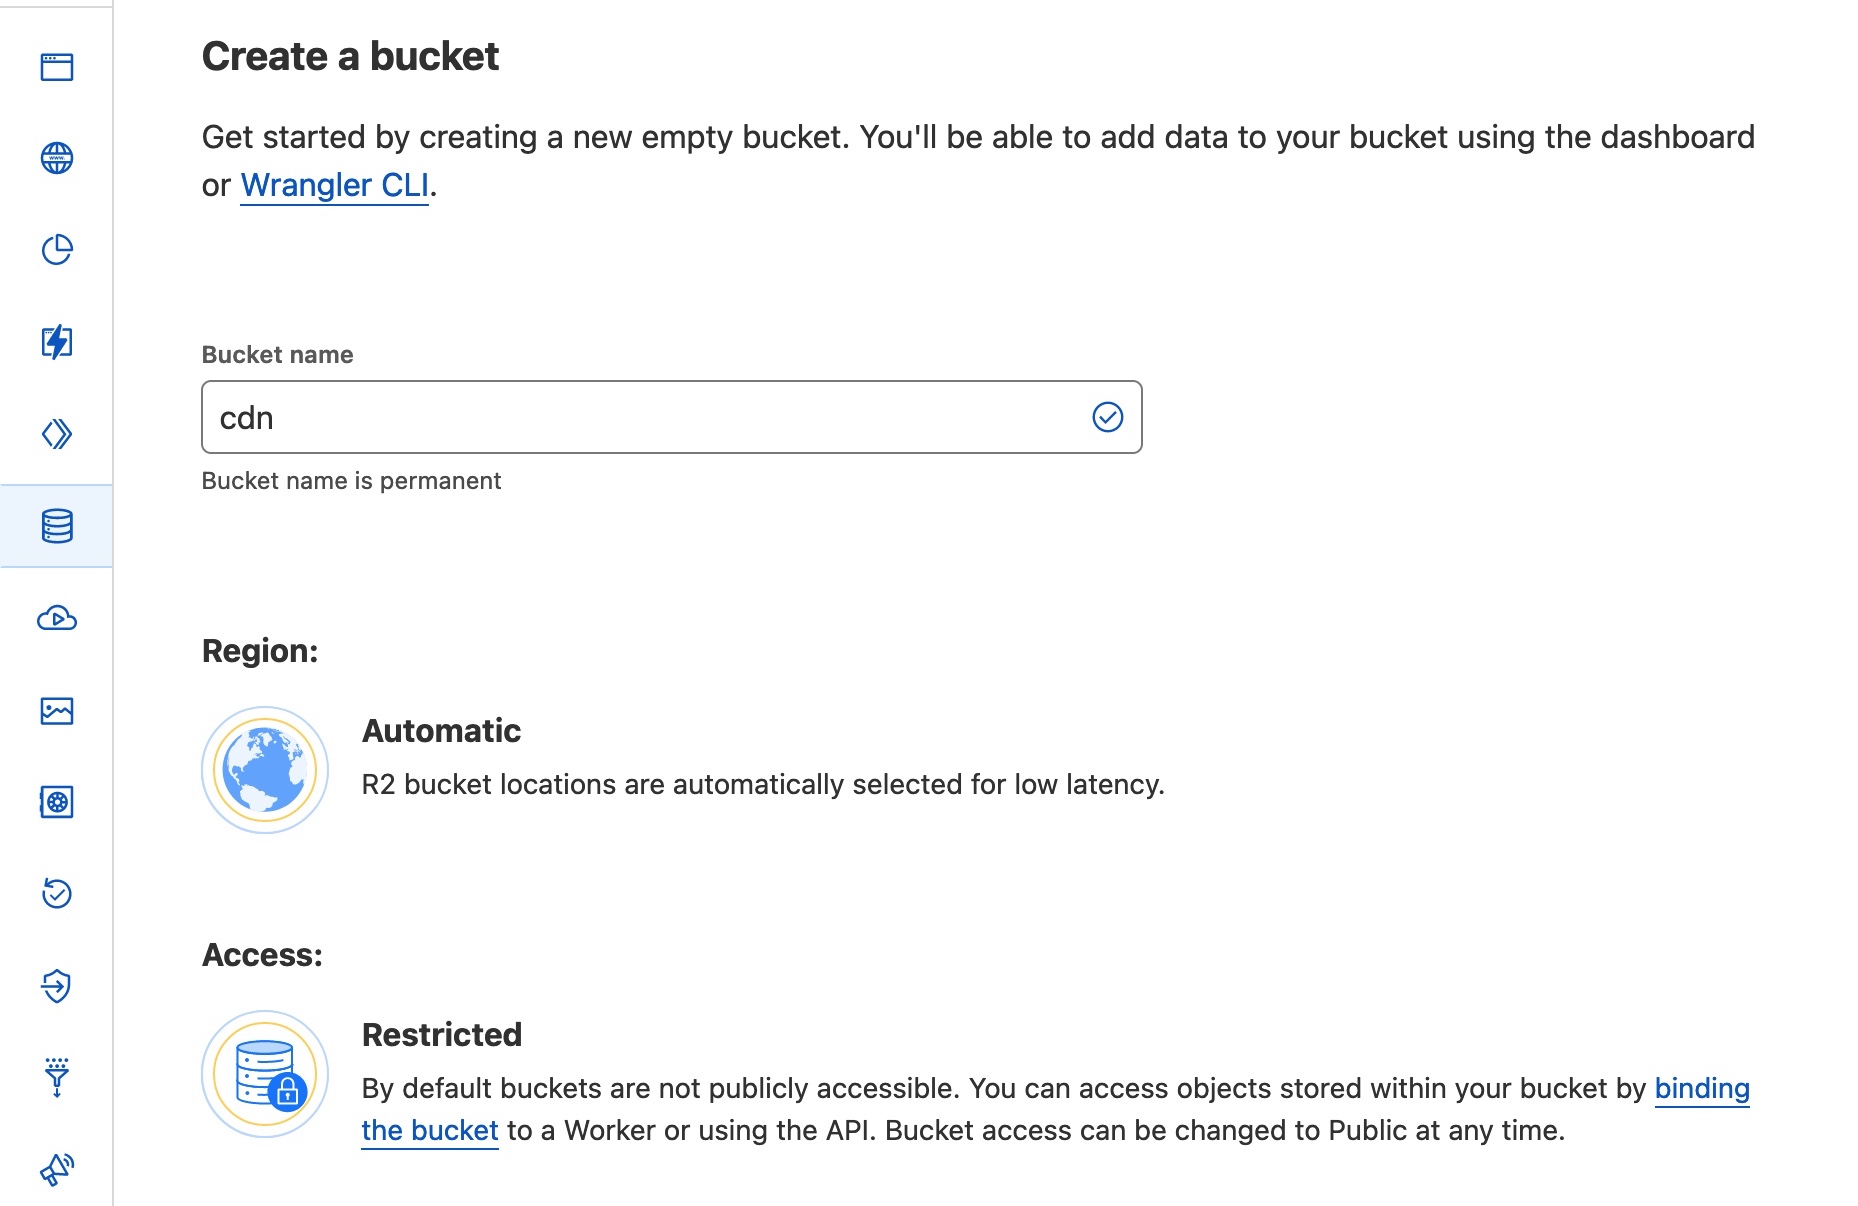
You’ll then be asked what the name of the bucket is going to be. This can be anything as descriptive as CDN or named after your favourite actors or astrological constellations. For purposes of this tutorial it will be CDN
When the bucket is created you will then be directed to the bucket information page. This gives information on bucket size and the amount of A class and B class operations. For now these should be blank. Navigate to Settings on the top tab and then to Domain Access and press the Connect Domain button.
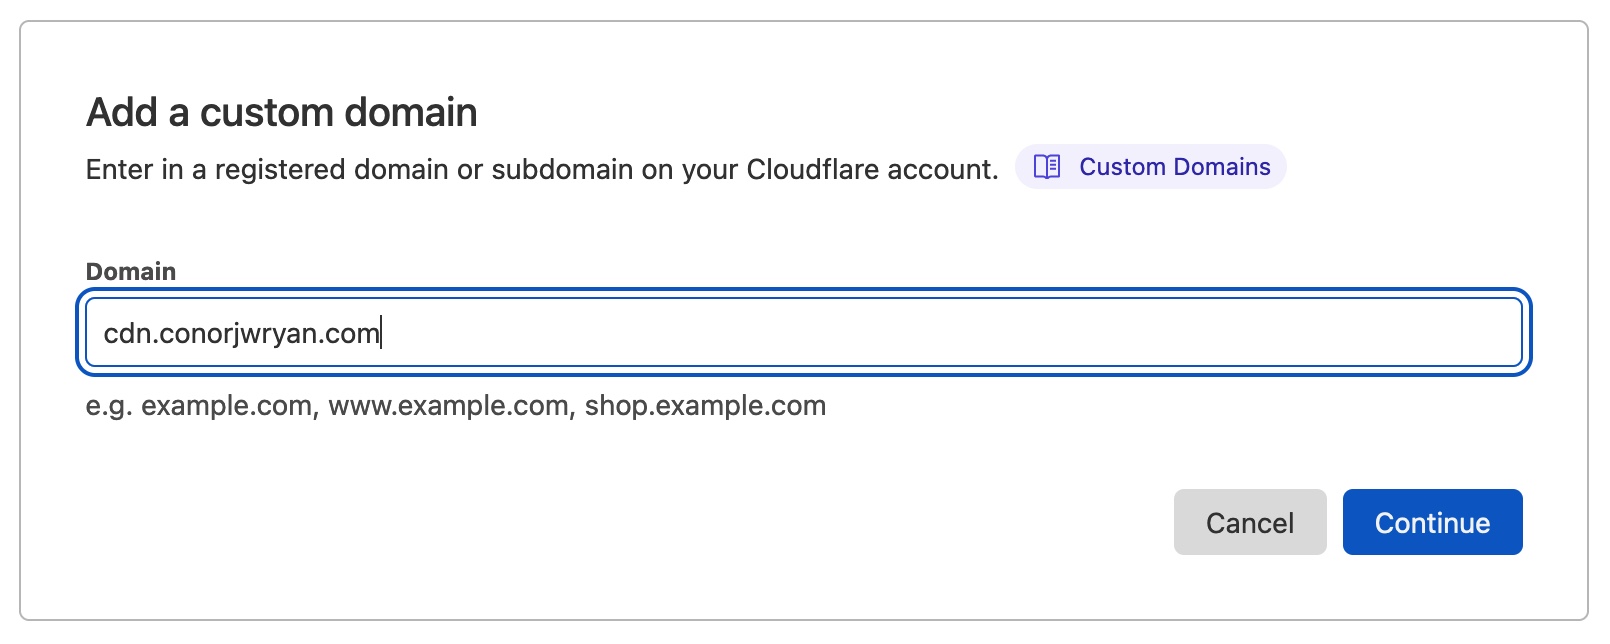
Here is where you put the full URL, subdomain.domain.tld eg: cdn.conorjwryan.com. This is going to be the domain through which all of your images are going to be called/accessed on for your Hugo site like: https://cdn.conorjwryan.com/conorjwryan/static/images/testing-image.jpg
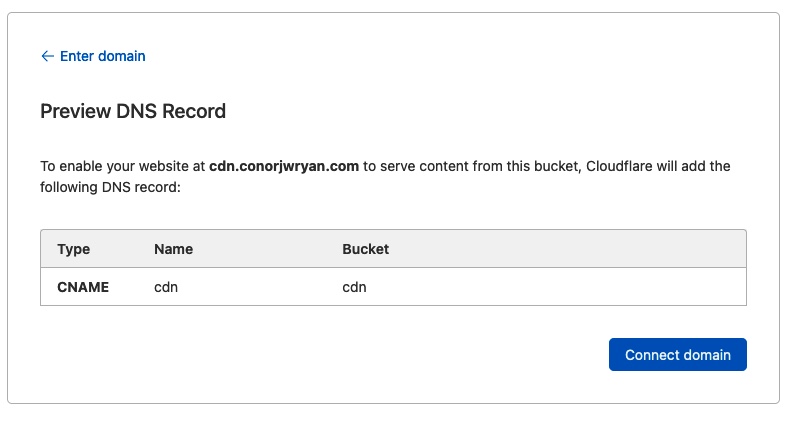
Note: If you get the error That domain was not found on your account. then you need to add the domain on your main Cloudflare Dashboard, easily accessible by pressing the Cloudflare logo in the top left. To learn how to add the domain click here.
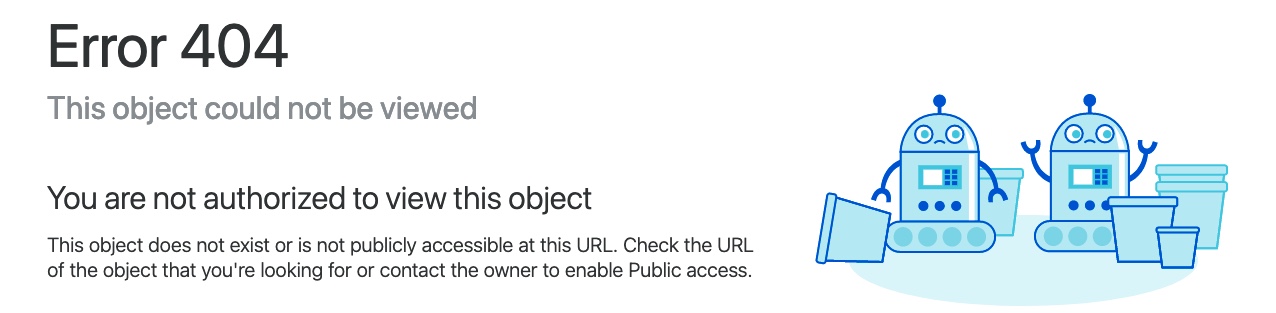
After setting up the cdn subdomain go to it in your browser (in this tutorials case https://cdn.conorjwryan.com/). It should come back with an error stating that This object could not be viewed. This is normal and proves that the subdomain has been successfully associated with the R2 bucket.
Having now setup the R2 bucket we will now use begin viewing and adding content to the CDN.
Viewing and Adding Images to the R2 Bucket
Now the R2 Bucket is setup it is now time to add images to the CDN. This can be achieved using the simple “Drag and Drop” interface on the ‘Objects’ page however, it is not recommended because it only has limited organisational functionality. In order to take full advantage of our bucket’s potential this requires the use of an remote file explorer like Cyberduck.
Keep the R2 bucket page open as it will be needed later. We will now install and setup Cyberduck.
Install and Setup Cyberduck
Download Cyberduck here. It is available for both MacOS and Windows. Once installed open the application and press Open Connection in the top left.
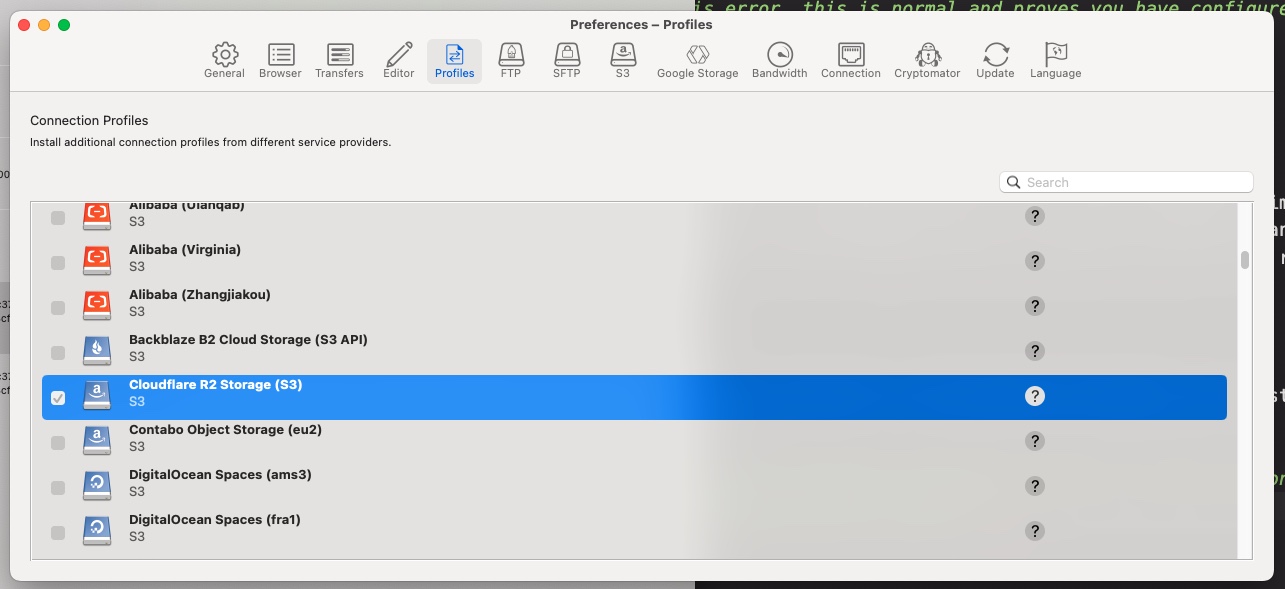
From there press the dropbox which says “SFTP”. We are looking for the Cloudflare R2. It is not listed by default so we need to add it. Press More Optionswhich will then bring you to the Profiles section of the application preferences. Find Cloudflare R2 Storage (S3) and make sure to tick the box. This will then add it to the dropdown list.
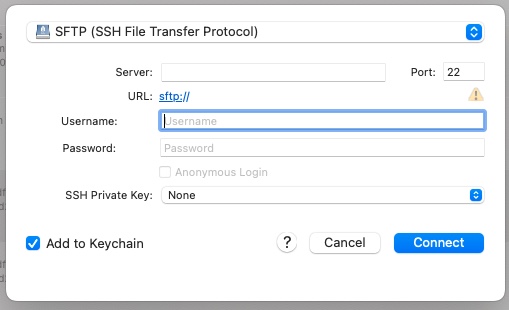
Close the preferences window and select Cloudflare R2 Storage (S3) from the dropdown. This will then bring you to the connection window. This is where you will need to input the Access Key ID and Secret Access Key from the R2 bucket.
Obtaining the S3 URL, Access Key and Secret Key
Open the R2 bucket page and navigate to the main R2 page. In the top right of the page there is a section called Account details. In this section there is your account ID, a selection of letters and numbers like 8ab5345678de6543fb. This is part of your S3 URL. Copy this ID and paste it into the Server field in Cyberduck, adding .r2.cloudflarestorage.com to the end. It should look something like this: 8ab5345678de6543fb.r2.cloudflarestorage.com.

To obtain the Access Key ID and Secret Access Key go back to the R2 Overview page and in the top right under the Account ID we just used press the Manage R2 API Tokens button. This will bring you to the R2 API Page page which will show a list of currently in use API tokens. Press the Create API token.
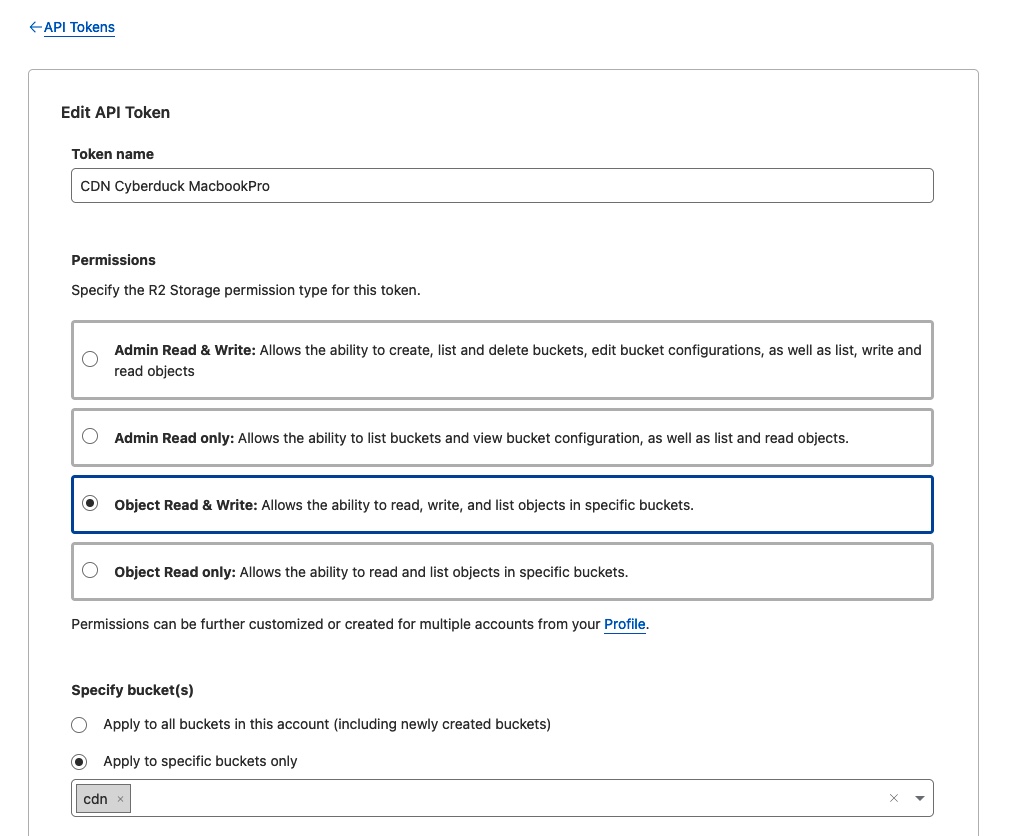
The first step is to give your API Token a name. This can be anything you want but ideally it’s important to be specific as it’ll help you remember later. A good rule is call it bucket name application computer name. So in my case it would be CDN Cyberduck MacbookPro.
Next under Permissions chose Object Read & Write. This will allow you to read and write to the bucket (drag and drop our images). There is nothing stopping you from using Admin Read & Write but it is not recommended as it gives full access to the buckets on the account, and allows you to delete buckets and change settings.
Choosing Object Read & Write will then bring up a list of buckets on the account. Select the bucket you created earlier. In this case it is CDN. This means that someone with this API token can only read and write to the CDN bucket.
While there are other settings like TTL and Client Access Control these are not required for this tutorial. If you would like to choose a specific date for the token to expire you can do so under do so by choosing a date in the TTL
Once you have selected the bucket press Create Token. This will then bring you to a page with your Access Key ID and Secret Access Key.
Do not close this page until you have copied these keys somewhere safe as they will not be shown again. If you do lose them you can always create a new token.
On Cyberduck, make sure Cloudflare R2 is selected from the dropdown menu. Copy these and paste them into the Access Key ID and Secret Access Key fields in Cyberduck. Open the More Options dropdown and where it says Path put /cdn (as cdn is the name of your bucket). Do not forget the / at the start of the path. This is important as it will not work without it.

All that’s left to do is give it a nickname: again be descriptive. I’ve called mine R2-CDN. Press Connect and you should be connected to the bucket. If you get an error, retry the above steps and make sure you have the correct API details.
Add Images to the Bucket
Now that you are connected, before you add images to the bucket it’s important to create a structure to organise your images. Create a folder named that of your website (in my case conorjwryan) and another folder called static inside that. Inside the static folder create an image folder. This is similar folder structure that Hugo uses to store images.
It should look something like this:
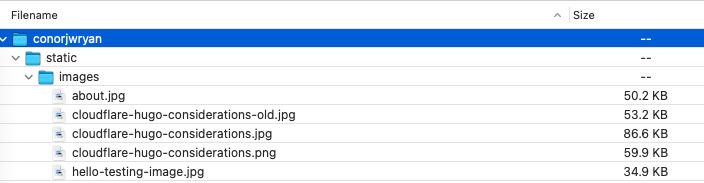
With your folder structure in place you can now add images to the bucket. Drag and drop images into the images folder. You can also create subfolders to organise your images. It will make it easier to find images later.
Now that you’ve setup the bucket and added images to it, it’s time to add the images to your Hugo site.
Adding Images to Hugo
Now that you have added images to the bucket it’s time to add them to your Hugo site. This is done using a shortcode. A shortcode is a small snippet of code that can be used to add functionality to a Hugo site. In this case we are going to create an img shortcode that will allow us to add images to our Hugo posts/pages in Markdown format.
We are going to use the img shortcode to inject a Hugo code snippet into the Content (written portion) of a post. When I want to add an image to a post I will reference the img shortcode and Hugo knows then to replace that img snippet with the HTML <image>/<img> tag referencing the public URL of the R2 bucket which contains the images.
|
|
Instead of writing these HTML tags every time I want to include an image in a post, I can simply use the img shortcode like this:
|
|
This will save time and can be used again and again. It means we don’t have to include html in markdown posts.
Adding the CDN Link to the Hugo Config
Before we can create the shortcode we need to add the CDN link to the Hugo site config in a variable called imageCdn. This is done by adding the following to the config.toml file.
We are using a variable because that way if ever we change our CDN location to a new URL we only have to change the variable in the config file and not every single post.
Hugo knows that when it sees the img picture.jpg shortcode it will replace it with <img src="$imageCdn and then the name of the image picture.jpg and a closing tag >.
Hugo then turns this into the full HTML tag:
|
|
Such a time saver!
Defining the Shortcode Variables
In your Hugo site navigate to the layouts/shortcodes folder. If it doesn’t exist create it. Inside the shortcodes folder create a file called img.html. This is where HUGO looks for the HTML to replace the img shortcode with.
First within the script we need to define two variables:
imageCdnwhich is the variable we created in the config file earlier.imageNamewhich is the name of the image we want to add. In this case it ispicture.jpg.
The Site.Params prefix to imageCdn tells Hugo to look in the config file for the variable.
$imageName is looking for the name of the image we want to add. In this case it is picture.jpg. The .Get 0 tells Hugo to look for the first argument after the img. In this case it is picture.jpg.
Hugo counts from 0. So in this case picture.jpg is the first argument not .Get 1 which would be the second argument.
Next we need to create the HTML tag.
Creating the HTML Tag
With our variables defined we can now create the HTML tag. This is done using standard HTML syntax. Below the variables add the following:
|
|
Your img.html file should look something like this:
And thats it! Save the file and now you should be able to add images to your Hugo site using the img shortcode.
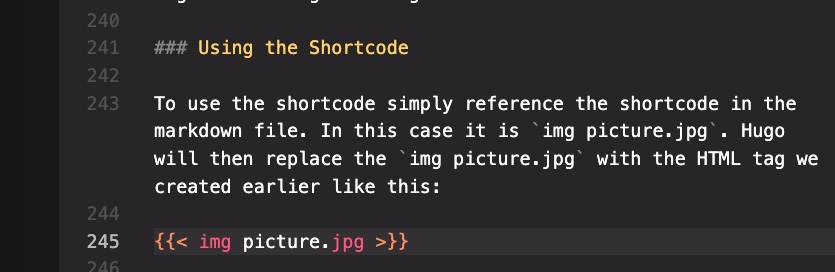
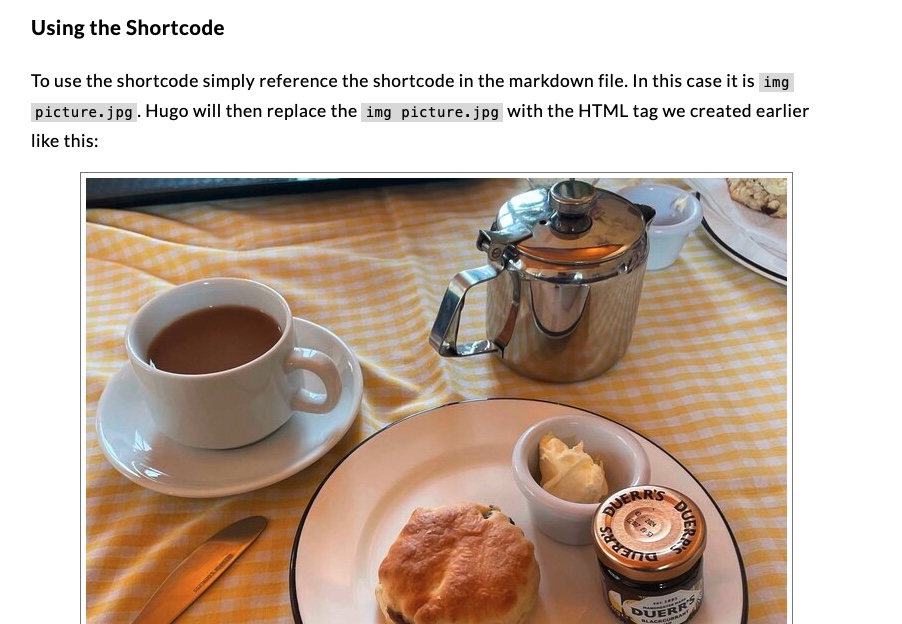
Using the Shortcode
To use the shortcode simply reference the shortcode in the markdown post file:
I write the img shortcode in the markdown file:
And Hugo transforms it into this on the post:
Troubleshooting
If this does not work make sure:
- The
img.htmlfile in thelayouts/shortcodesfolder - The
imageCdnvariable is in the config file. - The
imgshortcode is in the markdown file withimg picture.jpgis within the tags ensuring there is a space between the brackets{{< >}}andimg:
{{< img picture.jpg >}} - The image is in the
imagesfolder on thecdnbucket.
Conclusions & Considerations
This tutorial has shown you how to use Cloudflare R2 as an image CDN for your Hugo site. It has shown you how to setup the bucket, add images to the bucket and how to add the images to your Hugo site. However, there are a few things to consider…
Image Optimisation
It’s worth noting that this tutorial does not cover image optimisation. This means that if you upload an image to the bucket which is 10MB in size it will still be 10MB in size when it is served to the user. This is not ideal as it will slow down the site. It will also eat into your space allocation potentially incurring costs if you have many images.
There are two ways you can optimise images:
-
Optimise the image before uploading it to the bucket. This can be done using a tool like ImageOptim (MacOS) or ImageOptim (Windows). This is the easiest way to optimise images.
-
Use a tool like Cloudflare Images as stated above which will automatically optimise images for you. This is the more expensive option but is more convenient.
CSS Styling
This tutorial does not cover CSS styling. It is assumed that you have a basic understanding of CSS and how to style images. If you do not know how to style images click here to learn more.
You can use a combination of HTML and CSS to style the images and input that into the img.html file.
Next Steps
With this simple shortcode it does not allow for much flexibility. You cannot add captions or alt text to the images or add external images or links.
I envision this tutorial as a starting point for a more advanced tutorial on how to use an external image CDN with Hugo. In the future I would like to cover:
-
How to expand the image shortcode to allow for captions and alt text and external images.
-
How to create bash script to improve the drafts to publish workflow
I hope you found this tutorial useful. If you have any questions please get in touch!
Until next time,
Conor