TL;DR: If you want to go straight to the tutorial click here.
What is a Reverse Proxy?
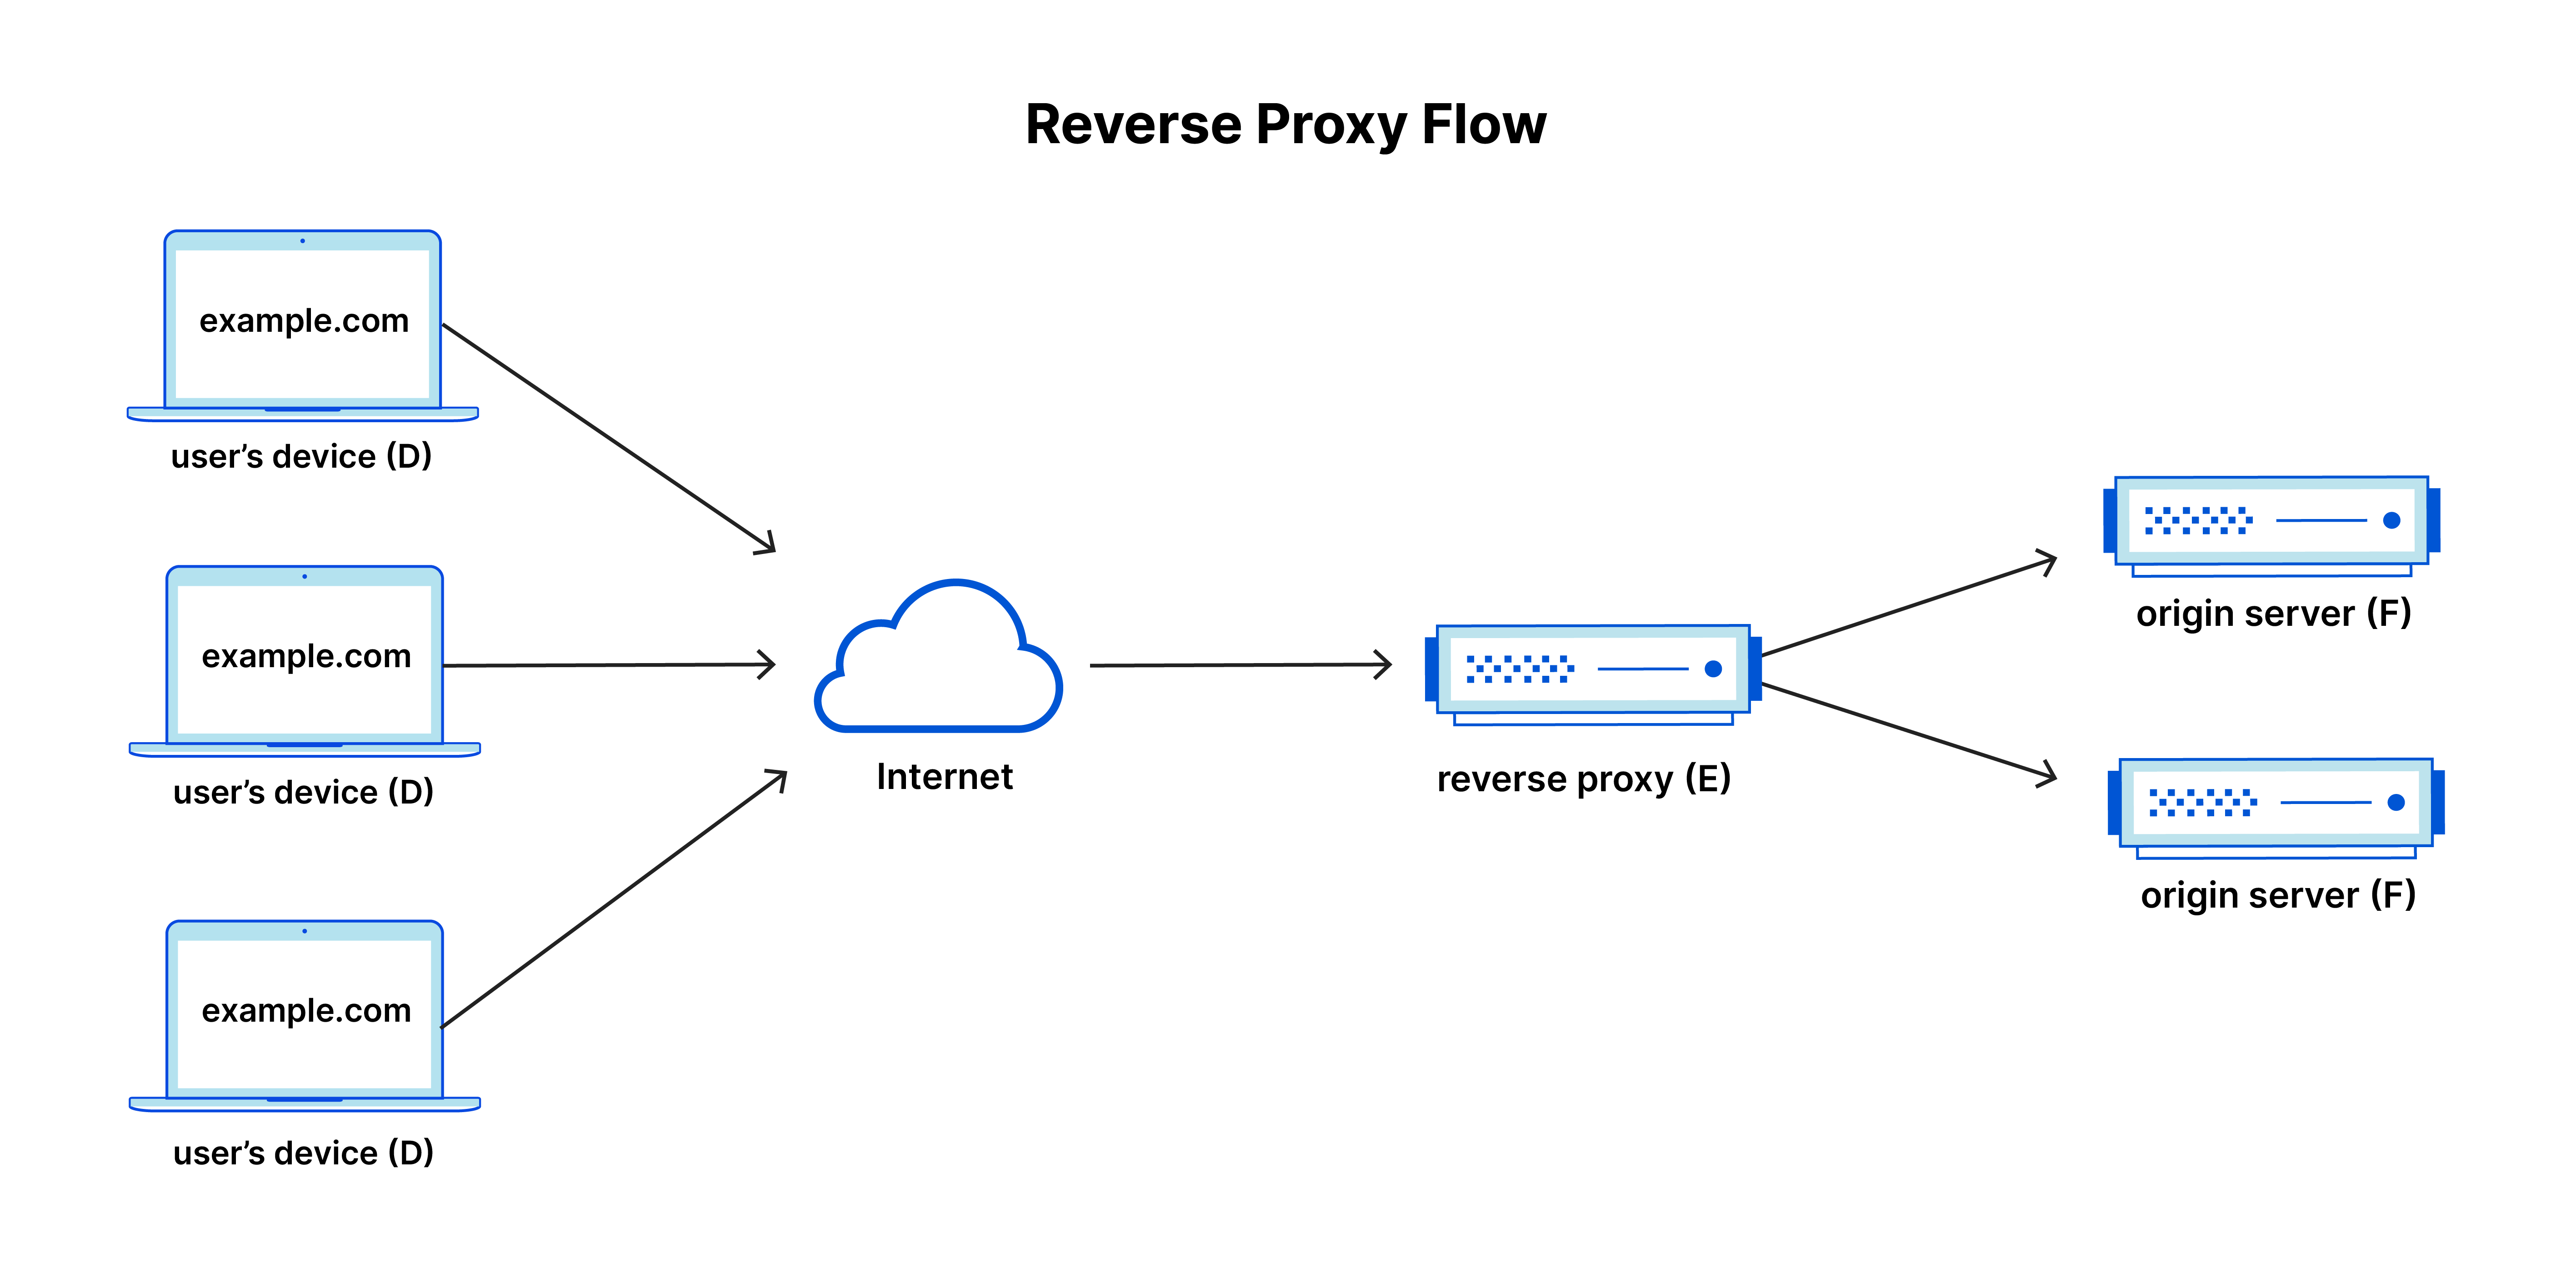
When a client makes a request to a server, the server responds with the requested data. This simple client/server model is the basis of the internet. This paradigm is also known as the request/response model. As the internet has grown, so has the complexity of the requests and responses.
A reverse proxy is a server that sits between the client and the origin server (the place where the content is located). It receives requests from the client and forwards them to the origin server. The origin server then responds to the request and the reverse proxy forwards the response back to the client. This allows the reverse proxy to act as a middleman between the client and the origin server. Learn more about reverse proxies here.
Why Would You Want to Use a Reverse Proxy?
There are many reasons you would want to use a reverse proxy/server. Some of the most common reasons are:
Security and Performance
A reverse proxy acts as a intermediate step the client goes through before reaching the origin server. The reverse proxy can act as a sudo-firewall between the client and the origin server and can block bad actors from taking down site by a DDoS attack.
It does this by both obscuring the origin server’s IP Address and by caching the content of the site on the reverse proxies servers. That content is loaded from the reverse proxy server before . This reduces strain on the origin servers CPU, memory and network bandwidth, ultimately reducing monthly hosting cost, because the origin server is insulated from direct contact with the client.
A reverse proxy is not a replacement for a firewall. It is an additional layer of security that can be used in conjunction with a firewall. It is still important to correctly configure your network and individual servers to be secure.
Easy Exposure of Internal Tools
A reverse proxy can also be used to expose internal tools. If a business has a tool (an internal wiki or intranet) that is only accessible from within the company’s network, a reverse proxy can be used to expose that tool to the public internet with secure authentication. This is useful if you:
- Want to share information with people outside of your company, but don’t want to give them access to your internal network. You can grant granular access to only specific tools like a file server.
- Want to share internal tools with employees who are working remotely.

Easy Development, Configuration and Deployment
The best reason to use a reverse proxy is that it makes development, configuration and deployment of your website/application much easier. In the past, developers had to configure their web server to serve content from a specific directory, to a specific port, using a specific service. This was a tedious process that took a lot of time and required a lot of manual configuration.
This was solved in part by the automation and containerisation of web servers. Couple containerisation programs like Docker with reverse proxies and you have a powerful tool for development, configuration and deployment. Now developers can simply have multiple containers on one single server configure the reverse proxy to serve that container on a specific port, on a specific domain on one server.
Why Cloudflare?
Reverse proxies are great in theory but in order to be actually useful, it requires scale. If you are a small business or a personal website, you don’t have the resources to set up an effective reverse proxy. That’s where Cloudflare comes in.
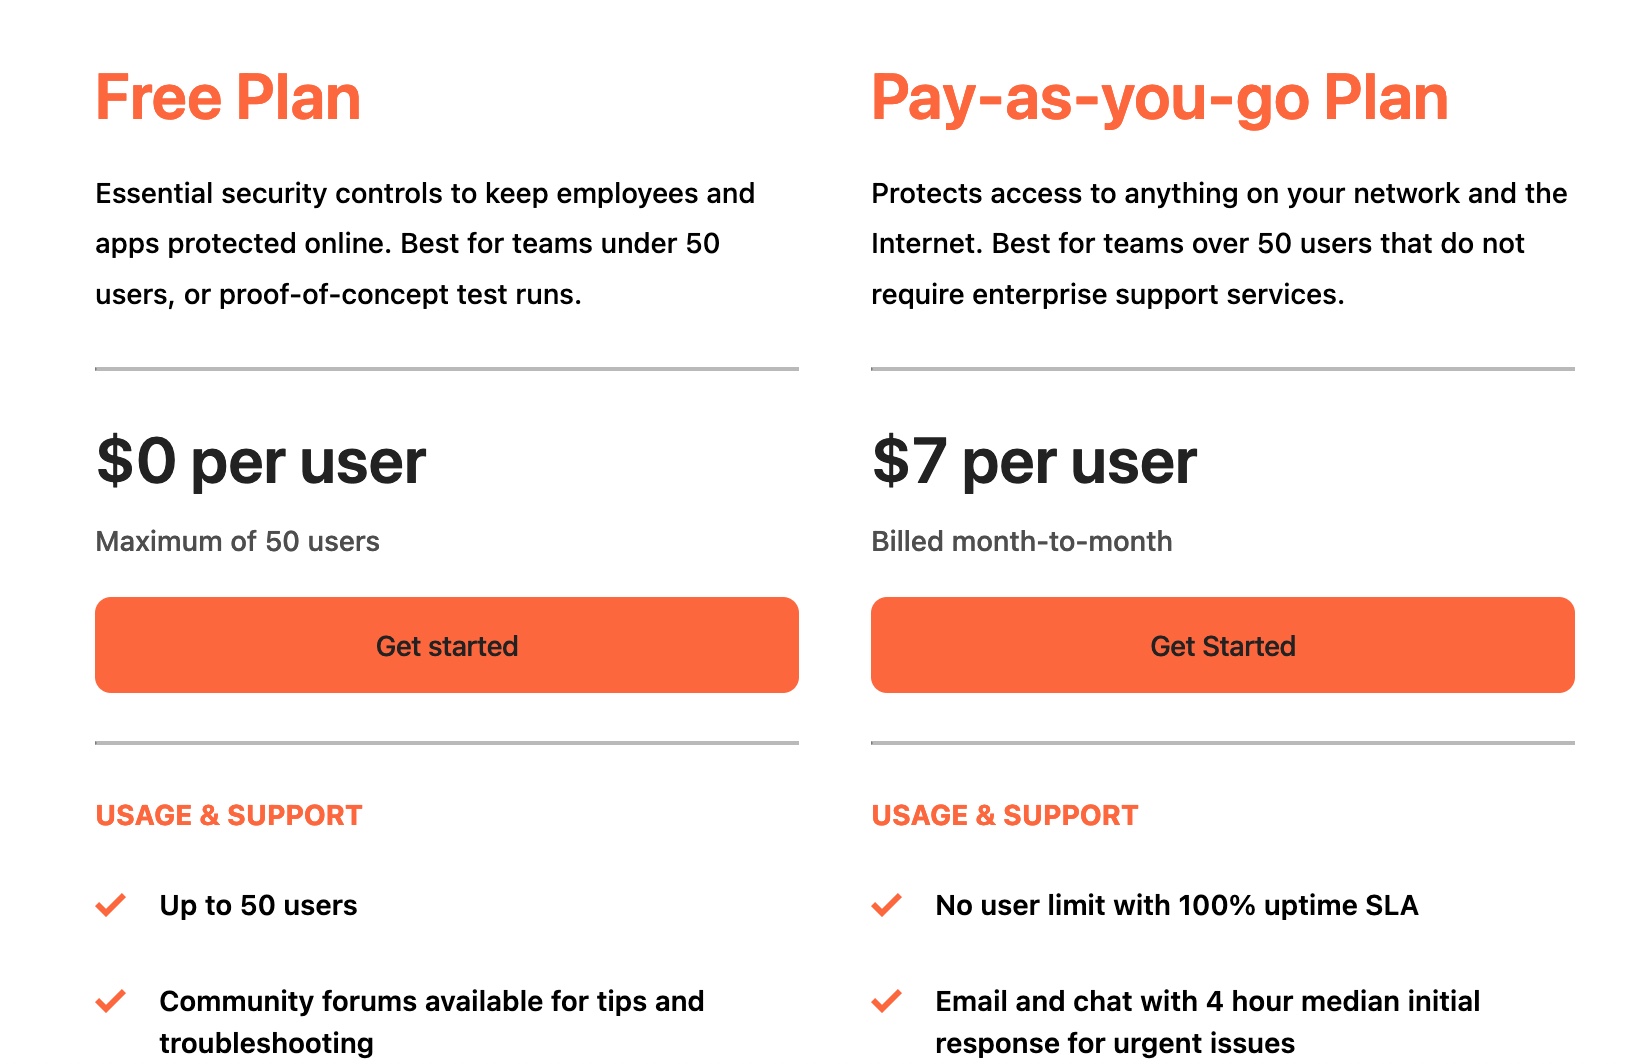
Cloudflare is a company that provides a suite of services to help make websites faster and more secure. One of the main reasons many like it is because even though it is a for-profit company focused on enterprise offerings, it has an extremely feature-rich free tier. This free tier is more than enough for most personal websites and small businesses. It’s reverse proxy service (Called Cloudflare Tunnel) is part of their Zero Trust Platform and is free to use.
While Cloudflare Zero Trust will not cost anything to set up and use it does require you to provide a credit card in order to use the service. You will not be charged unless you register more than 50 people to your Organisation
What is Zero Trust?
Zero Trust is a security model that is based on the principle of “never trust, always verify”. Cloudflare Zero Trust is geared towards corporations aiming to secure their internal network. It is a suite of tools that allows you to create a secure network that can be accessed from anywhere. Learn more about Zero Trust here.
This tutorial only is only going to cover setting up and securing a Cloudflare Tunnel, connecting your server/computer to the Cloudflare Network and exposing it to the internet. Cloudflare Zero Trust is way more expansive. If you want to learn more about the other features of Cloudflare Zero Trust, check out their documentation.
What is Cloudflare Tunnel?
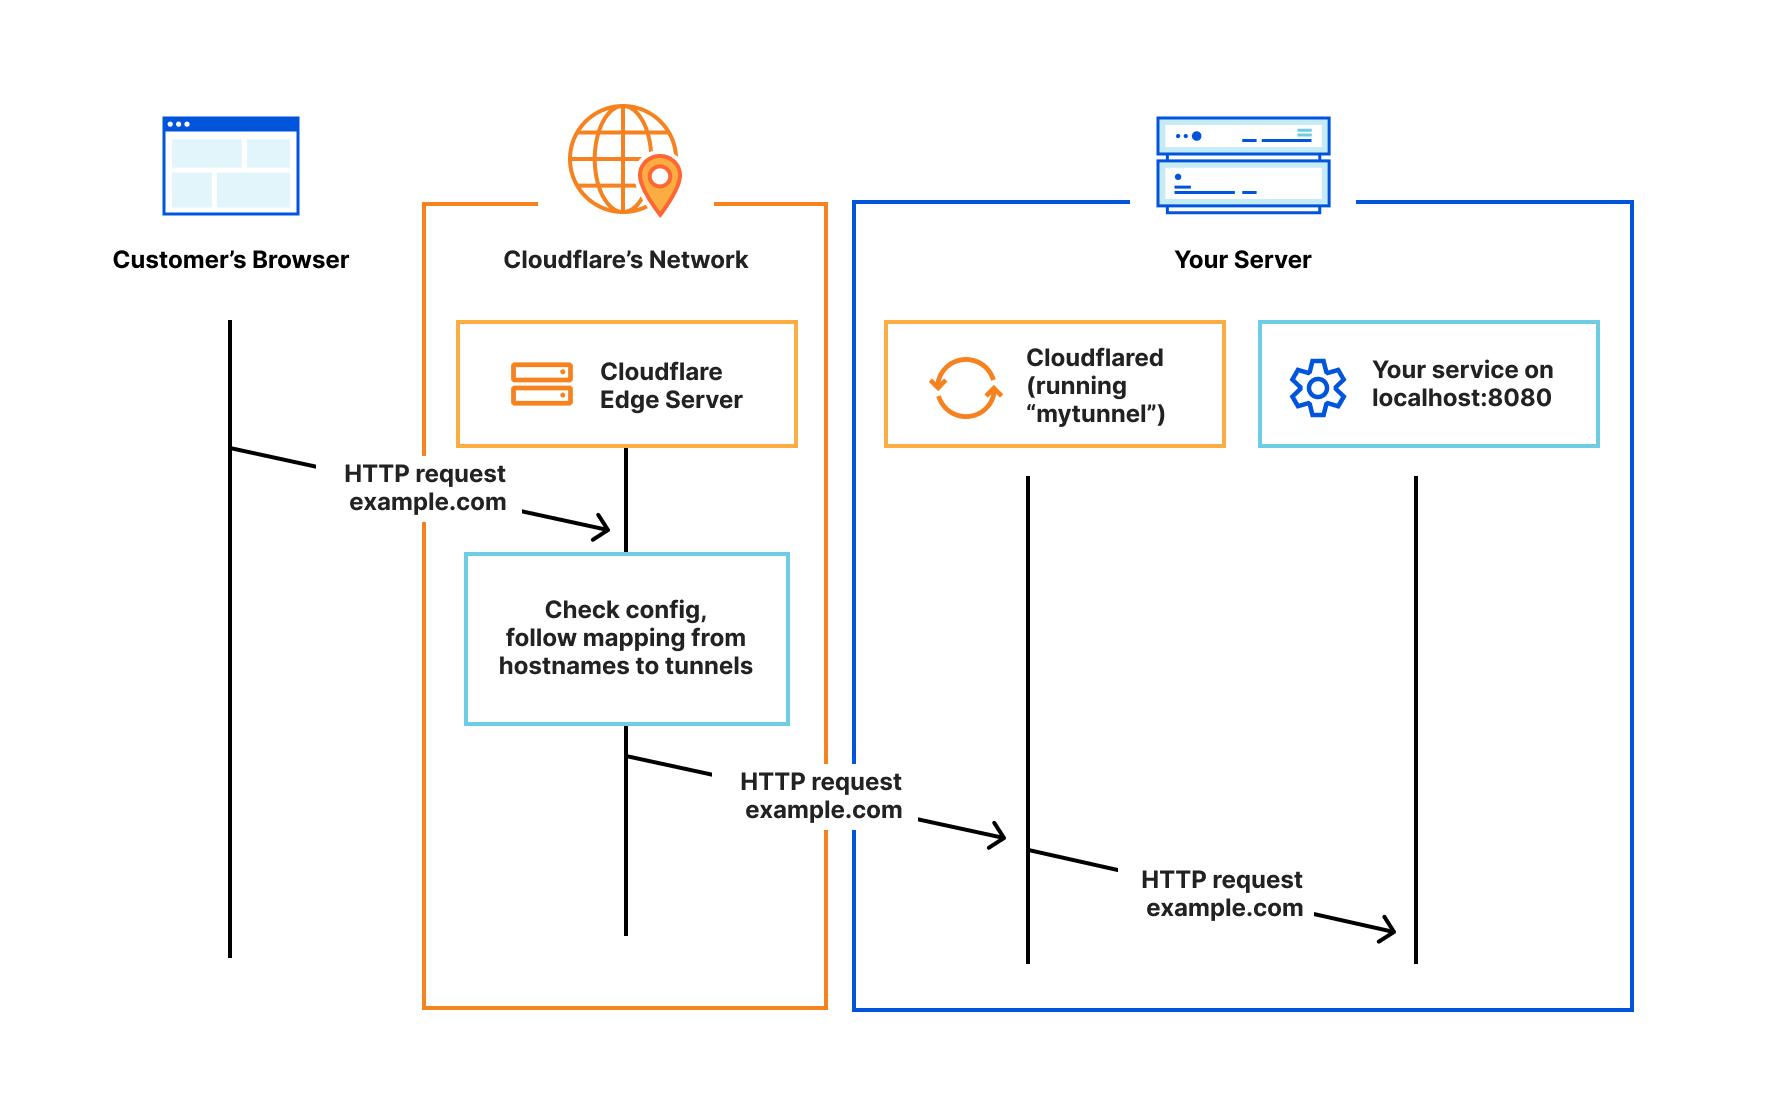
Cloudflare tunnel is a piece of software that is installed on the server/computer you want to expose to the internet. It creates a secure connection between your server/computer and the Cloudflare Network. This allows you to expose your server/computer to the internet without having to configure your network or server to be exposed to the internet.
Prerequisites
This tutorial assumes you have already got the following:
-
A Cloudflare account (FREE), sign up here
-
A domain name that you want to use to access application on your server/computer from (like conorjwryan.com)
-
A server that you want to expose to the internet
-
A credit/debit card (required to use Cloudflare Zero Trust)
You must have admin privileges in order to use Cloudflare Tunnel as we need to install software
This tutorial is specifically about exposing a server to the internet using Cloudflare Tunnel. You can use your computer, but keep in mind it is important to do so securely. A misconfiguration can result in your entire network being exposed. Be careful!

Tutorial Server Setup
In this tutorial I am going to be using a server running Ubuntu 22.04 with Docker installed. I am going to use Docker to run the following:
-
A Ghost site (on port 3001)
This is to simulate a website that you want to expose to the internet like a blog.
This can work easily with a WordPress site too, but I am using Ghost because it is a lot easier to set up and run for the sake of this tutorial.
-
A Portainer instance (on Port 9433)
This is to simulate a sensitive internal tool that only you want access to.
How to Setup a Cloudflare Tunnel
In order to set up a Cloudflare Tunnel we first need to setup the general Cloudflare Zero Trust configuration. This allows us to configure and maintain our Tunnel settings.
Setting Up Cloudflare Zero Trust
When you log into Cloudflare you’ll be greeted with the Dashboard, which has your Domains (called Zones) in the centre and a sidebar to the left.
Make sure before we continue that you have at least one Zone added to your account. You can find out how to do so here: Adding a Zone.
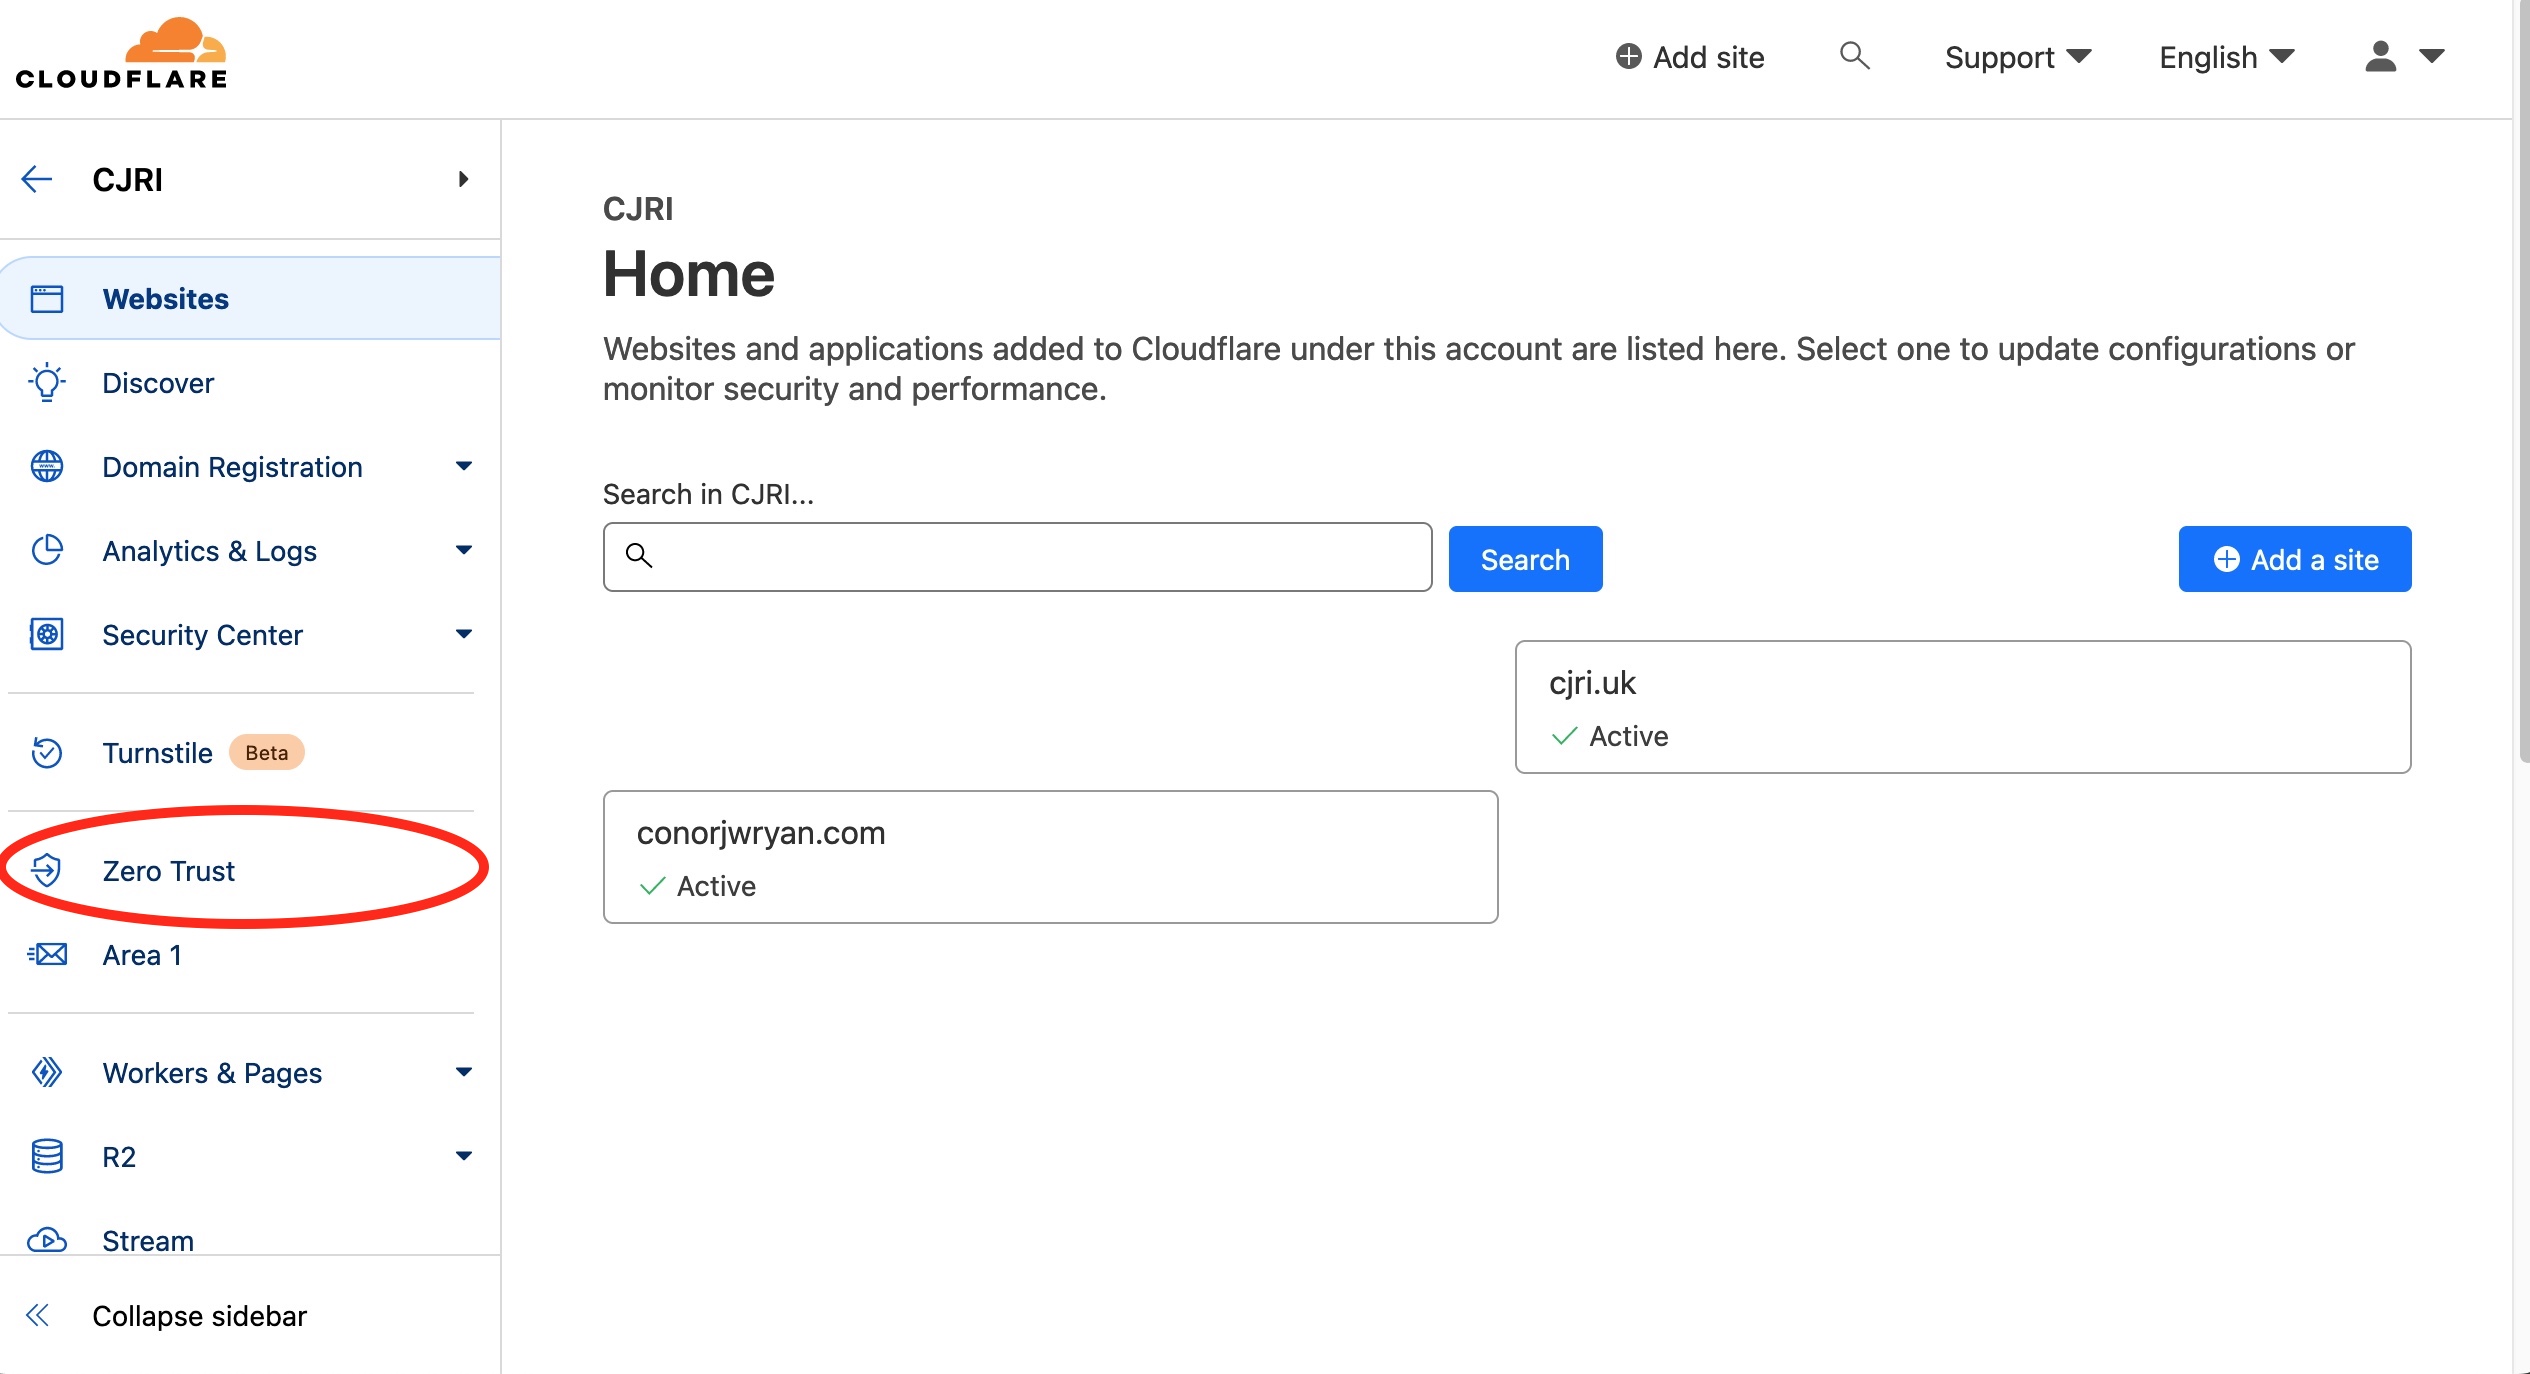
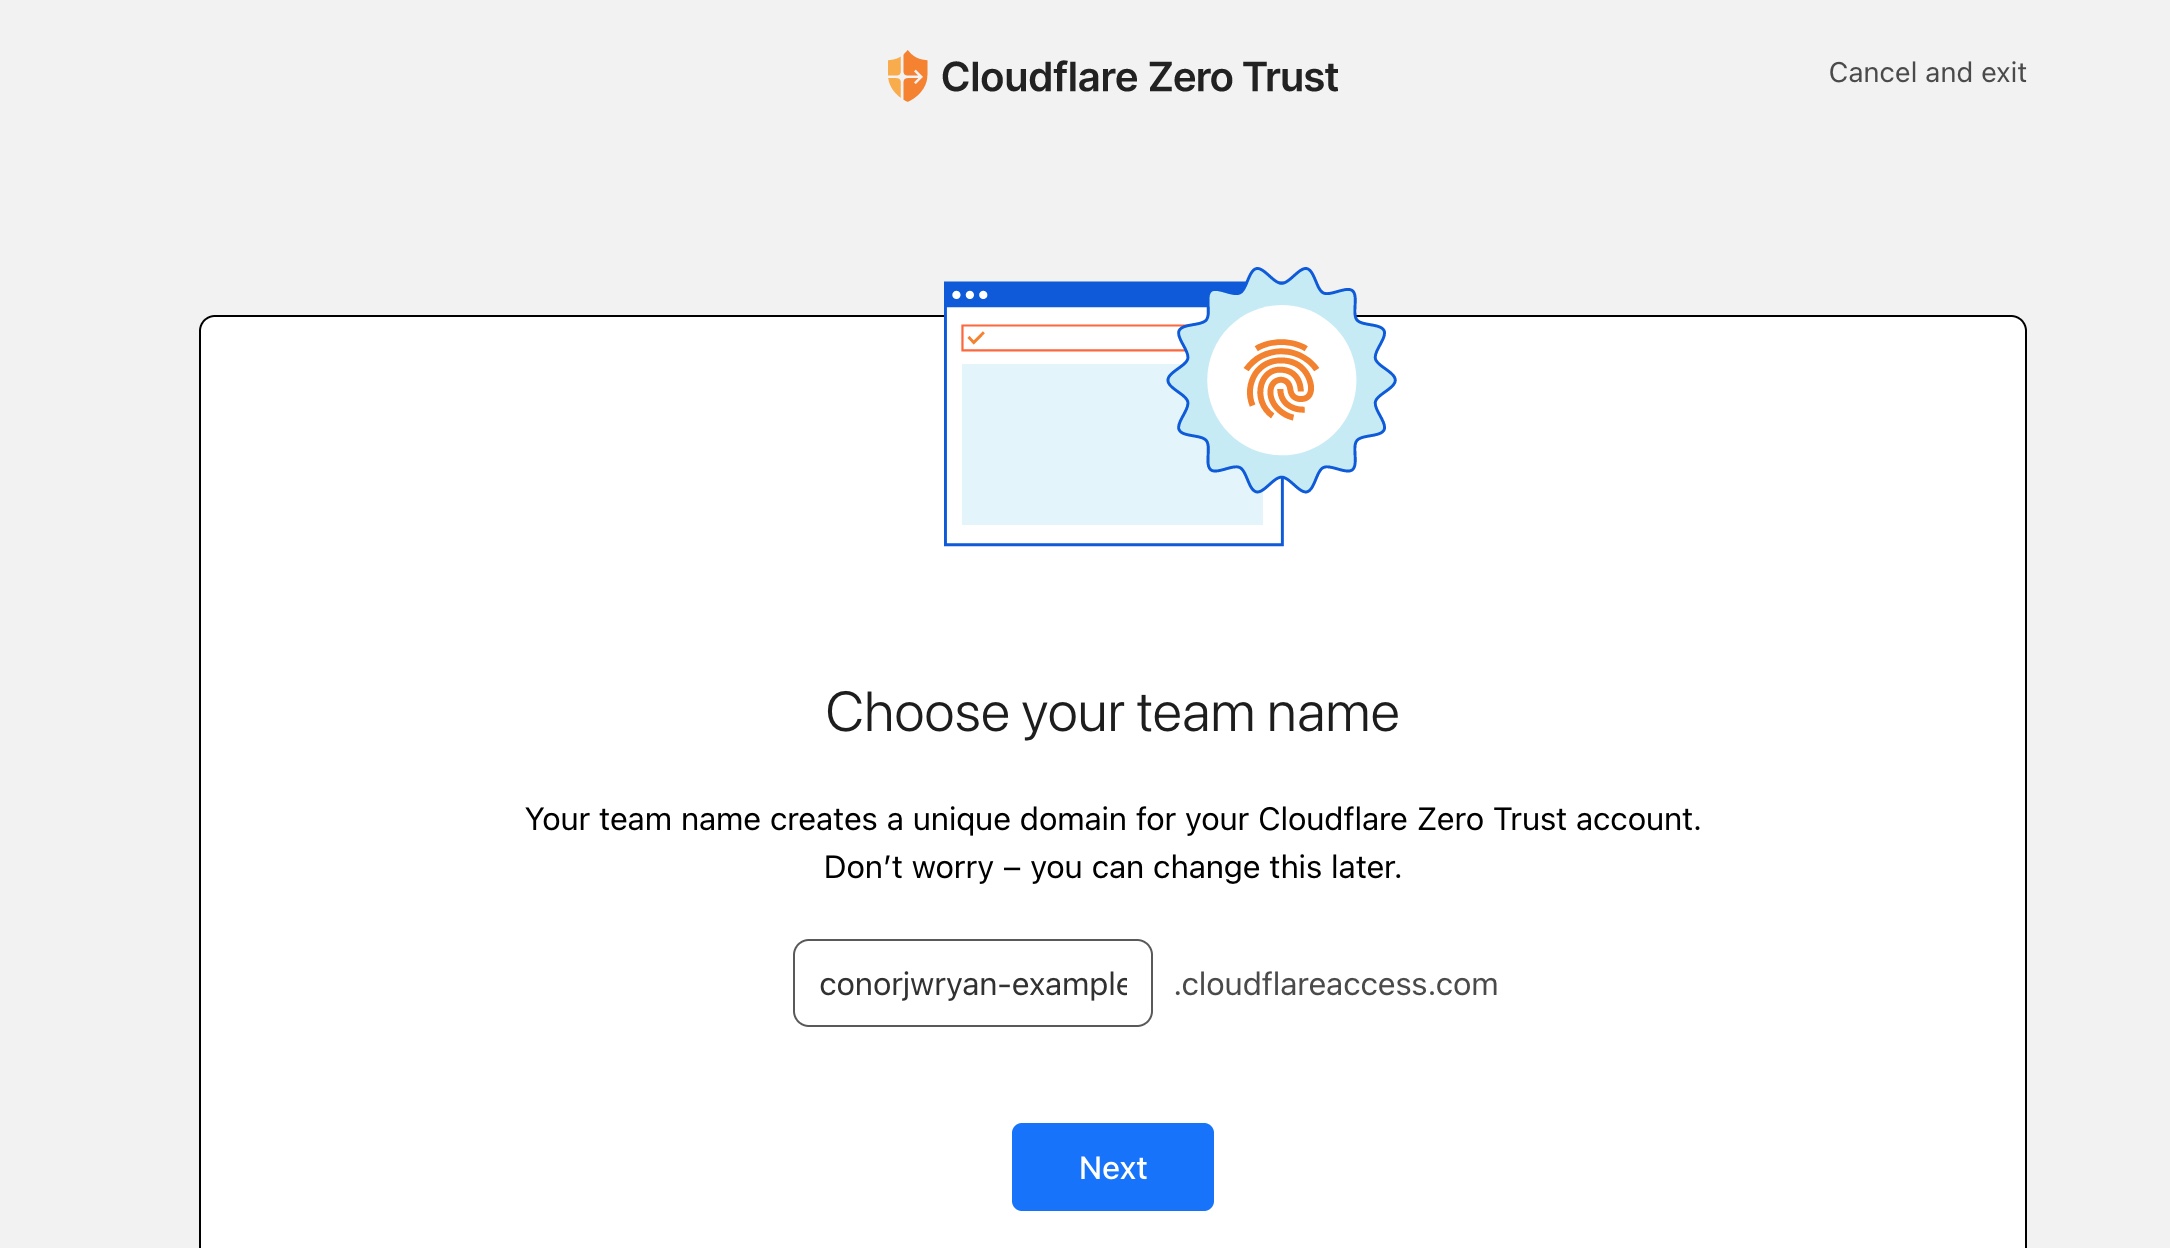
Click on the Zero Trust link in the sidebar. It will ask you to Choose your team name. This can be the name of your organisation or something unique to you. I’ve called mine conorjwryan-example. The idea is that <your-name>.cloudflareaccess.com is a central place people in your Organisation can access your tools in one place.
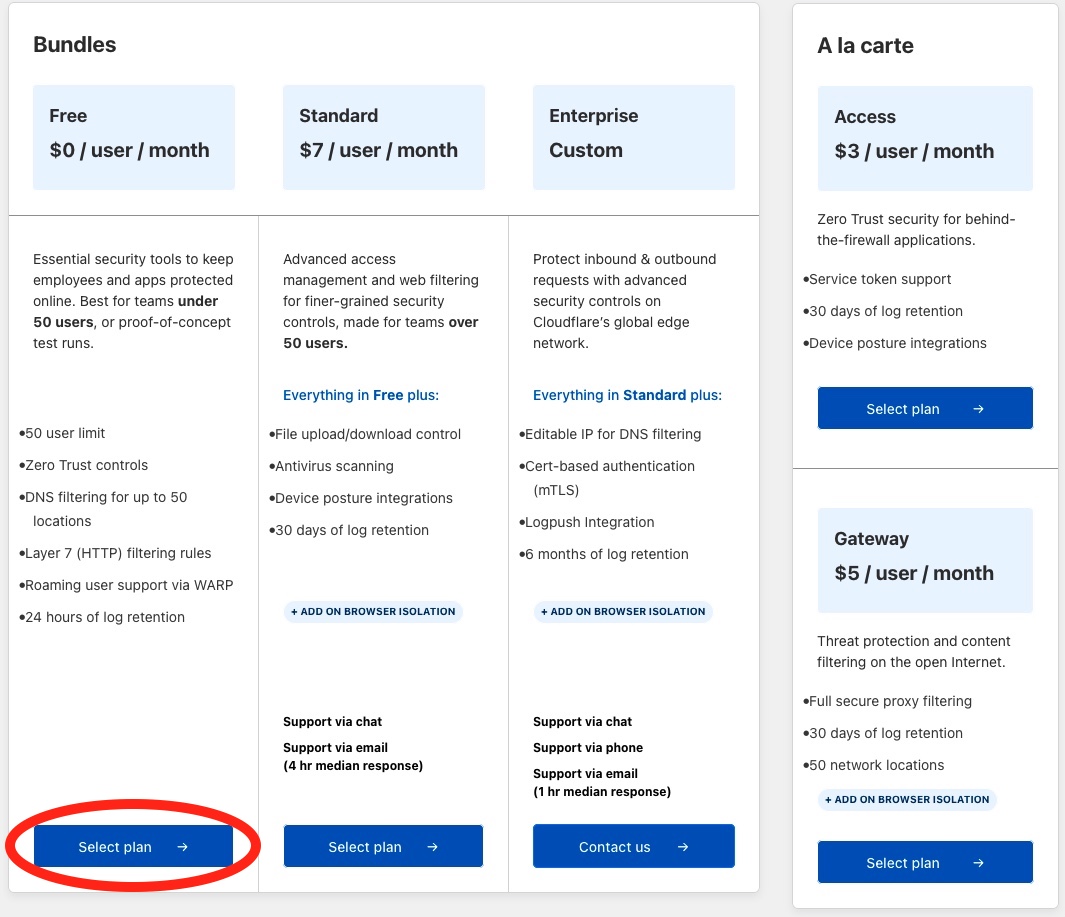
You’ll then be directed to choose a pricing plan. For this tutorial we are going to be using the free plan. Press Select Plan under the Free tier and press Continue. You’ll be asked to confirm your choice. Press Proceed to Payment.
Input your payment details (credit card or PayPal) and your billing address. After this is complete, you’ll be brought to the Zero Trust dashboard where we can now create a new Tunnel.
Setting Up a Cloudflare Tunnel
Now it’s time to set up the Cloudflare Tunnel. This can be done on the terminal but for this tutorial we are going to use the online Tunnel creation wizard.
You can also create and configure a tunnel via the terminal. You can find out how to set up a Tunnel using the terminal here: Cloudflare Tunnel Docs. This tutorial is going to use the online wizard as it is easier to follow along with.
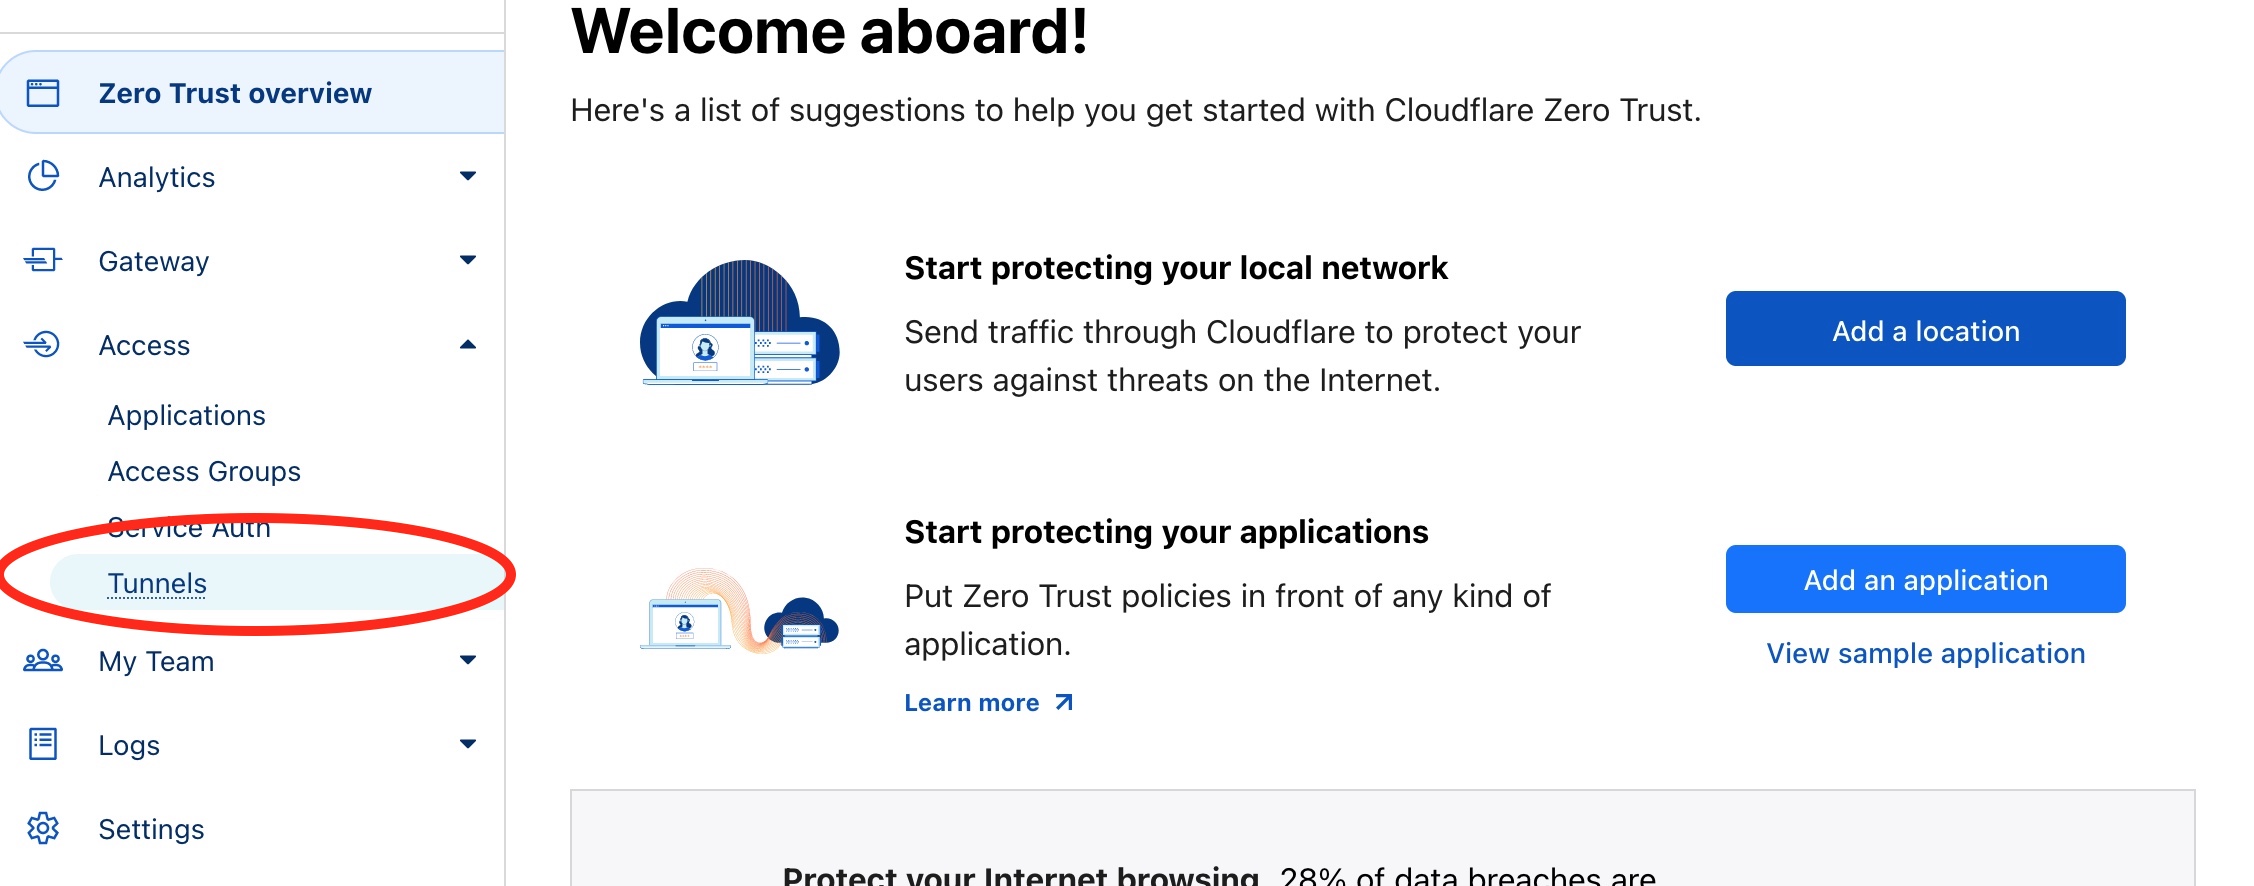
From the Zero Trust dashboard, click on the Tunnels tab. This is where you can configure your Tunnels.
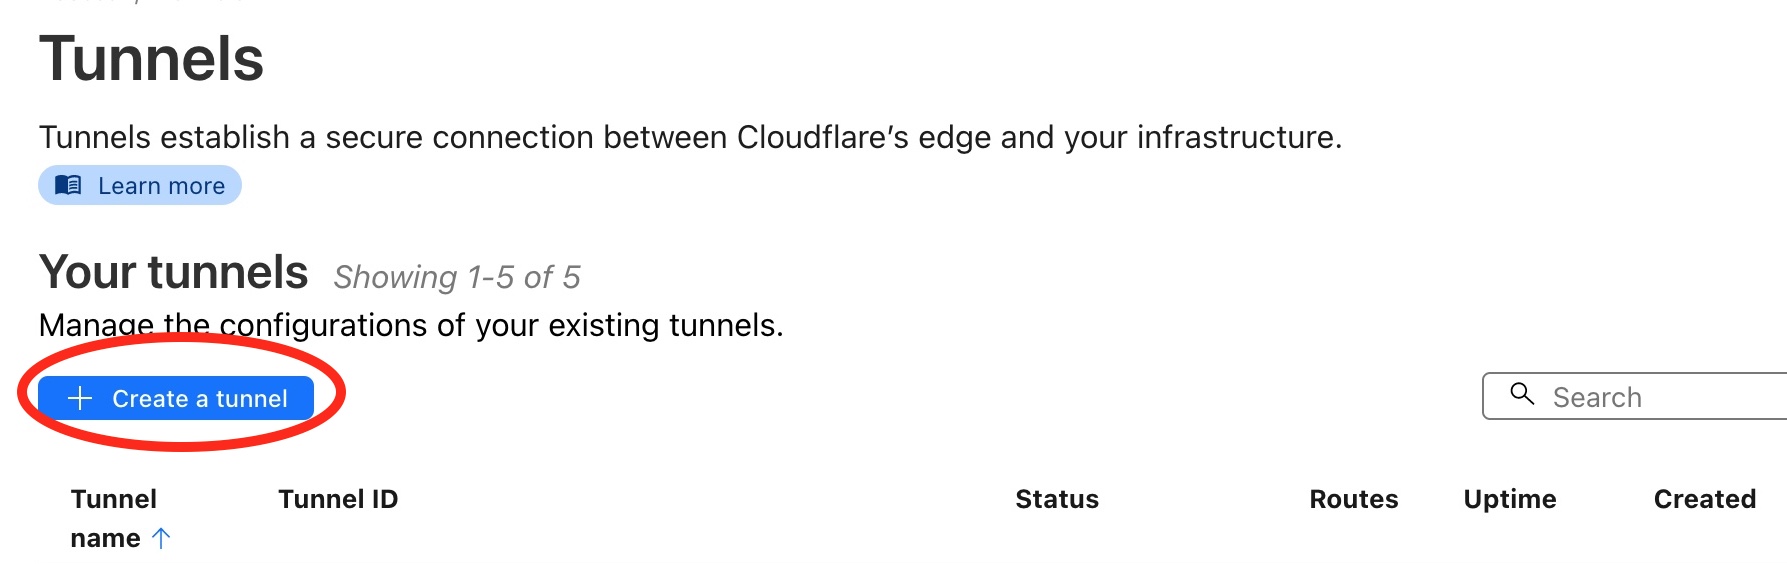
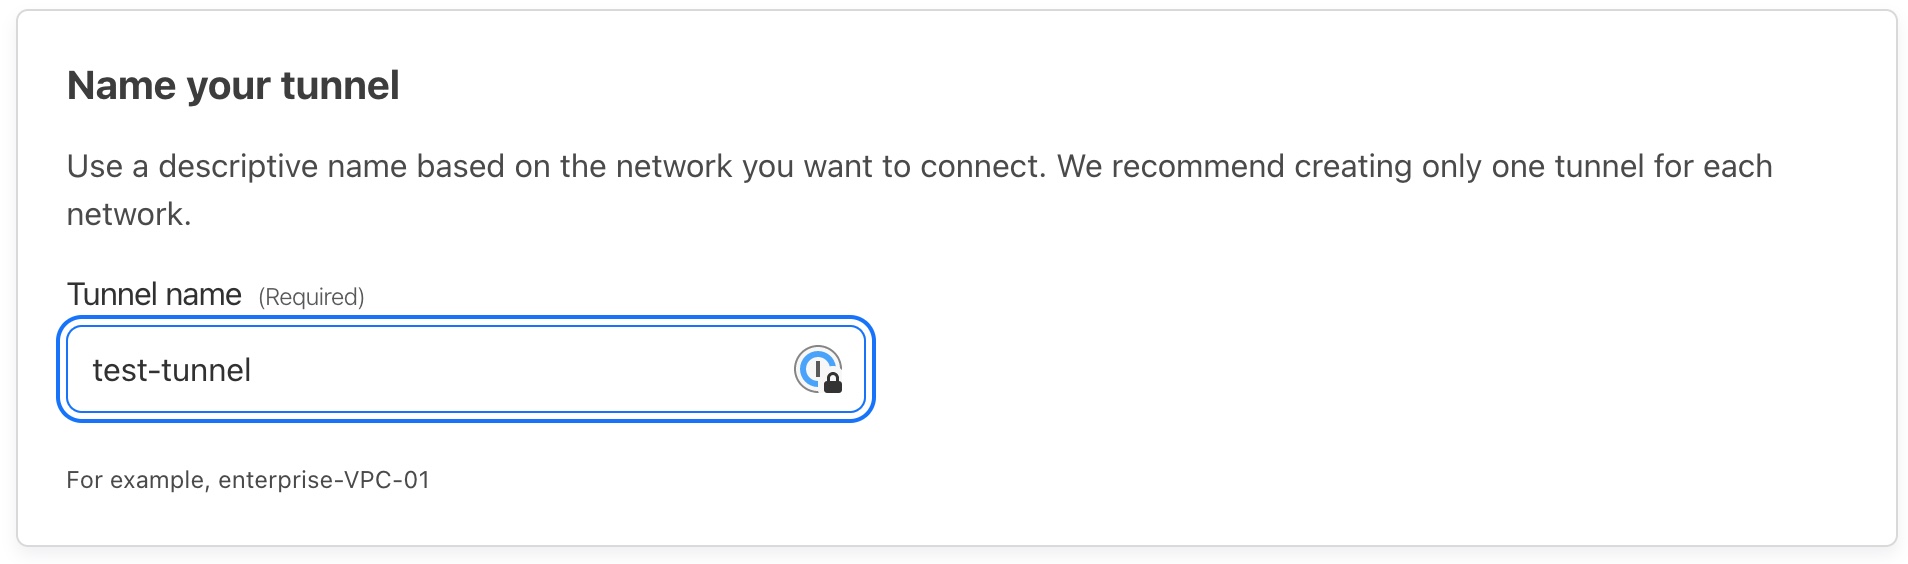
Click on the Create Tunnel button. You’ll be asked to give your Tunnel a name. I’ve called mine test-tunnel, but for yours it can either be the name of the server or network server is on e.g. office-server-tunnel or home-tunnel.
After you have named the tunnel, press Save tunnel. You’ll then be asked to Choose your environment. This is the system that you’re going to install the tunnel software on. For this tutorial I am using Ubuntu so will choose Debian and then 64-bit as the architecture.
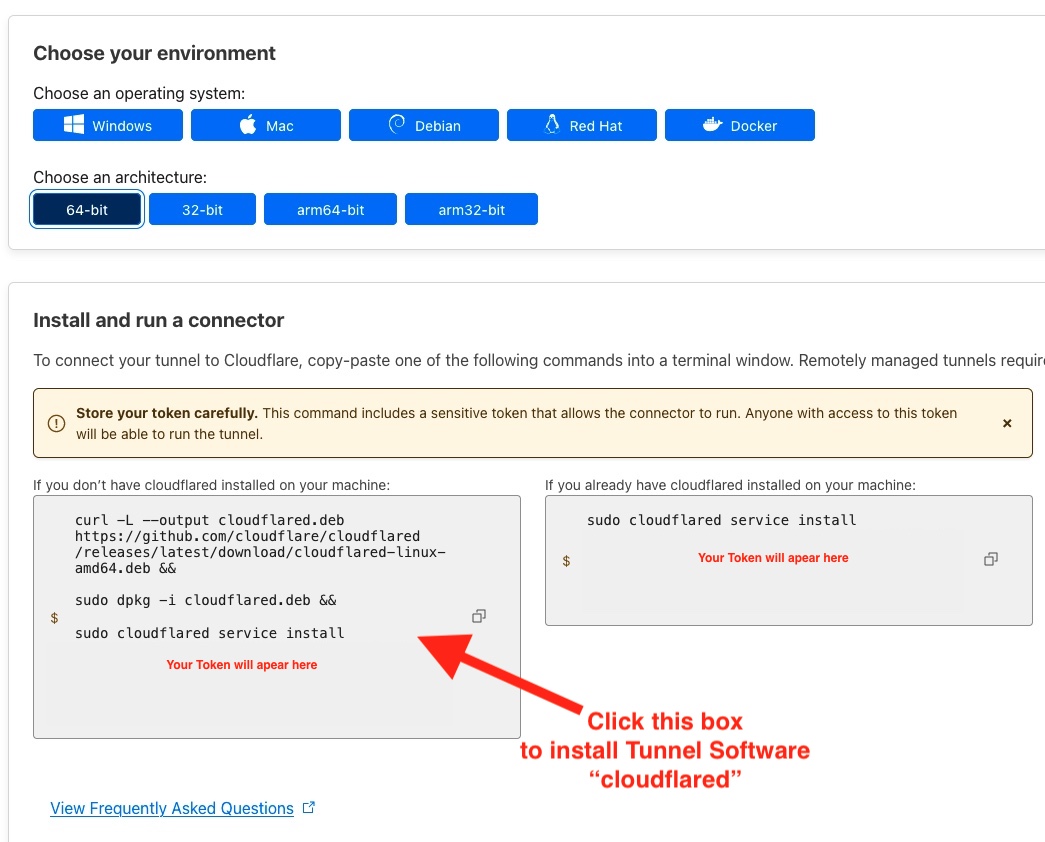
It’ll then present you with 2 gray boxes. These are terminal commands that we put into our server to install the Cloudflare Tunnel (named cloudflared). The left box is for those that do not have the cloudflared software installed (a few extra steps) and the right box is for those that do. I do not have cloudflared installed so I will click to copy the commands in the left box.
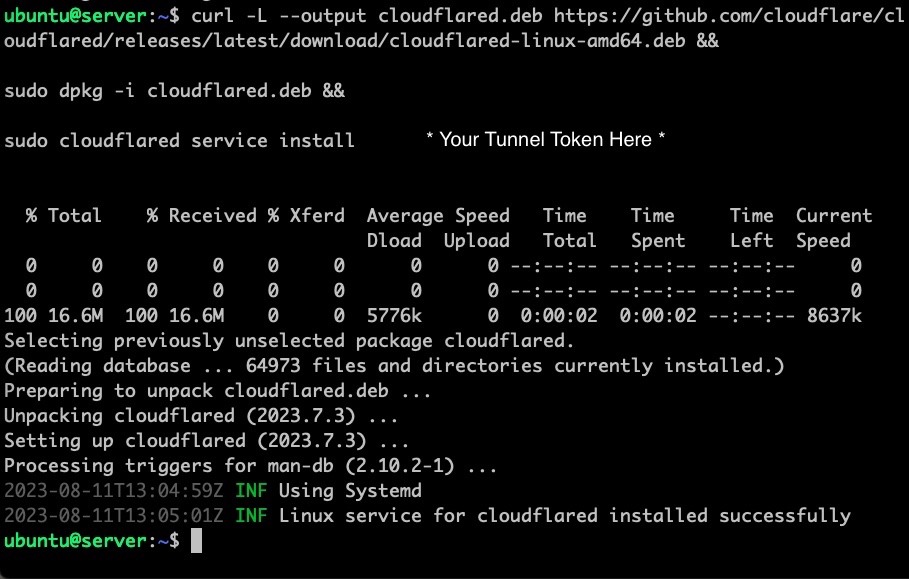
Paste these into your terminal and it will look something like this:
To check that the installation was successful go back to the Tunnel configuration page and scroll down to the very bottom under the Connectors section. It should say Connected under Status.
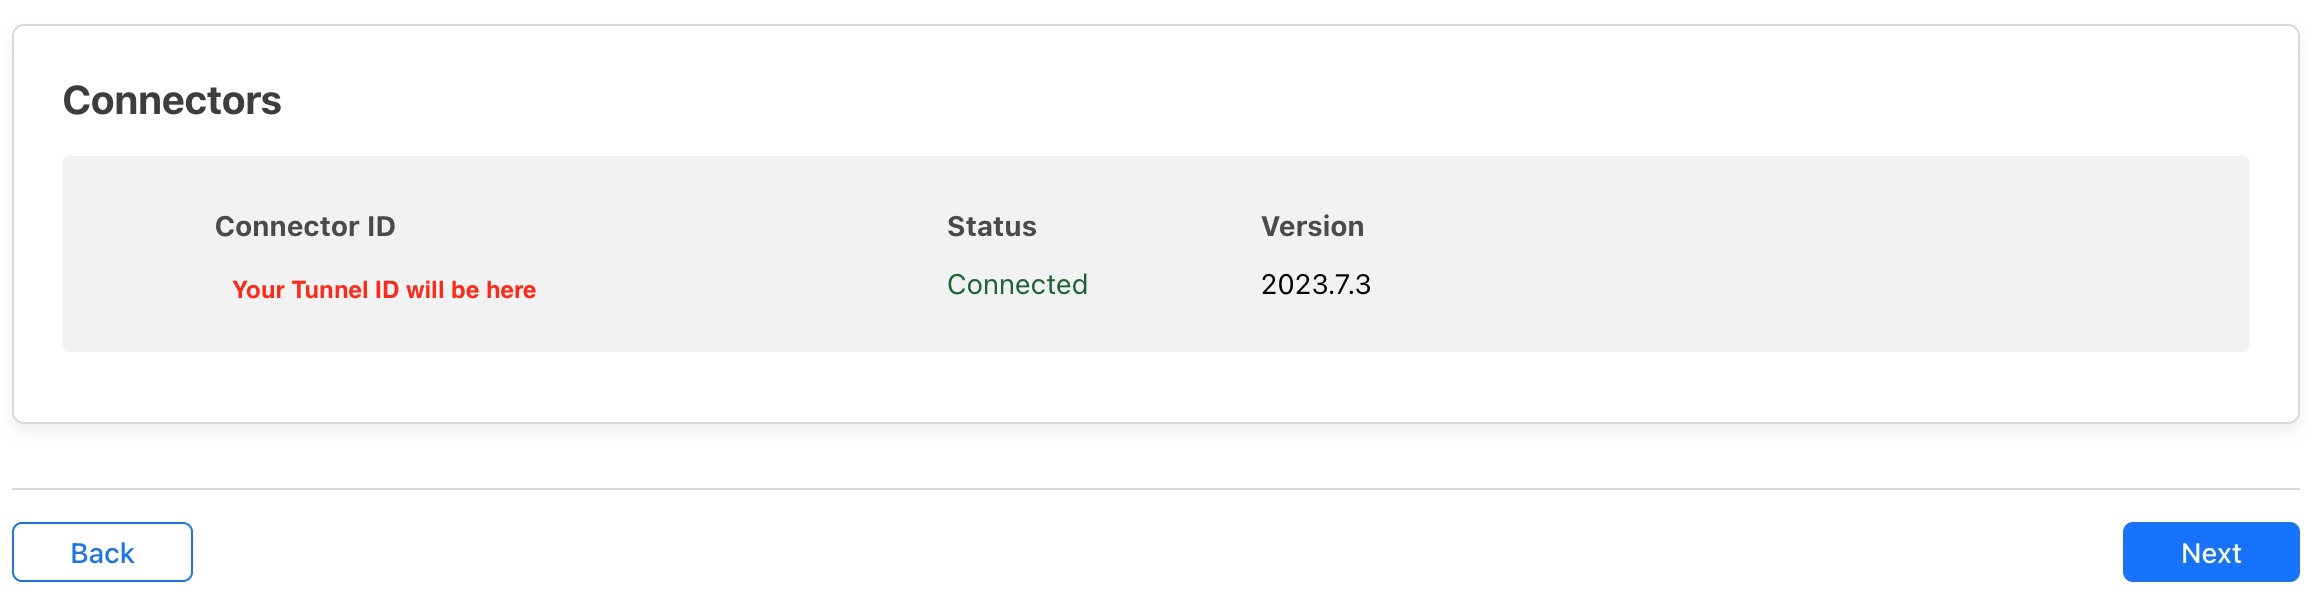
With the tunnel created and working correctly we can now press Next to begin exposing our server’s ports to the internet.
Configuring a Cloudflare Tunnel
After you press Next you’ll be taken to the last section where it wants you to Route Traffic to your tunnel. This is where you can configure Public Hostnames or Private Networks to be exposed to the internet. Since this is our first time after creating the tunnel create our first Public Hostname.
After doing this initial setup of one instance then you’re able to add others.
In my case I want to expose my Ghost blog to the internet. This is running on port 3001 on my server, and I want it to be at ghost.conorjwryan.com.To do this I will input ghost in the Subdomain field and choose conorjwryan.com from the dropdown menu. Under Service Type I select HTTP and under URL I input http://localhost:3001.
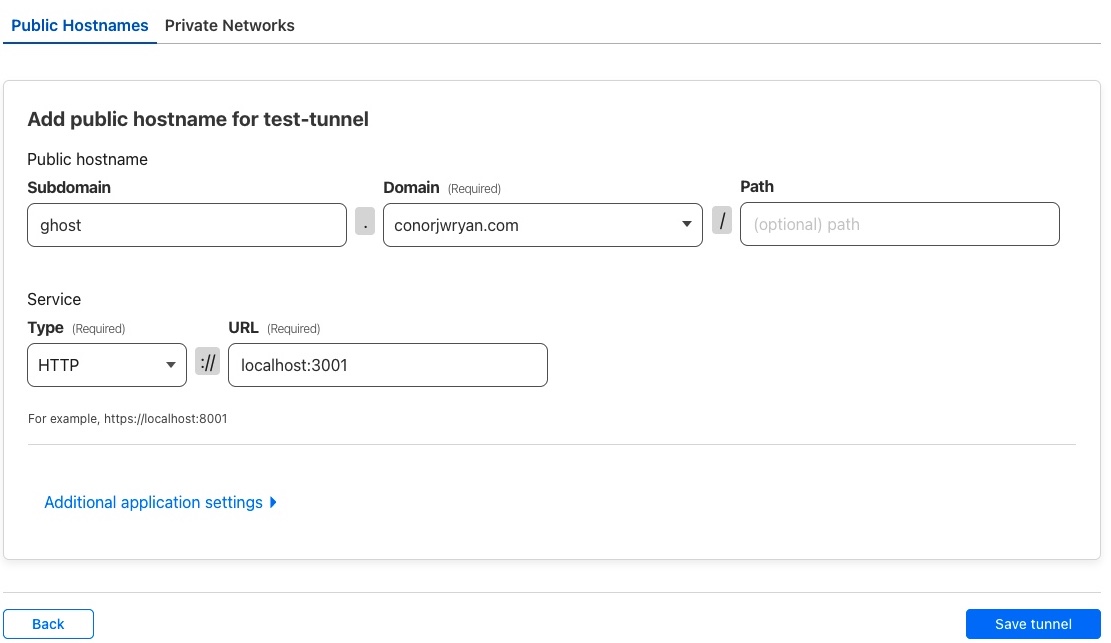
The URL refers to the internal address relative to the server. So if you’re service is running locally you have to put localhost in the URL. If it’s running on another server you have to put the IP address of that server, like 192.168.0.45:3001.
After you have inputted the details press Save tunnel. You’ll be brought back to the Tunnel configuration page. To check the tunnel works I go to ghost.conorjwryan.com and it should load my Ghost blog.
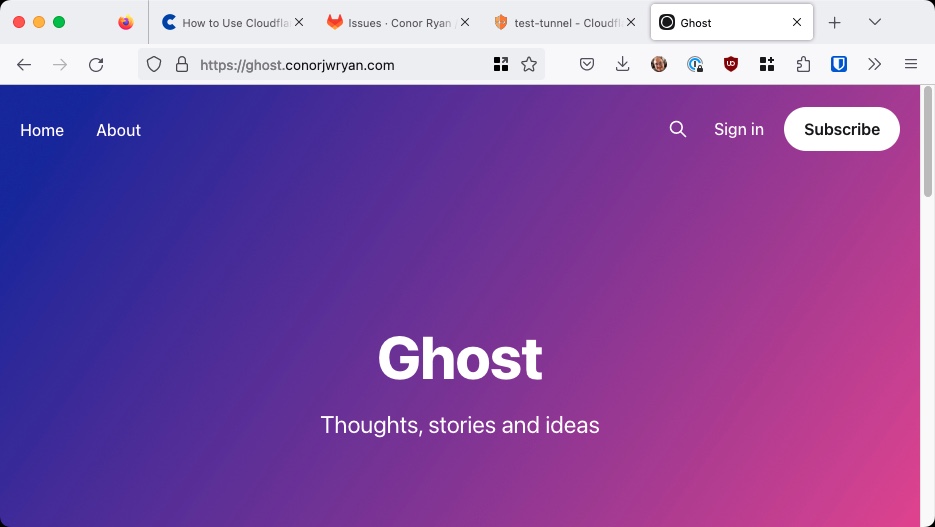
It works! And because it’s Cloudflare it also provides our site with a SSL certificate. However, this does not in any way mean that our site is secure! It just means that the connection between the client and the Cloudflare server is secure. The connection between the Cloudflare server and our server is still insecure. This is better illustrated in dealing with internal tools, which I shall do next.
Adding Internal Tools
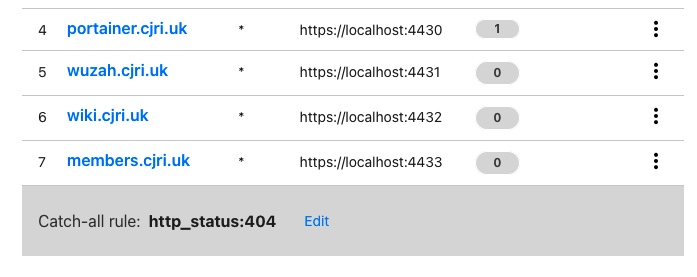
Now that the first Public Hostname has been added it redirects us back to the Tunnel configuration page. From here we can add more Public Hostnames to route our internal services to. In our case we need to add our Portainer Docker management tool.
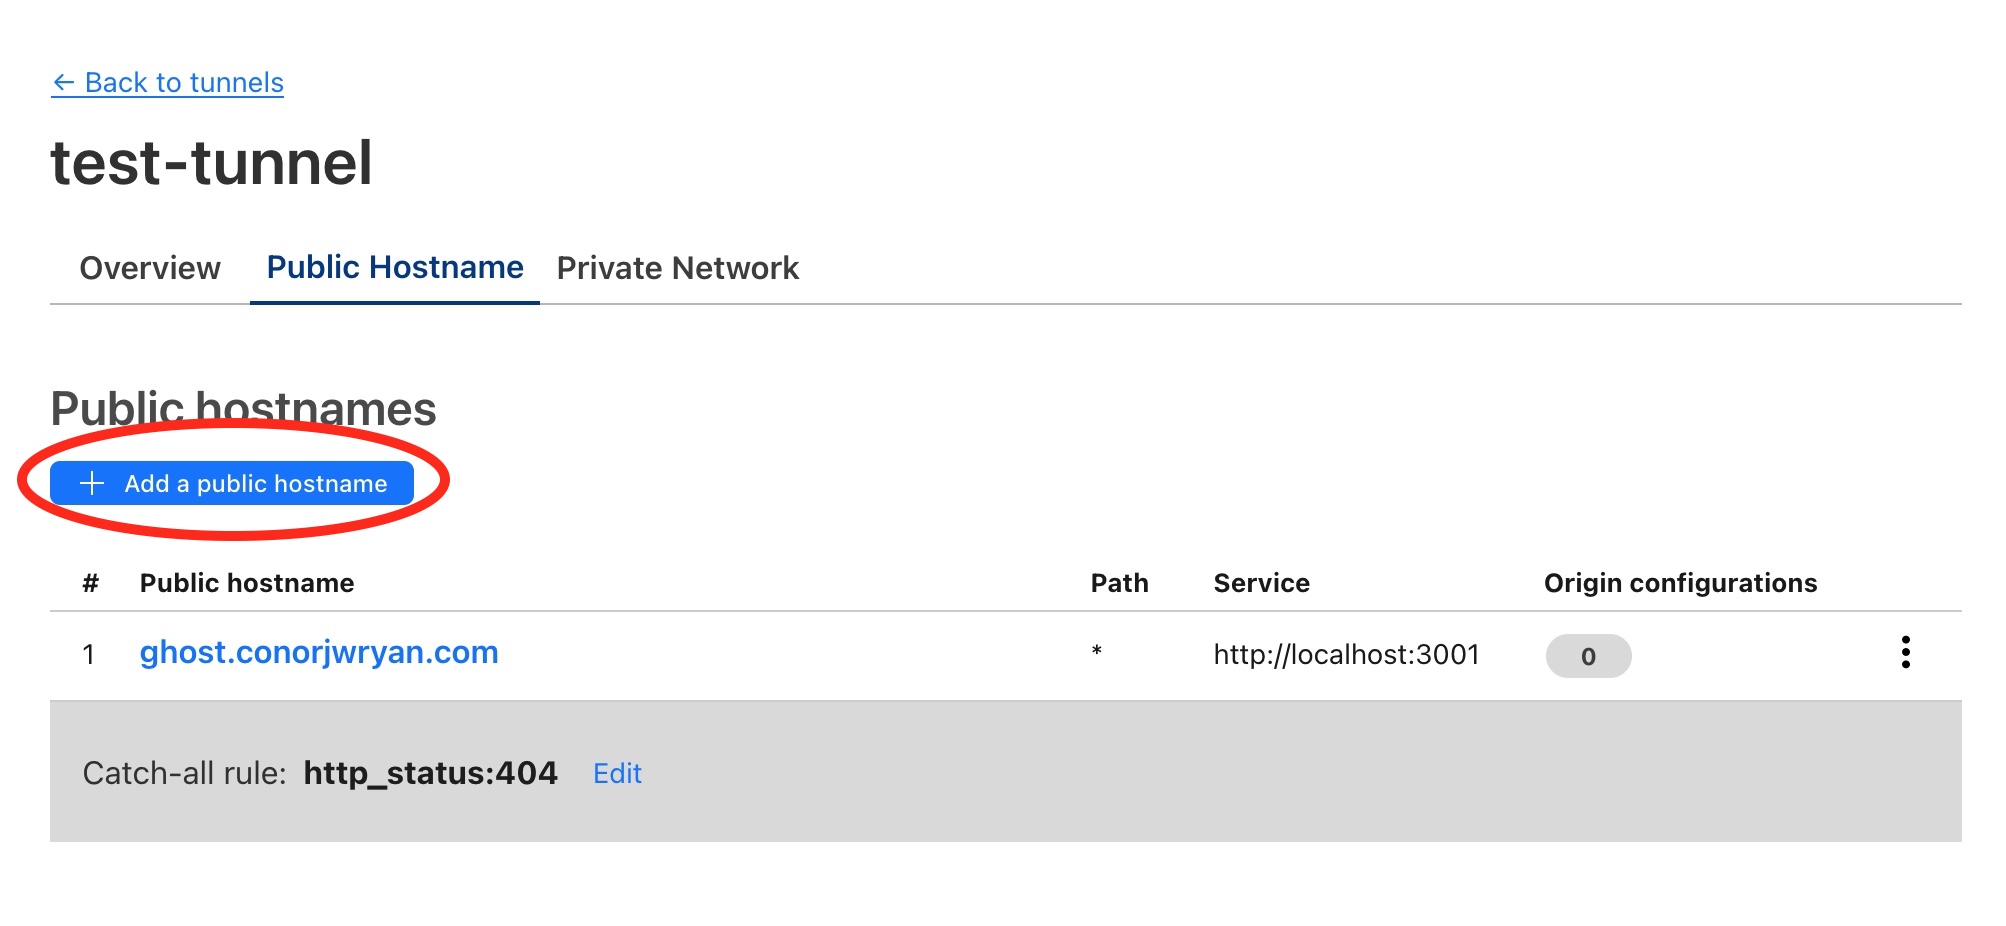
First we press Add a public hostname and then input the details as we did before with the Ghost Blog. I want my Portainer site to be reached at portainer.conorjwryan.com and it’s running on port 9000 on my server.
All we need do is add the details in the same way we did for the Ghost site:
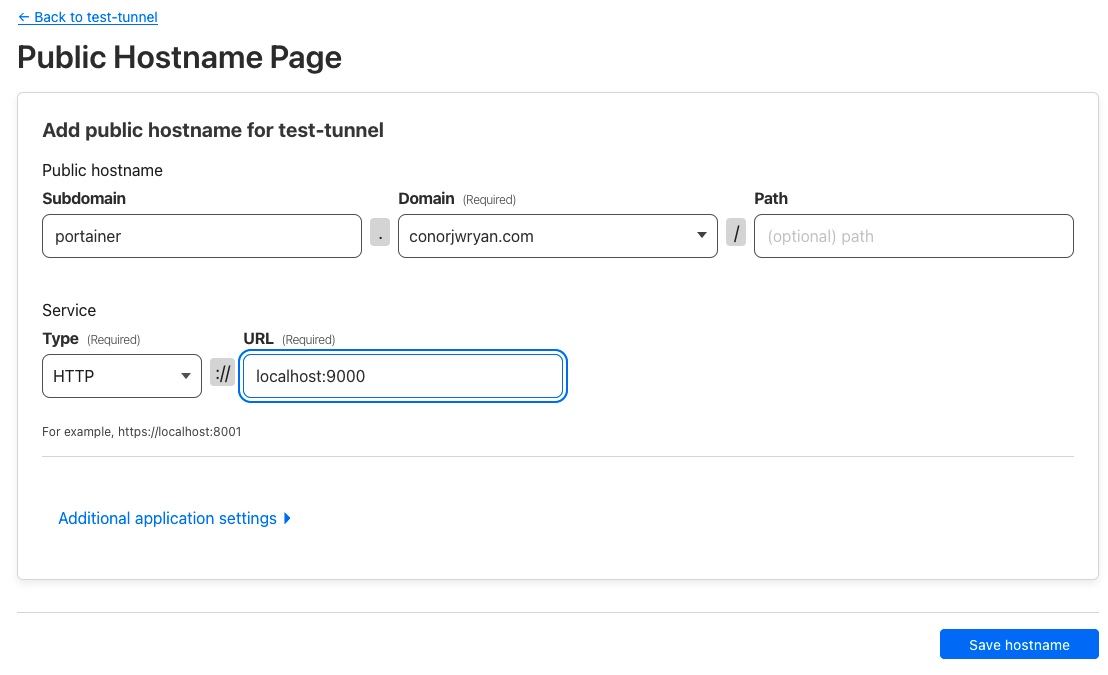
Having pressed Save hostname we should now be able to navigate to portainer.conorjwryan.com and see our Portainer site.
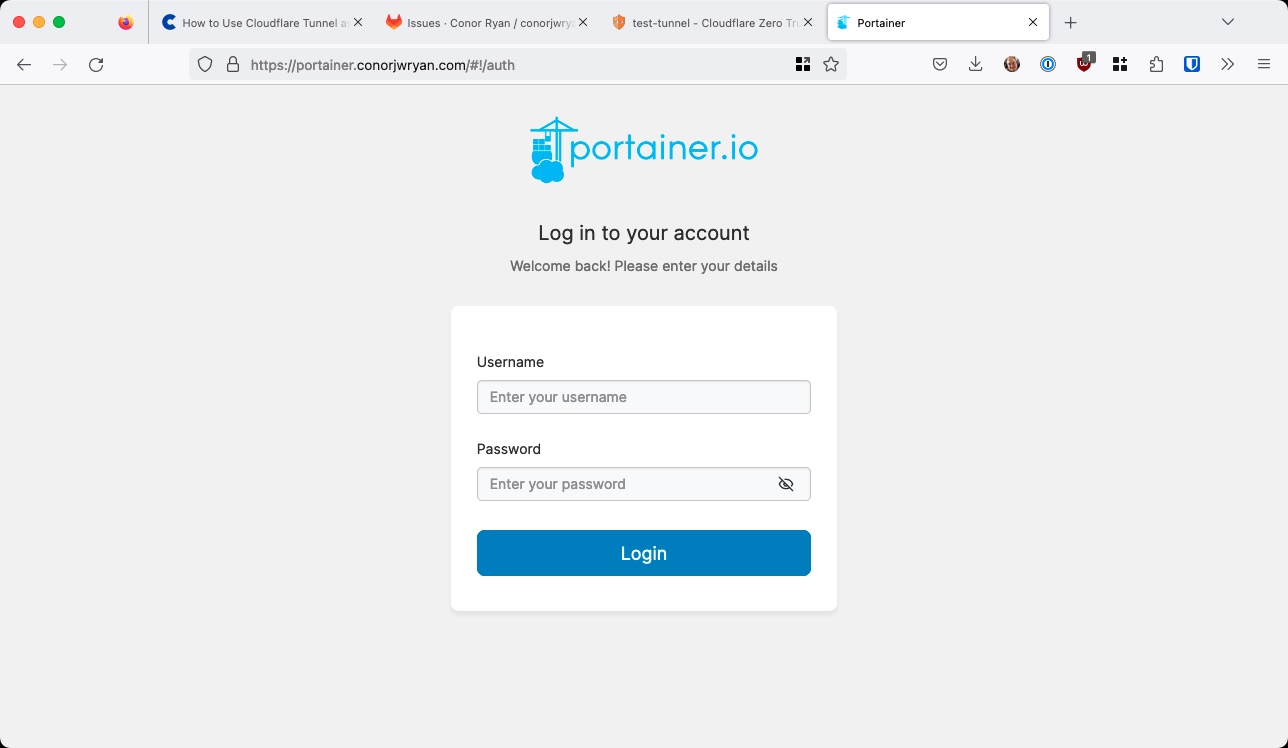
It works! BUT this internal tool is now accessible to anyone on the internet. As this is an internal tool we need to secure it. Cloudflare allows us to do this by creating an Access policy.
Securing with Access
CLoudflare Access allows us to create policies that restrict unauthorised people our internal tools. We can create policies that allow access to certain users, groups, or even IP addresses. The idea is that when someone visits our internal tool (like portainer.conorjwryan.com) they will be prompted to authenticate / login through Cloudflare Access before progressing to the internal tool.
We can then customise how this looks or even if they have to authenticate at all. An example where this would be applicable is where you wouldn’t want people having to authenticate with `Cloudflare`` unnecessarily if they’re accessing the internal tool from the internal network for example…
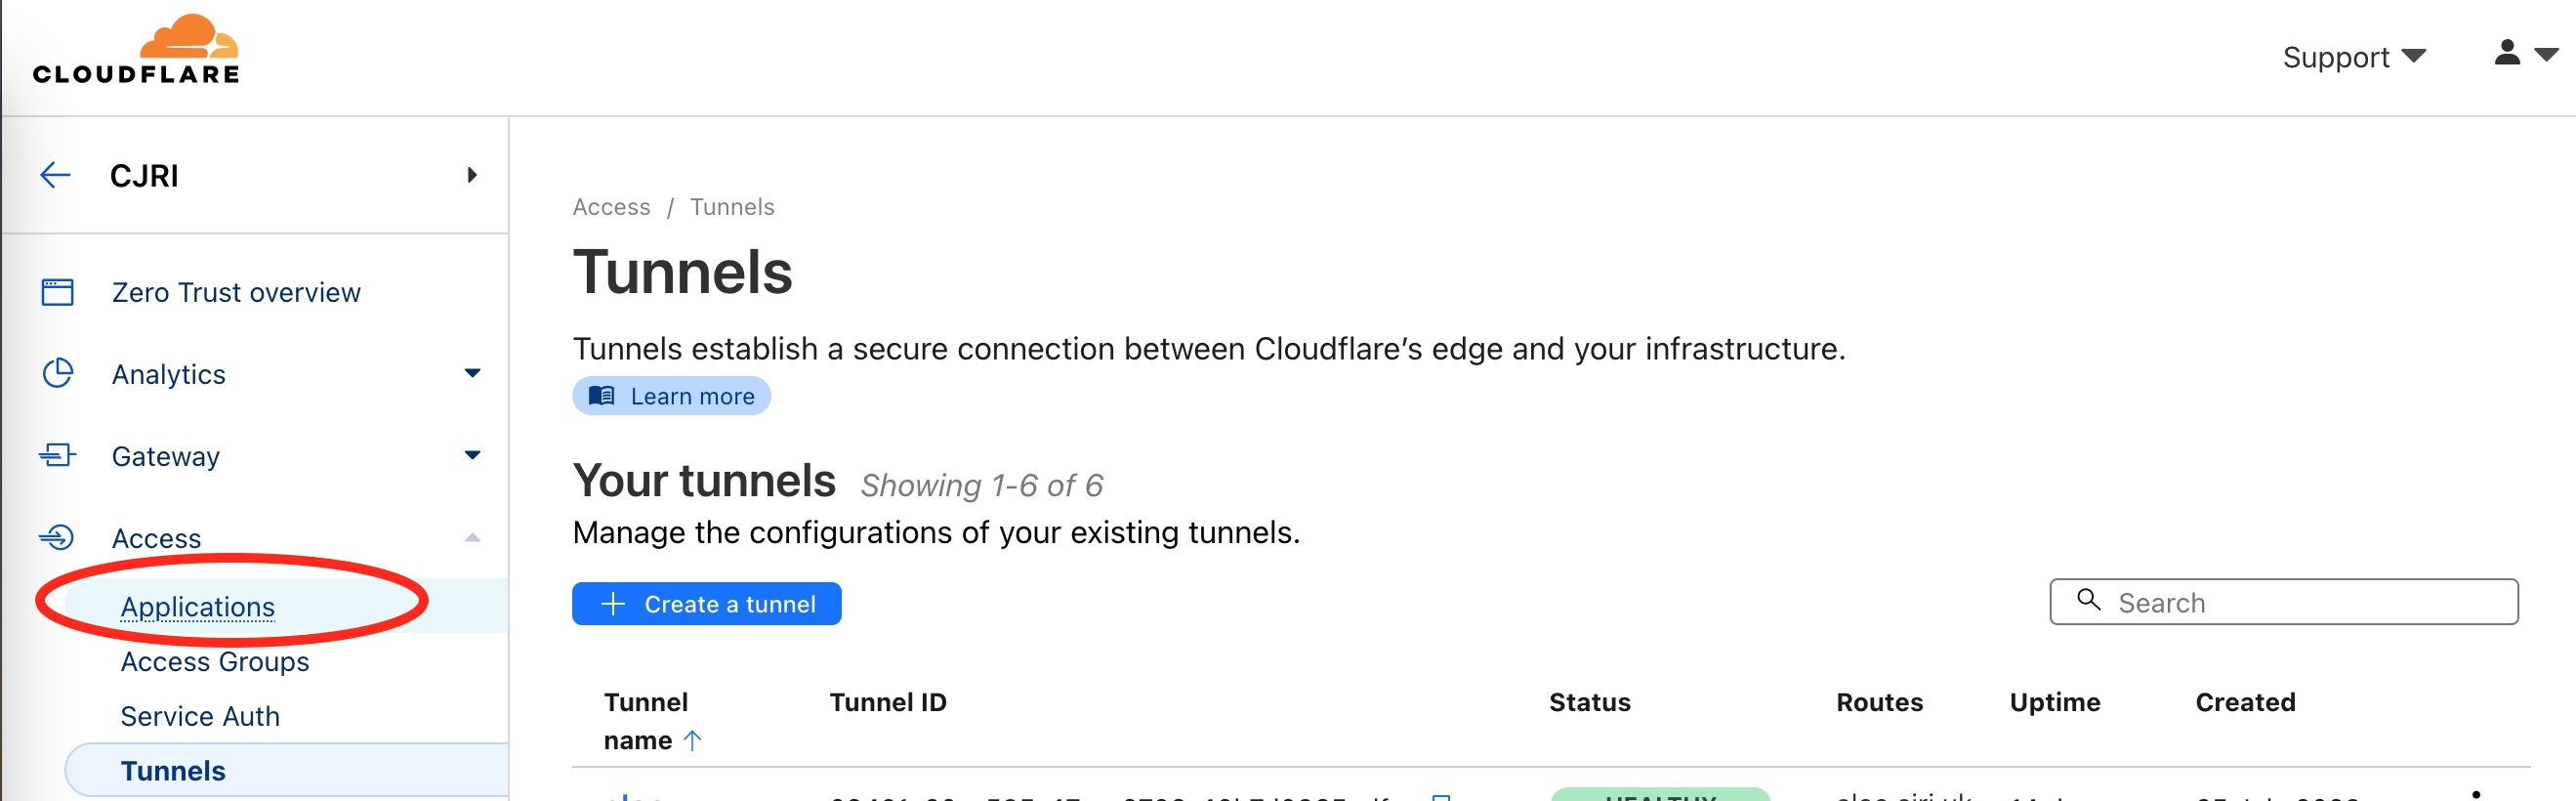
Having made the sites available over the internet it’s now important to secure them. On the Tunnel dashboard go to the Access tab on the left-hand side and go to ‘Applications’ and then ‘Create an Application’.
From there we press Create an Application. We are then presented with a choice of Application Types. In our case we want to choose Self Hosted as we want to secure our Portainer site.
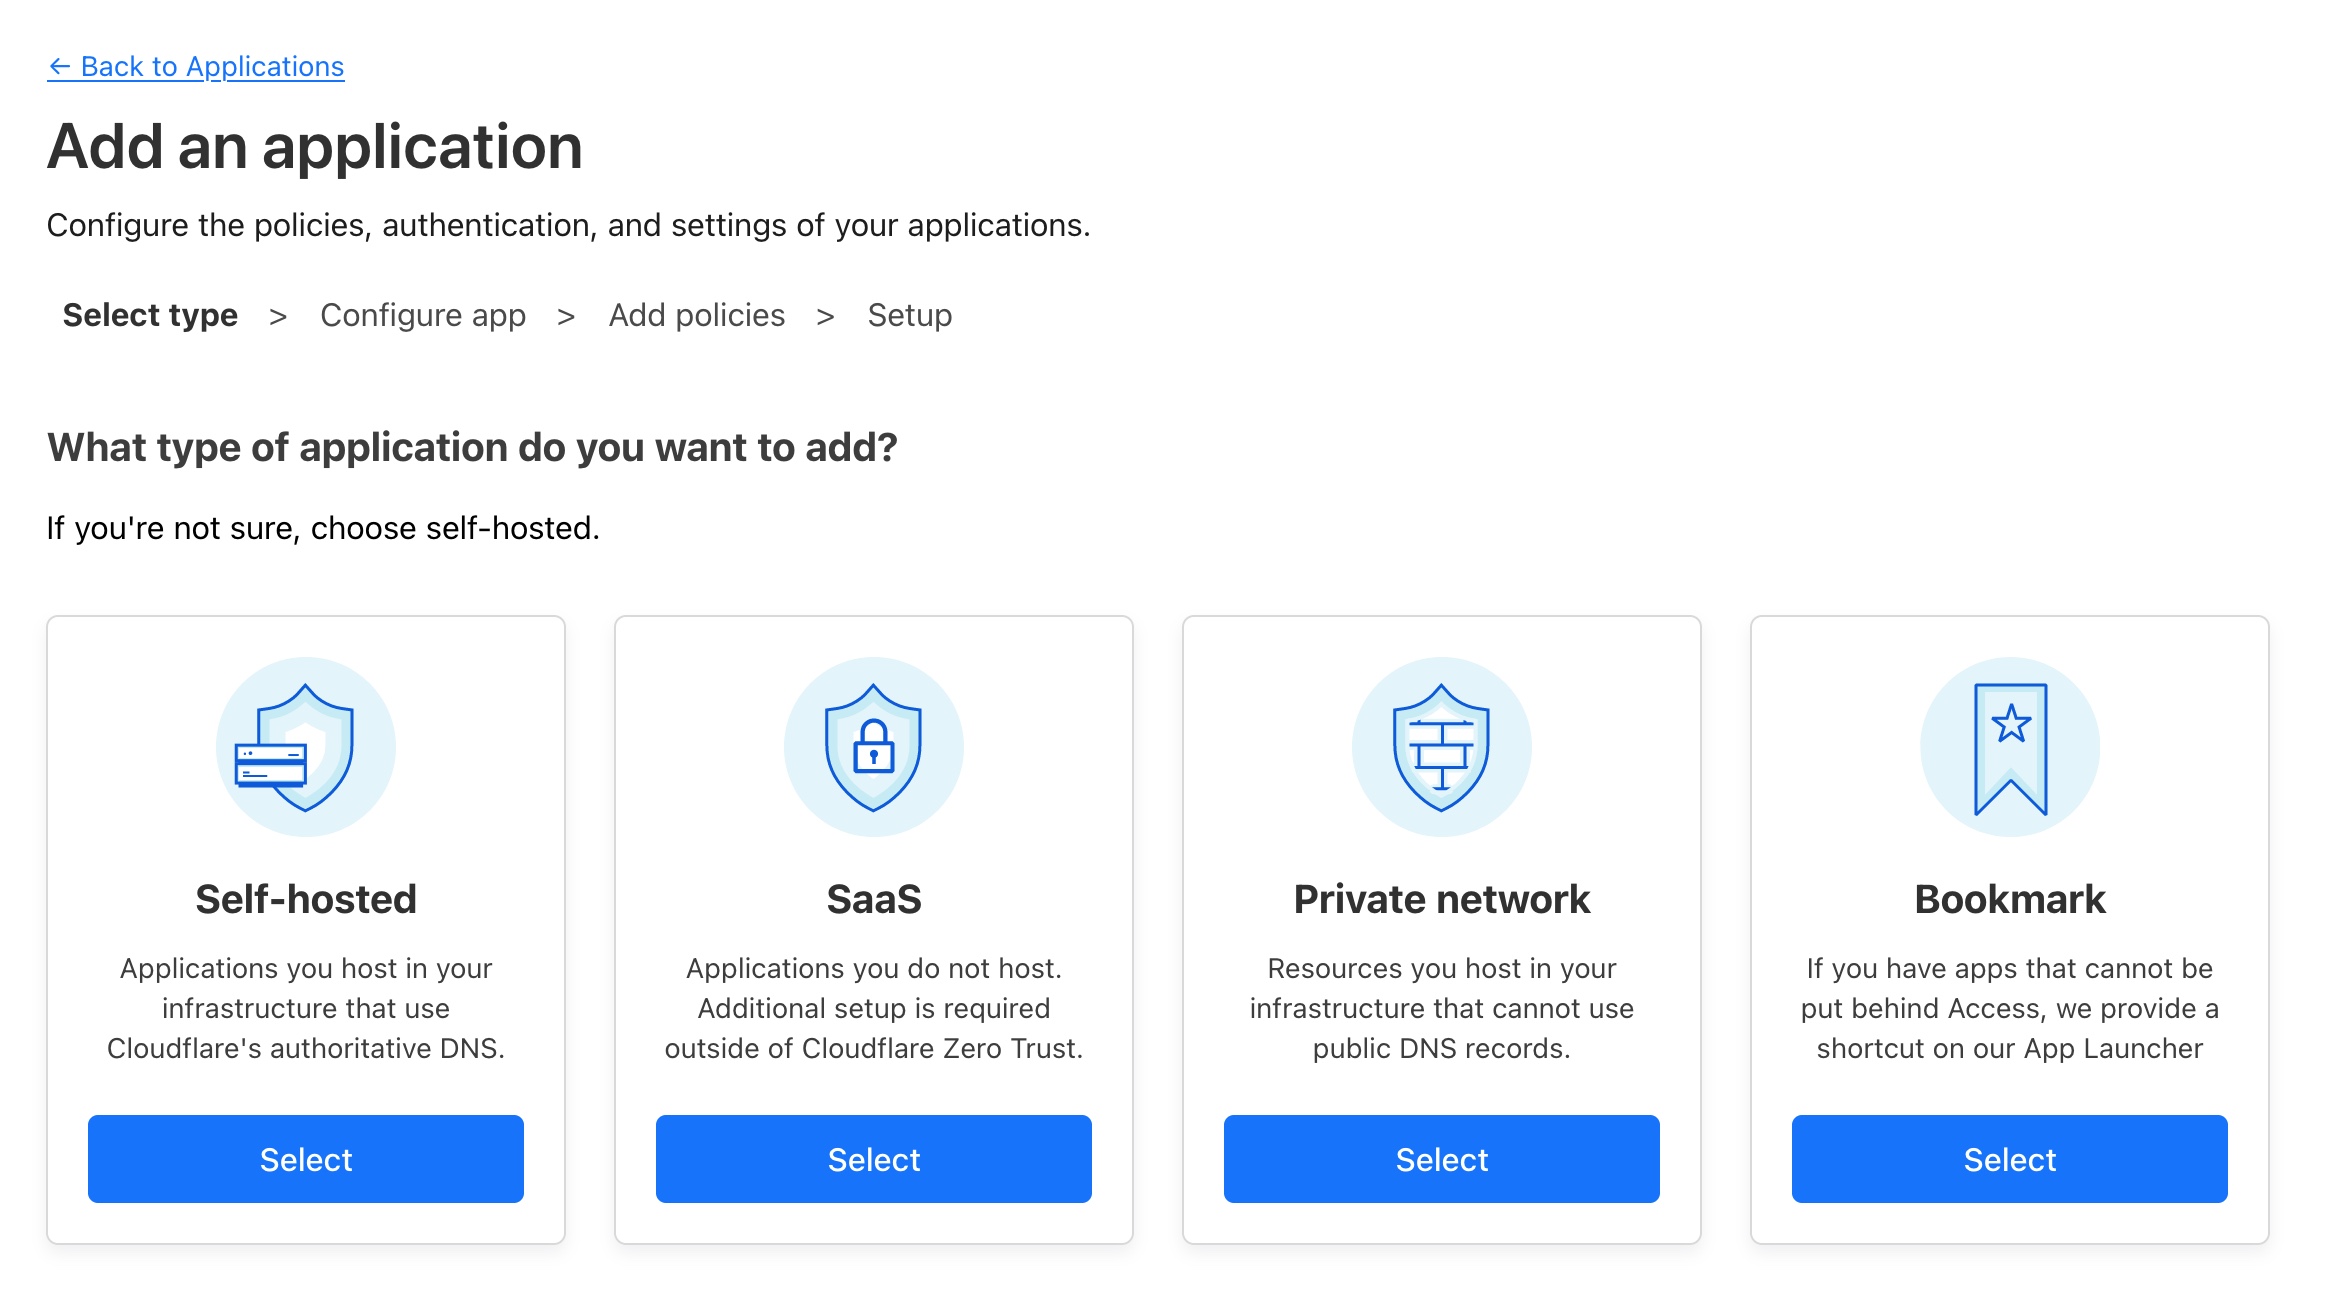
It is worth noting that you can protect any domain on your account with Cloudflare Access, it does not need to be done through Cloudflare Tunnel exclusively.
With Self-hosted selected we are taken to the Configure app page. On this page we have to focus on two sections: Application Configuration and Identity providers.
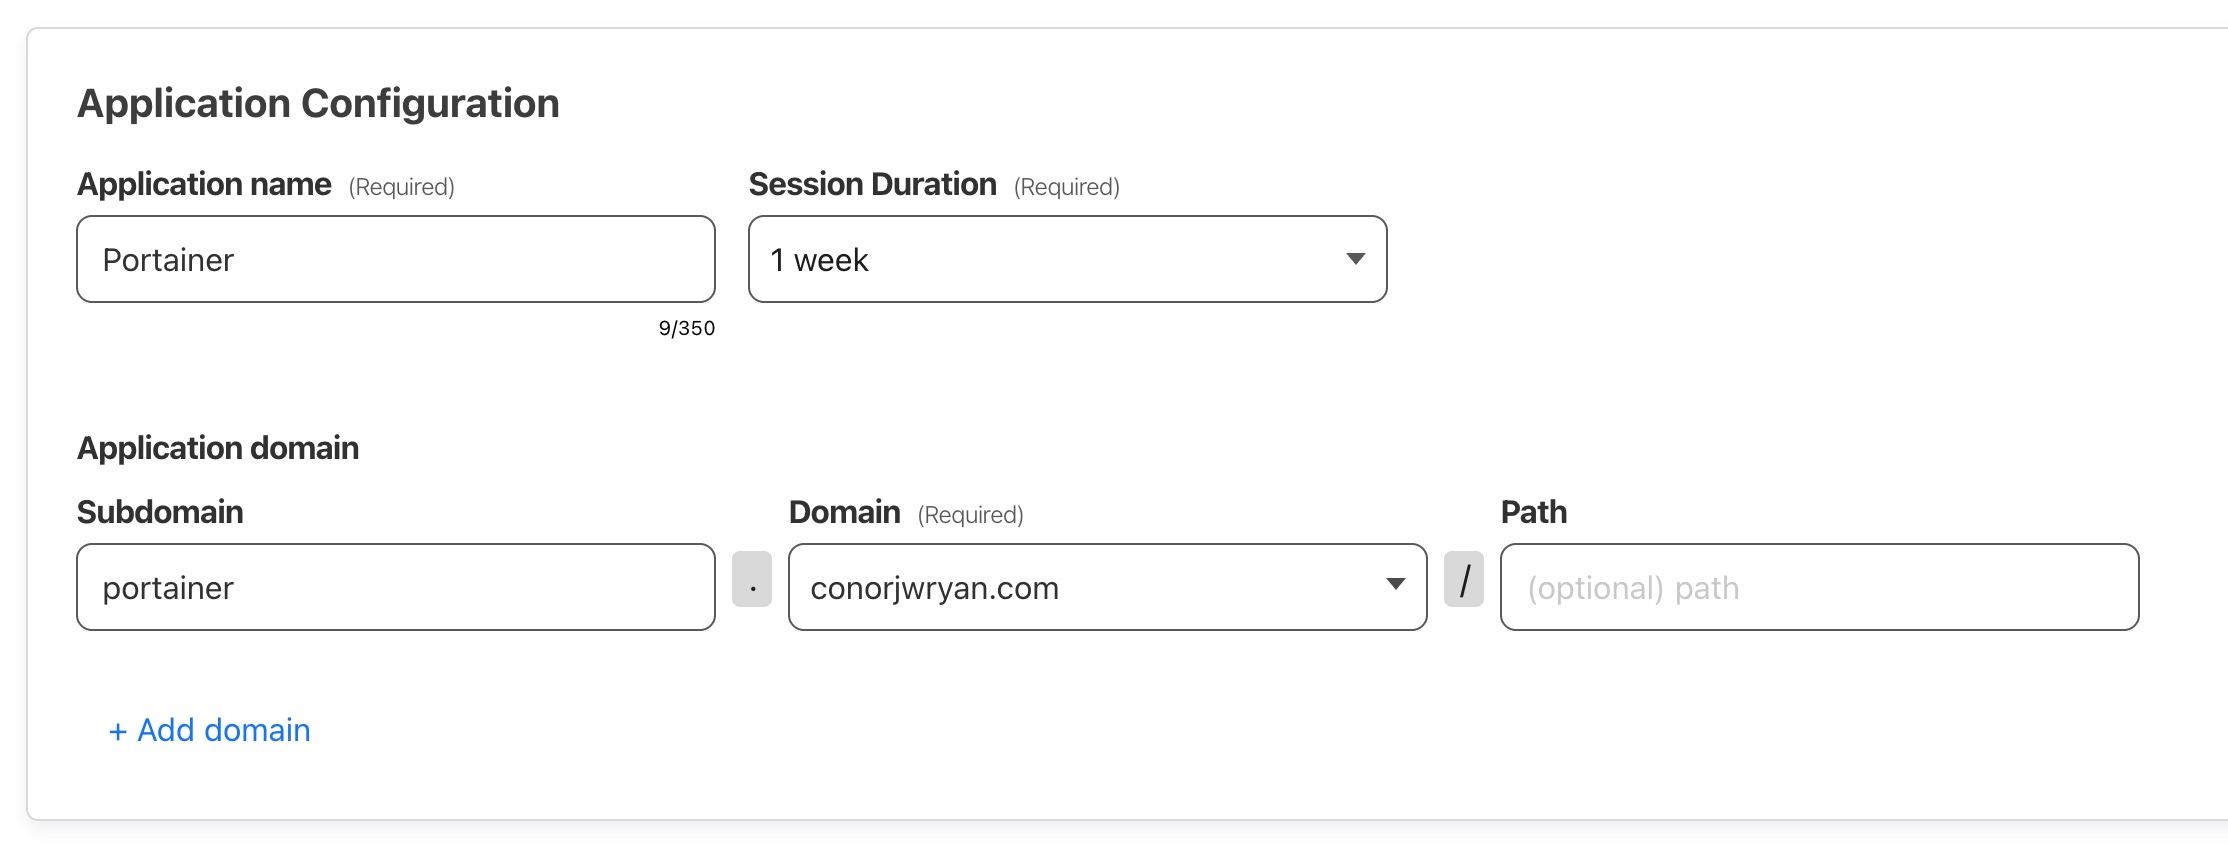
In the Application Configuration section we need to write the name of the Application, in my case Portainer and choose a Session Duration of 1 week
Session Duration refers to the amount of time you are authenticated in Cloudflare Access before having to log back in. It is not the same being logged into the Application, but rather how often the user is prompted / re-prompted for access.
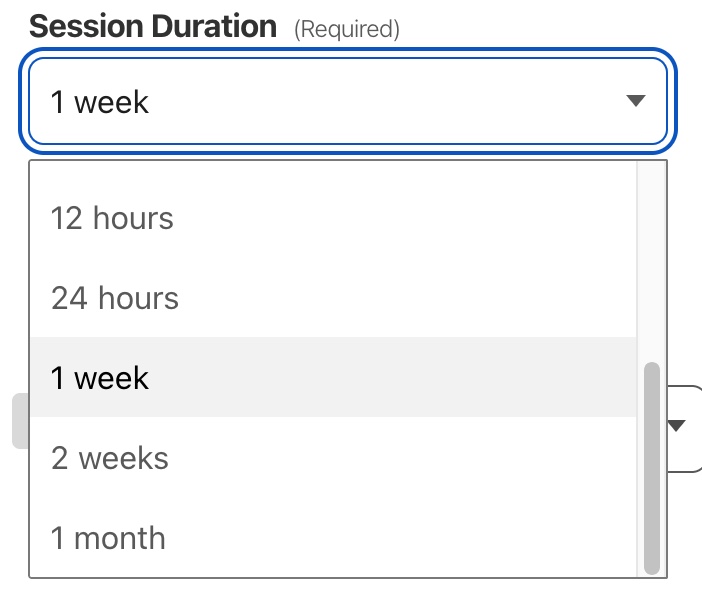
You can choose any time between Expires Immediately (where a person would need to login every time they access the site), up to a every month. It is dependant on the type of tool and the company security posture which you choose but as a nice middle ground between security and convenience I shall choose 1 Week.
It’s also important to input the same Domain information as we did when we set up the tunnel. In my case it was portainer.cjri.uk.
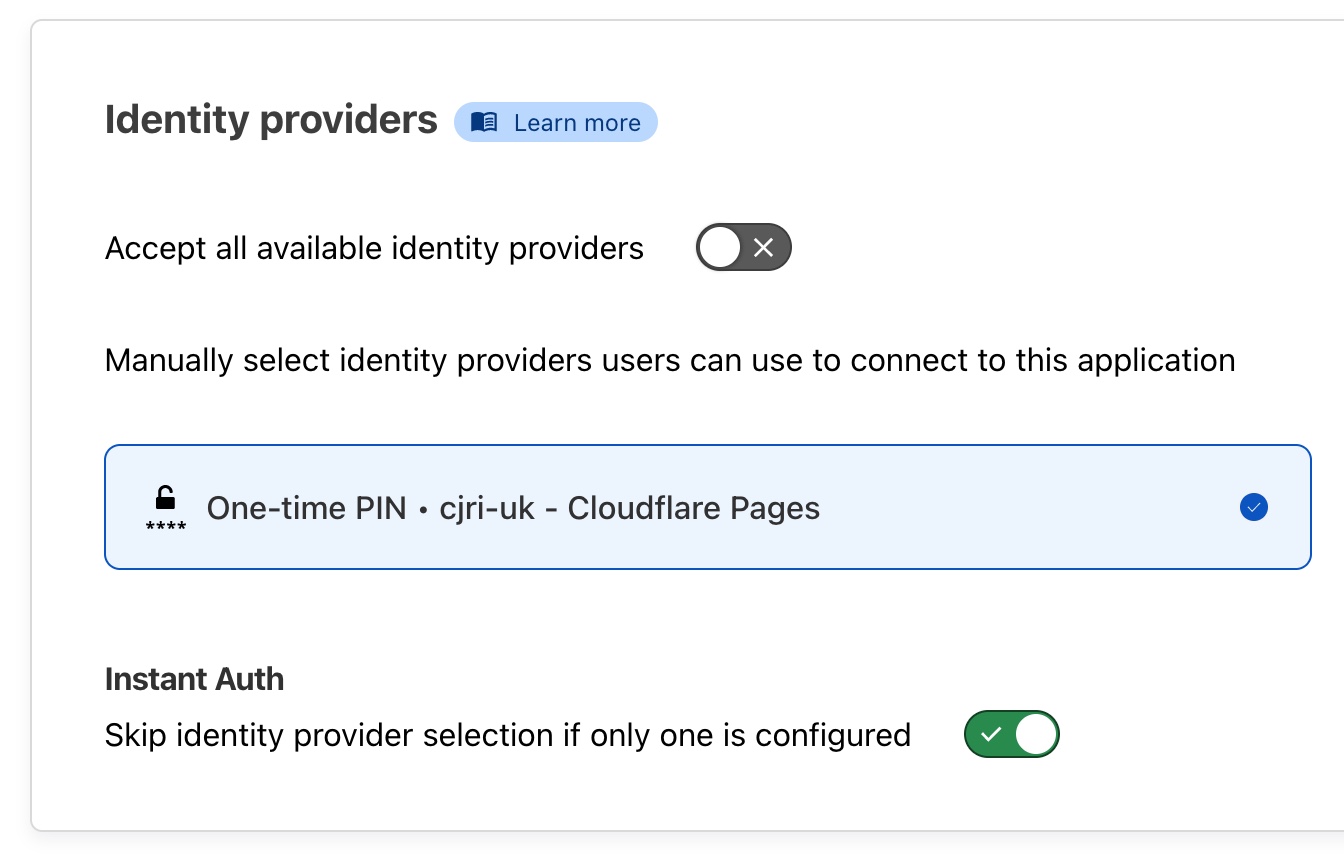
Now we have set up the basics of the Cloudflare Access Application now we need to scroll down to the bottom of the page where Identity providers section is located. Identity Providers are how the potential users interact with Cloudflare Access Authentication in order to determine how they get access to the Application.
The default way provided for Identity Verification is through the use of a One-time PIN which is automatically configured. When the user goes to portainer.conorjwryan.com they are greeted with a login screen where they are asked to submit their email. This email is then checked against Access List Policies (set up on the next page) to determine if they should get access. If they meet the criteria then they are emailed a link / code for access. Dependant on the Session Duration defined above is how often they have to reauthenticate by this method.
For now these settings don’t matter as much becauseOne-time PIN should be the ony option for new accounts but as you you were to add more Identity providers (like Microsoft Active Directory or Okta) keep One-time PIN selected to follow along with this tutorial.
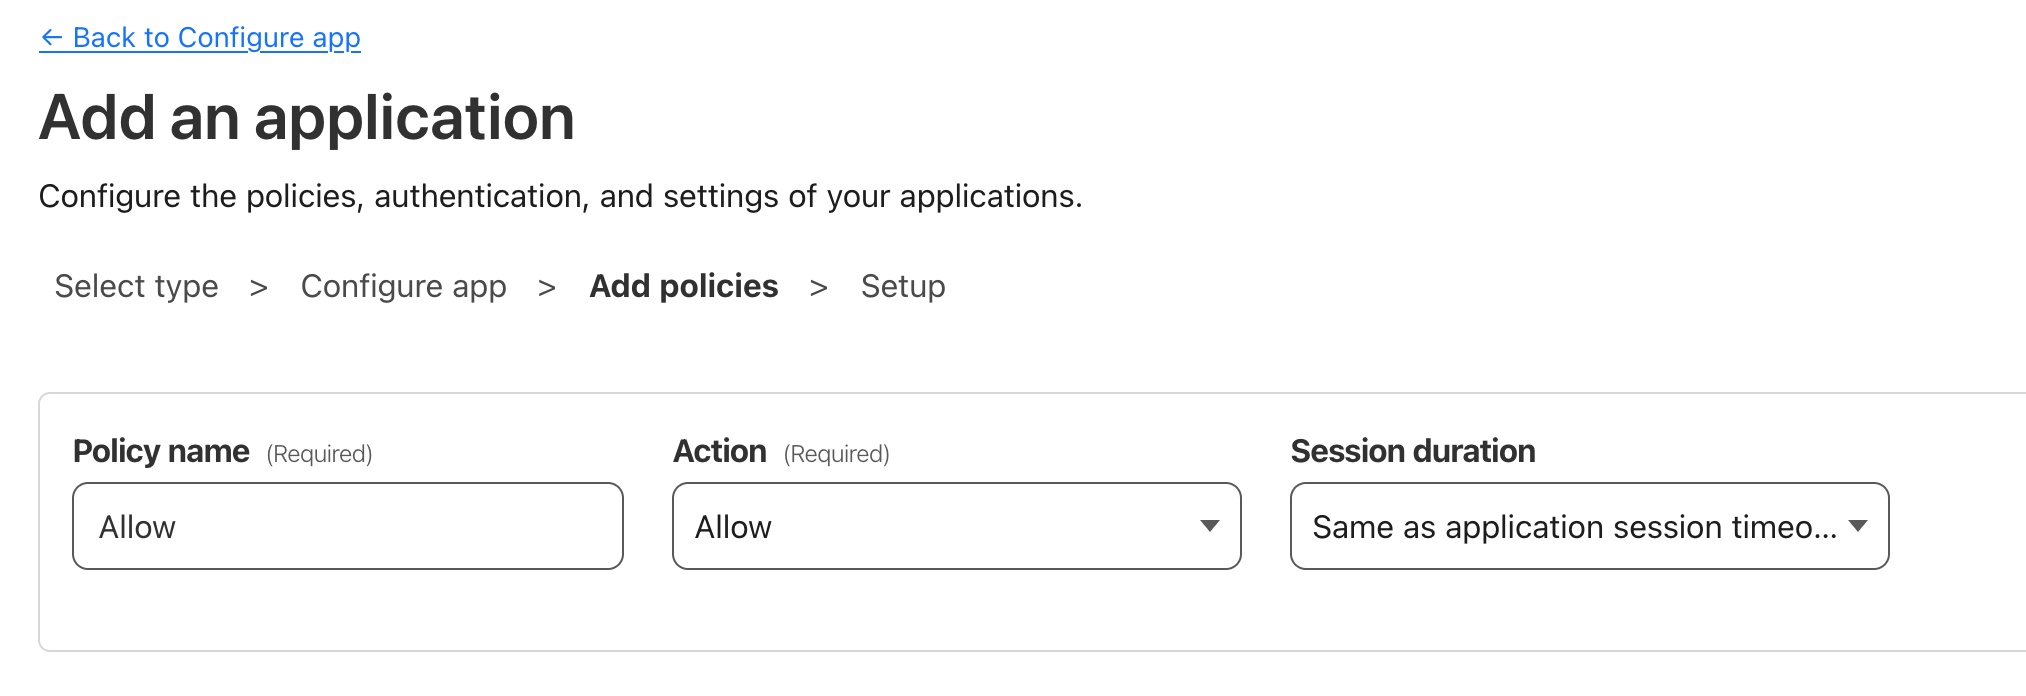
With the app basics configured we can move onto the next stage which is configuring our Application Access Policies which determine who has access to our application (and by extension who does not).
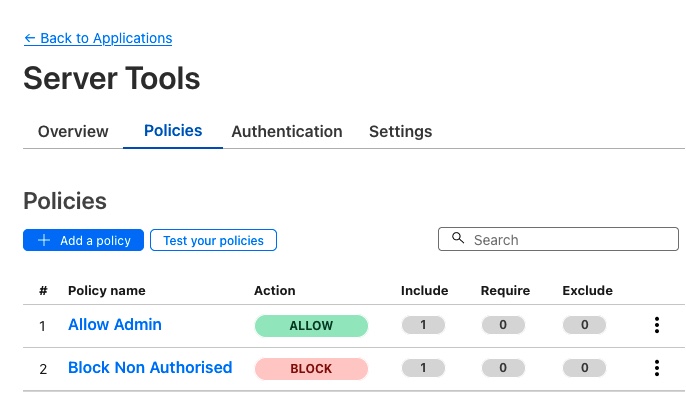
The first step is to give this policy a name. This should relate to the people or groups involved. It is a good idea to separate different groups into different policies (which you can add later). Normally you would have a policy for administrator users and one for other users.
Each policy can determine what criteria those users have to meet to use the Application as well as specific Session Durations for each group. You can have specific policies which also block if conditions are met (good for extra security). For now because it is only me accessing this.
Below this section it might ask you to select a group, this is useful if you’re configuring many Applications and will save in configuration time. You would have different Groups of different people or IP Address ranges like the example.
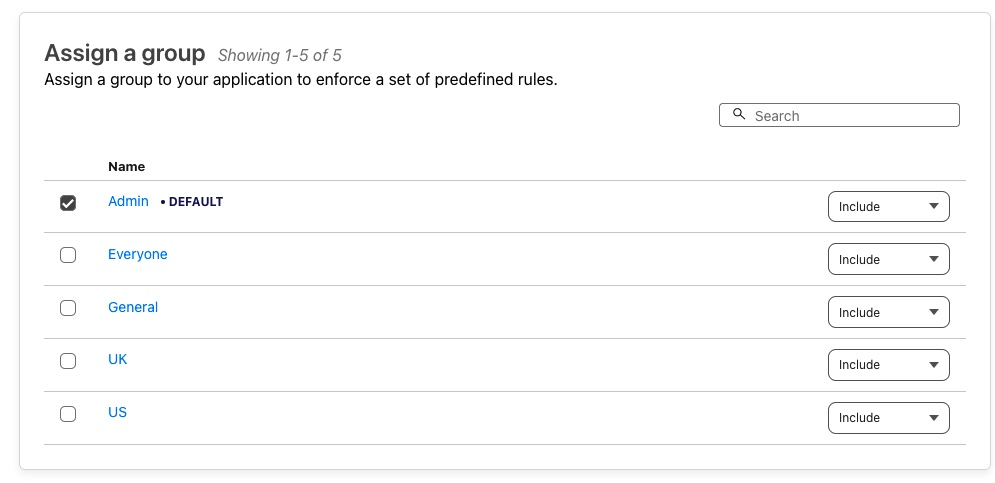
For now just scroll past this until you see Create additional rules section. This is where we will be doing simple, adhoc rules for this singular policy.
Our first and only rule will be to add our email address so only we have access to the application. We do this by choosing Emails under the Selector heading and under the value, we input the emails we want to be able to access the application. To add others, simply separate the emails by the use of a comma ,
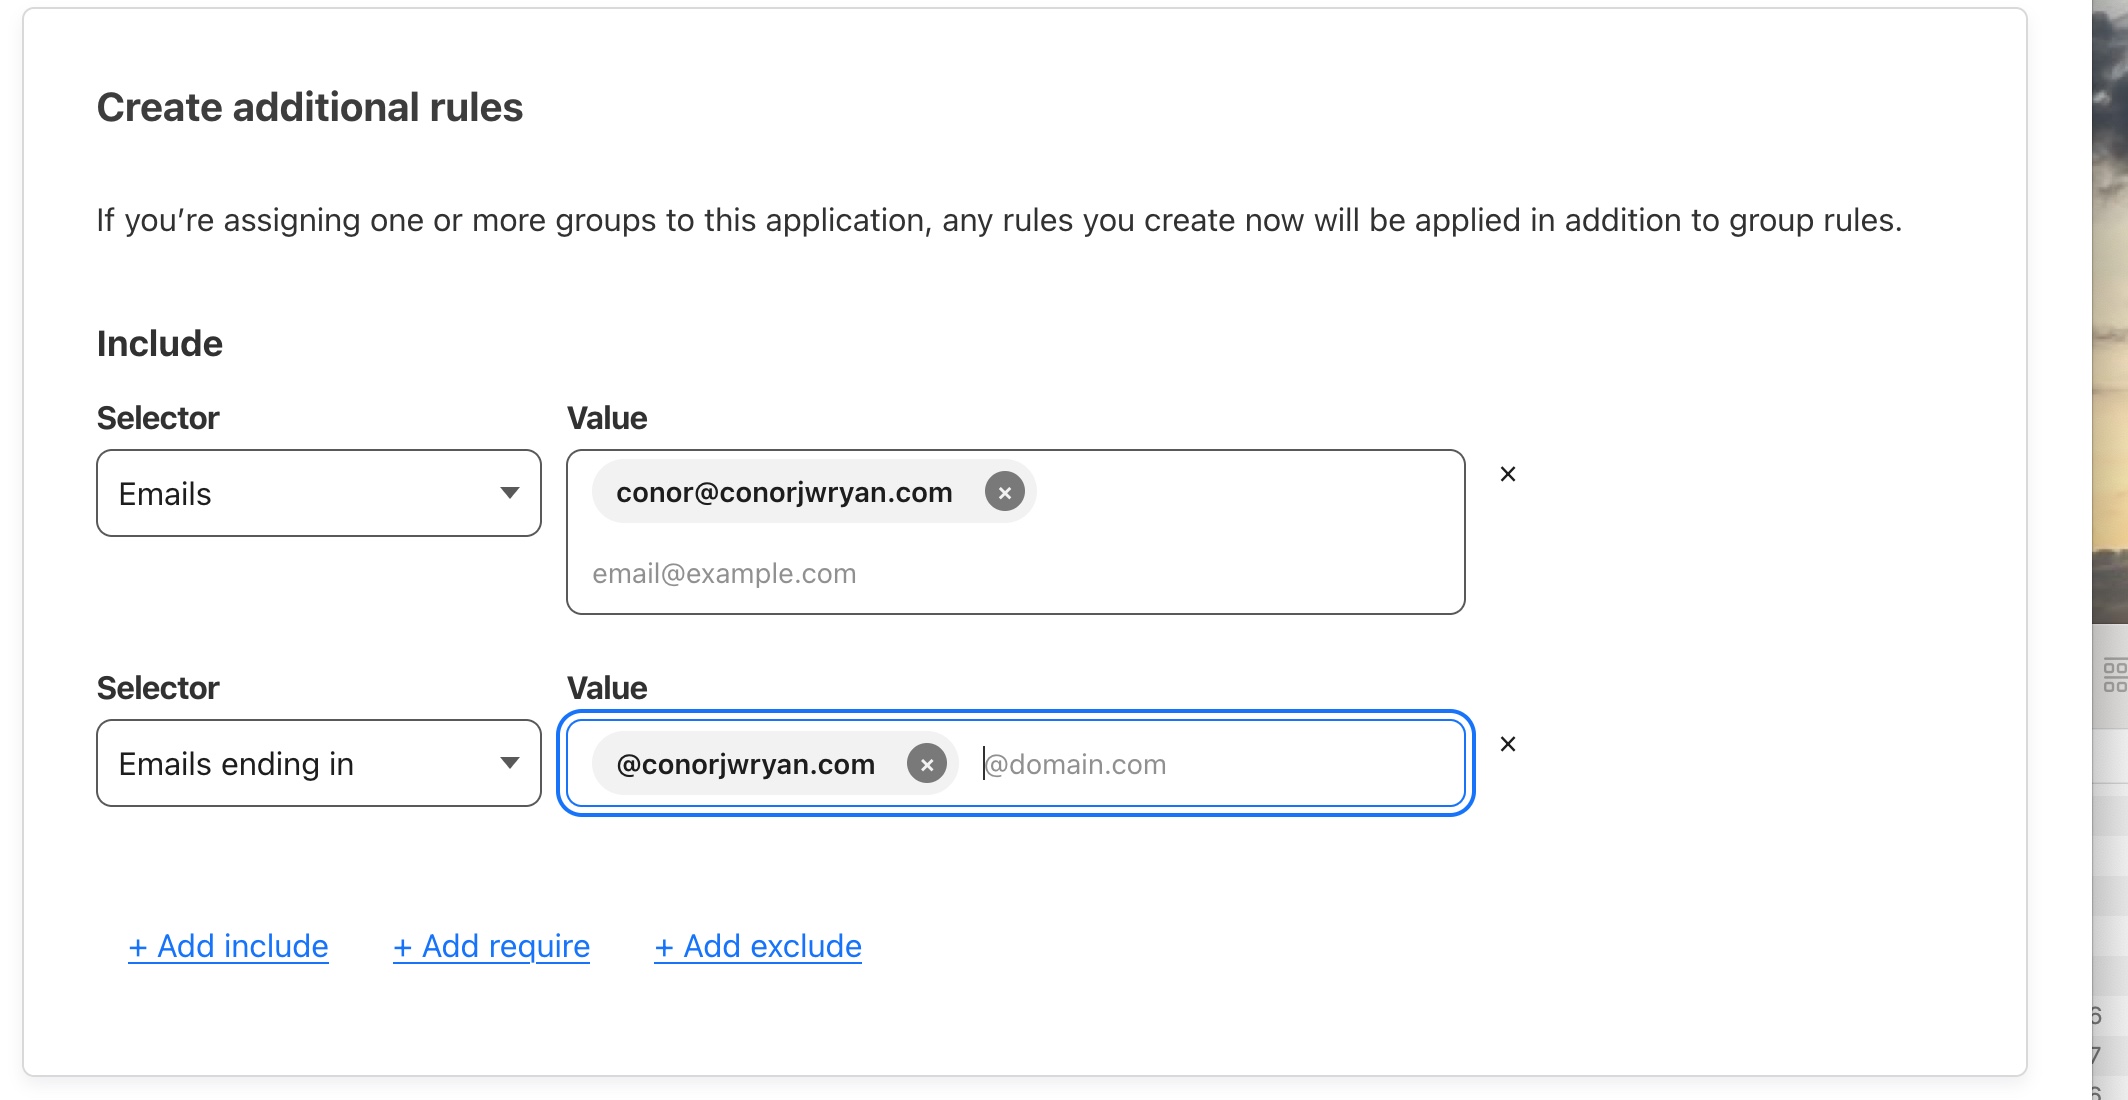
Alternatively if this was a general use internal tool like a company intranet site or knowledge portal we could change the Emails Selector to Emails ending in and type the our domain like @conorjwryan.com to allow all people with a conorjwryan.com domain to access the Application.
Progressing to the last page in this wizard we just need to change one setting, and that is to Enable automatic cloudflared authentication which helps enacting our chosen rules and Session Duration.

That is it! Now our Application is correctly configured we can press Add application in the bottom right and we’re done. We will automatically be taken to the Applications Dashboard and we should be able to see our newly created Access Application
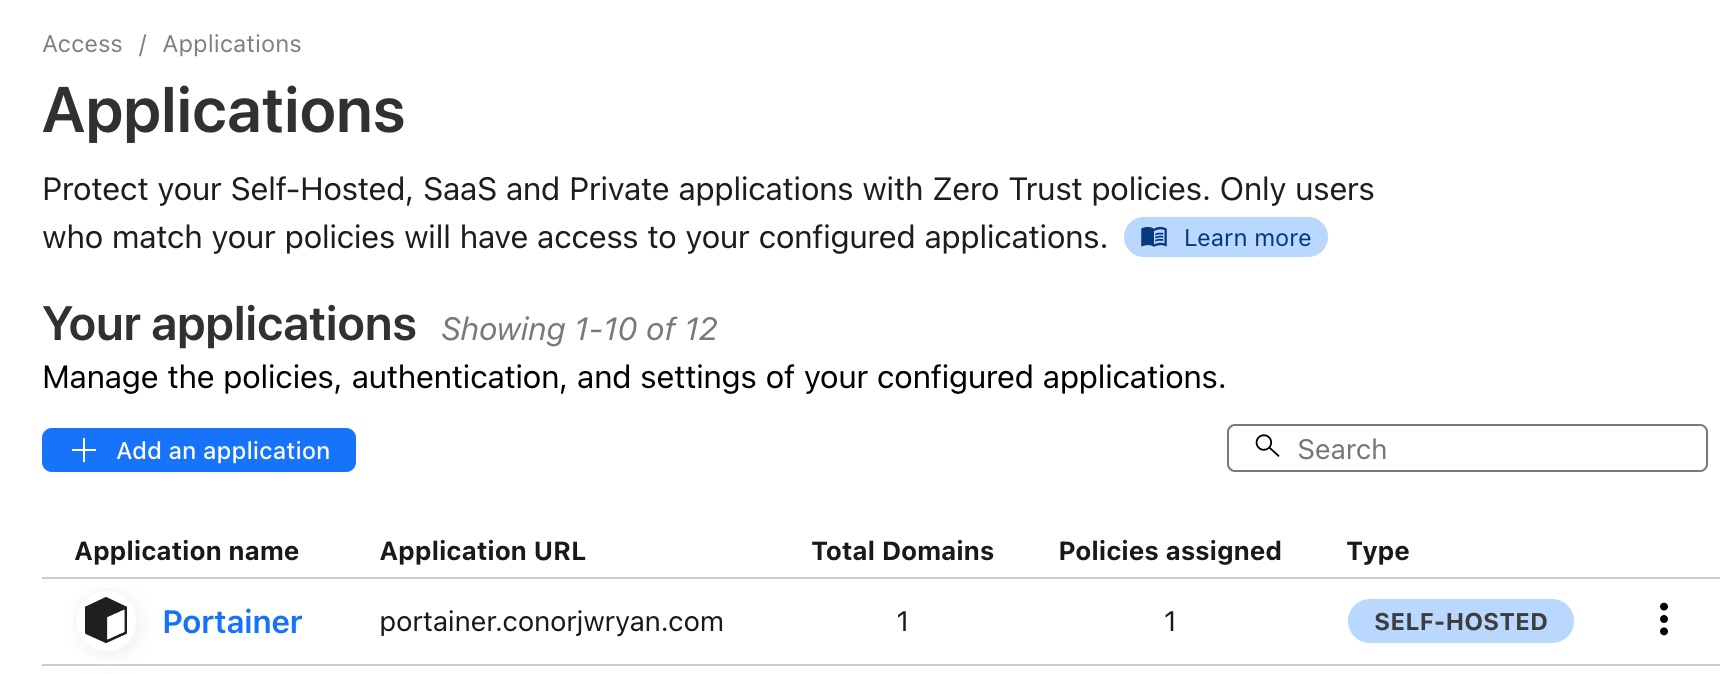
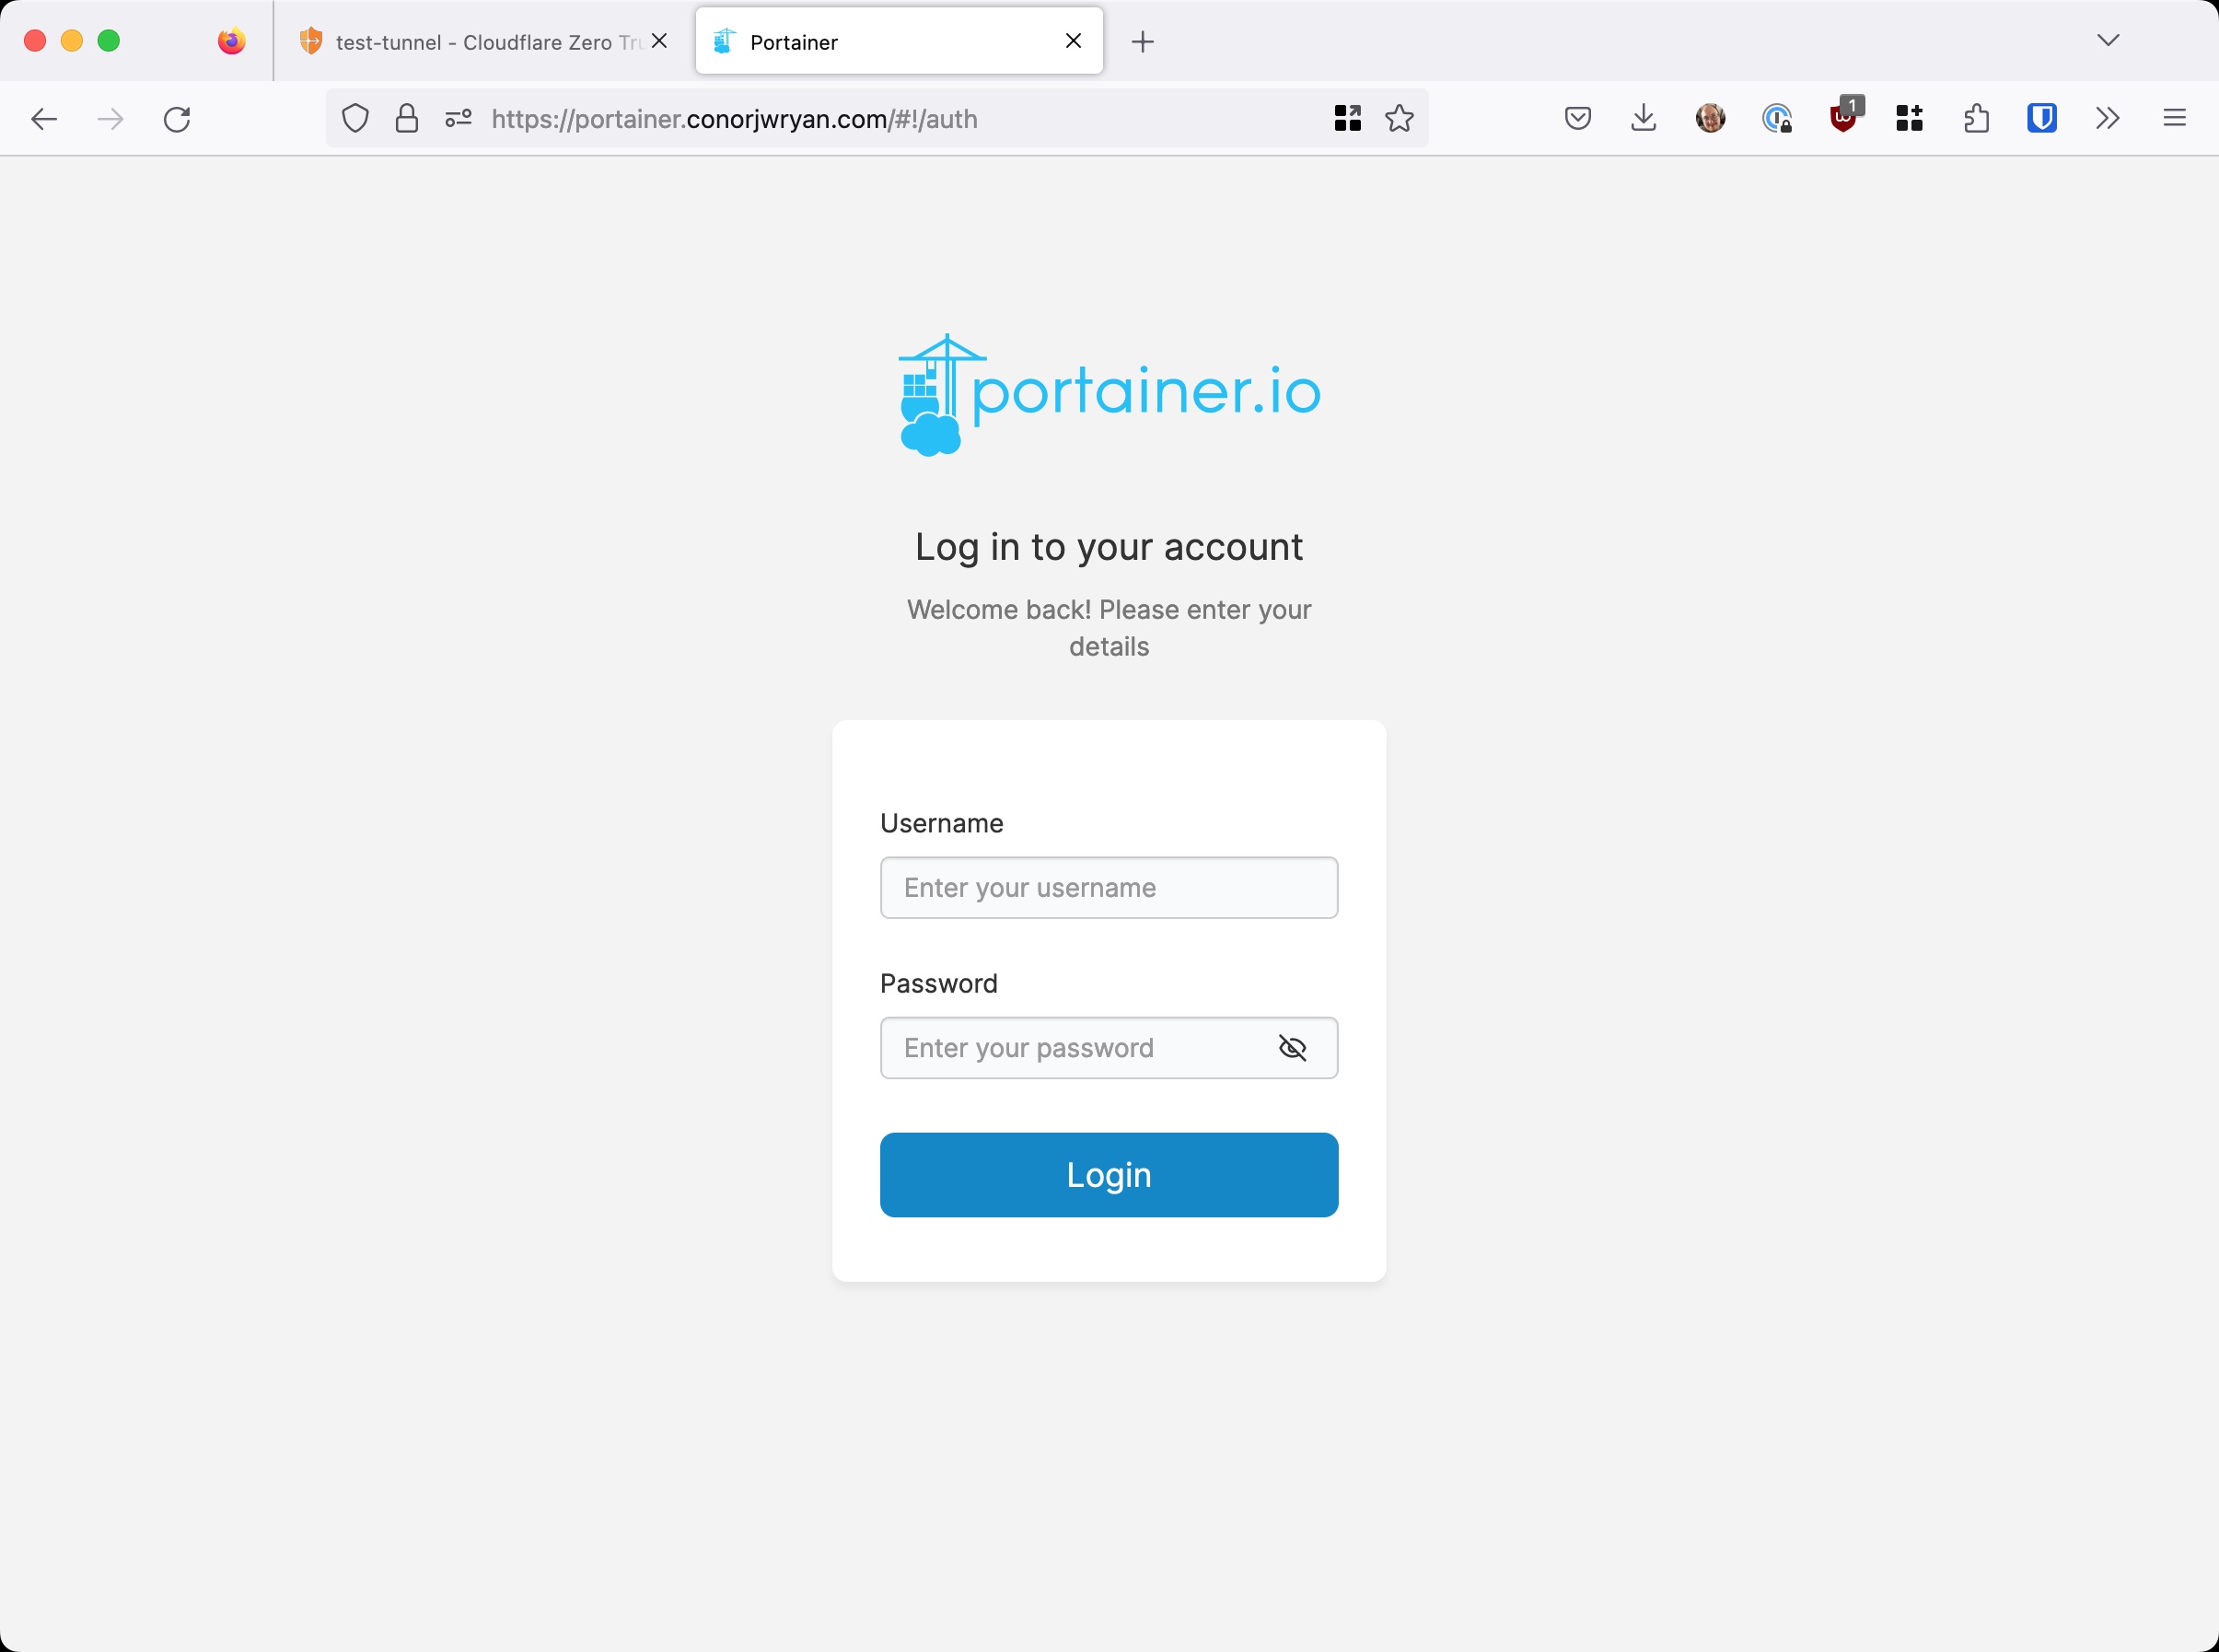
Now that our application is configured we can go to portainer.conorjwryan.com and see that we are greeted with the following logon page:
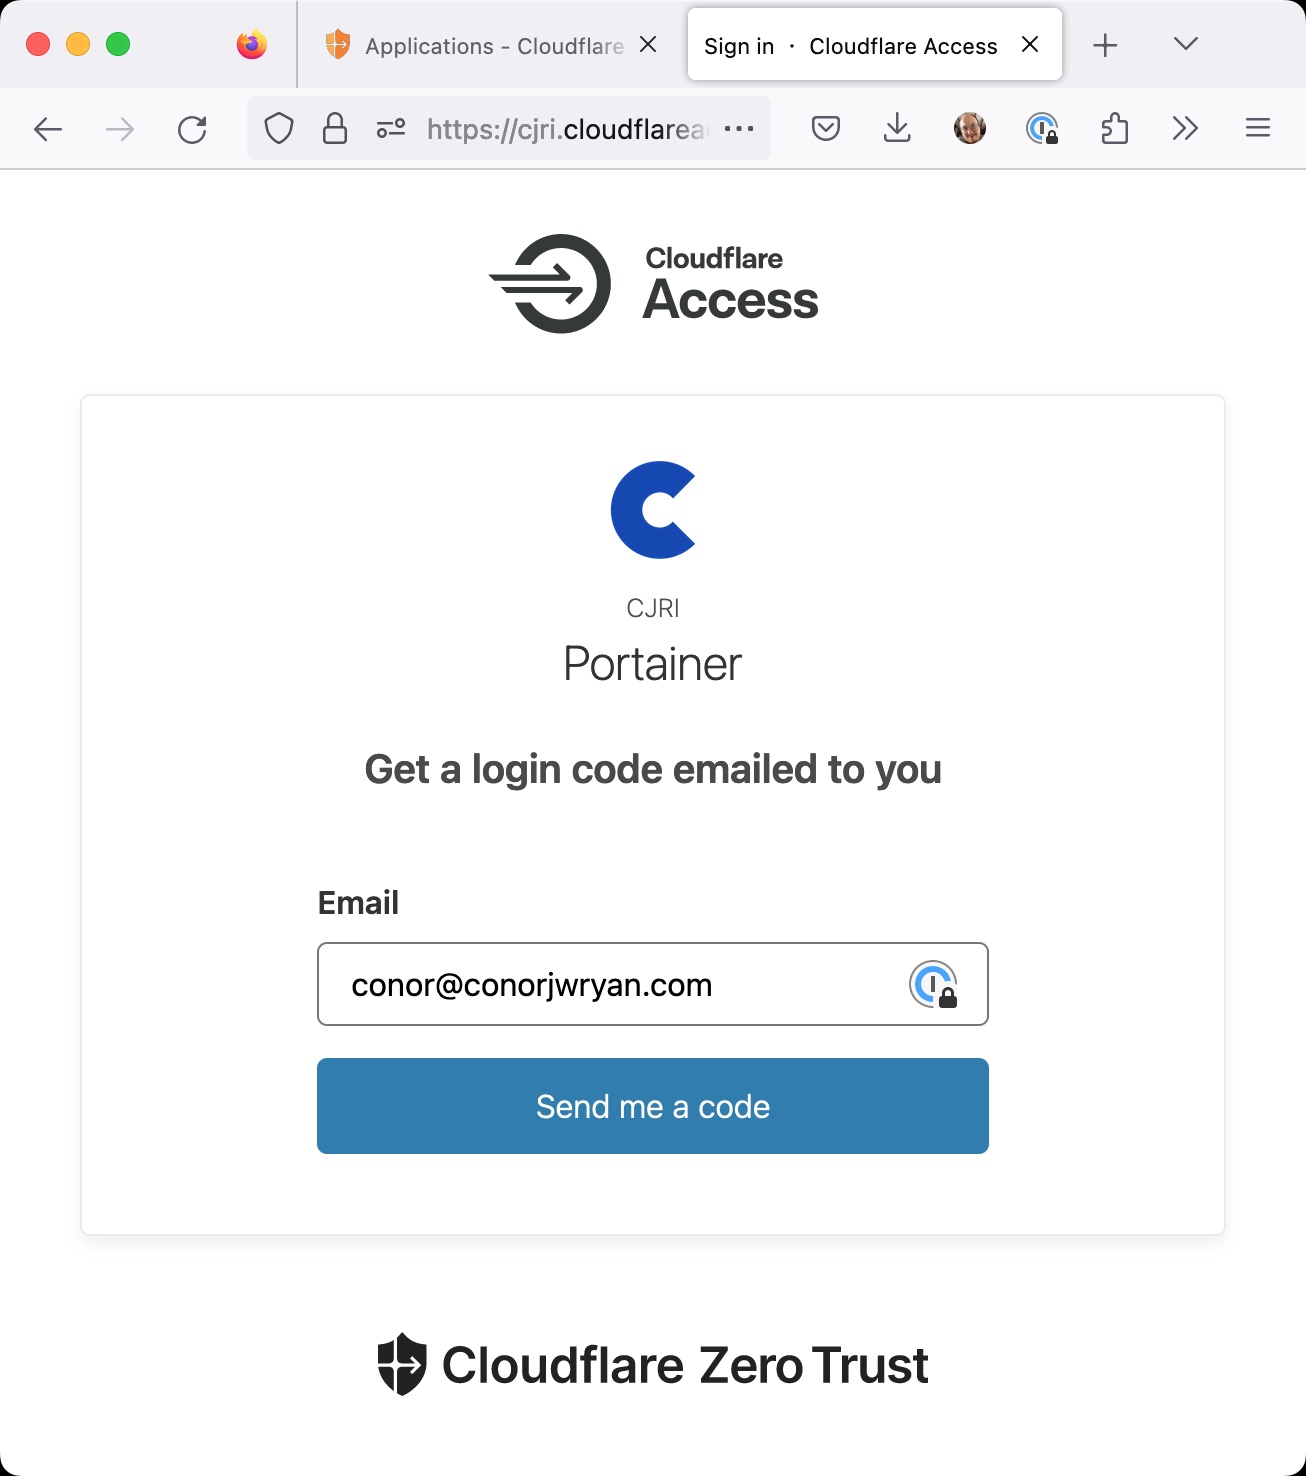
It works! Now we need to input our email and press Send me a code. Because we added our email to the Access Policy we should be able to get an email delivered to our inbox.
This email normally arrives in a few seconds but can take up to a minute. If you do not receive an email from Cloudflare check your Spam folder. Otherwise you have misconfigured your Access Policy.
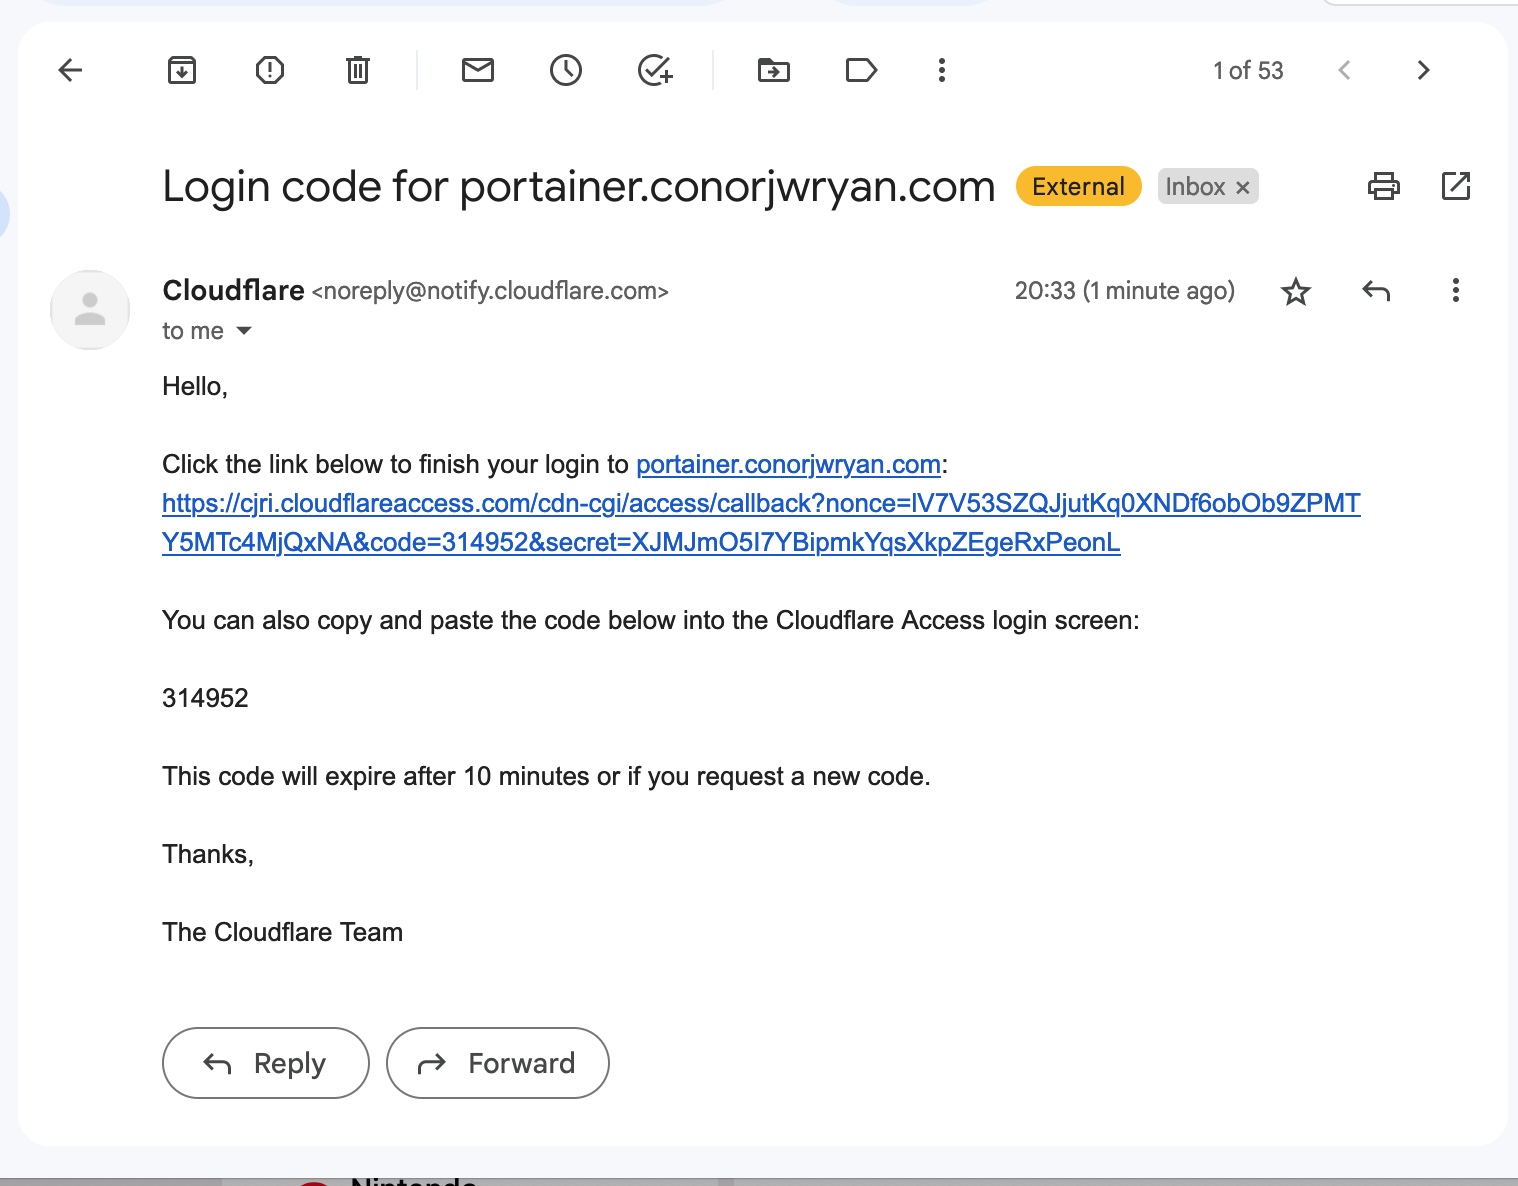
We have an email from Cloudflare, now we can click the link or type in the code.
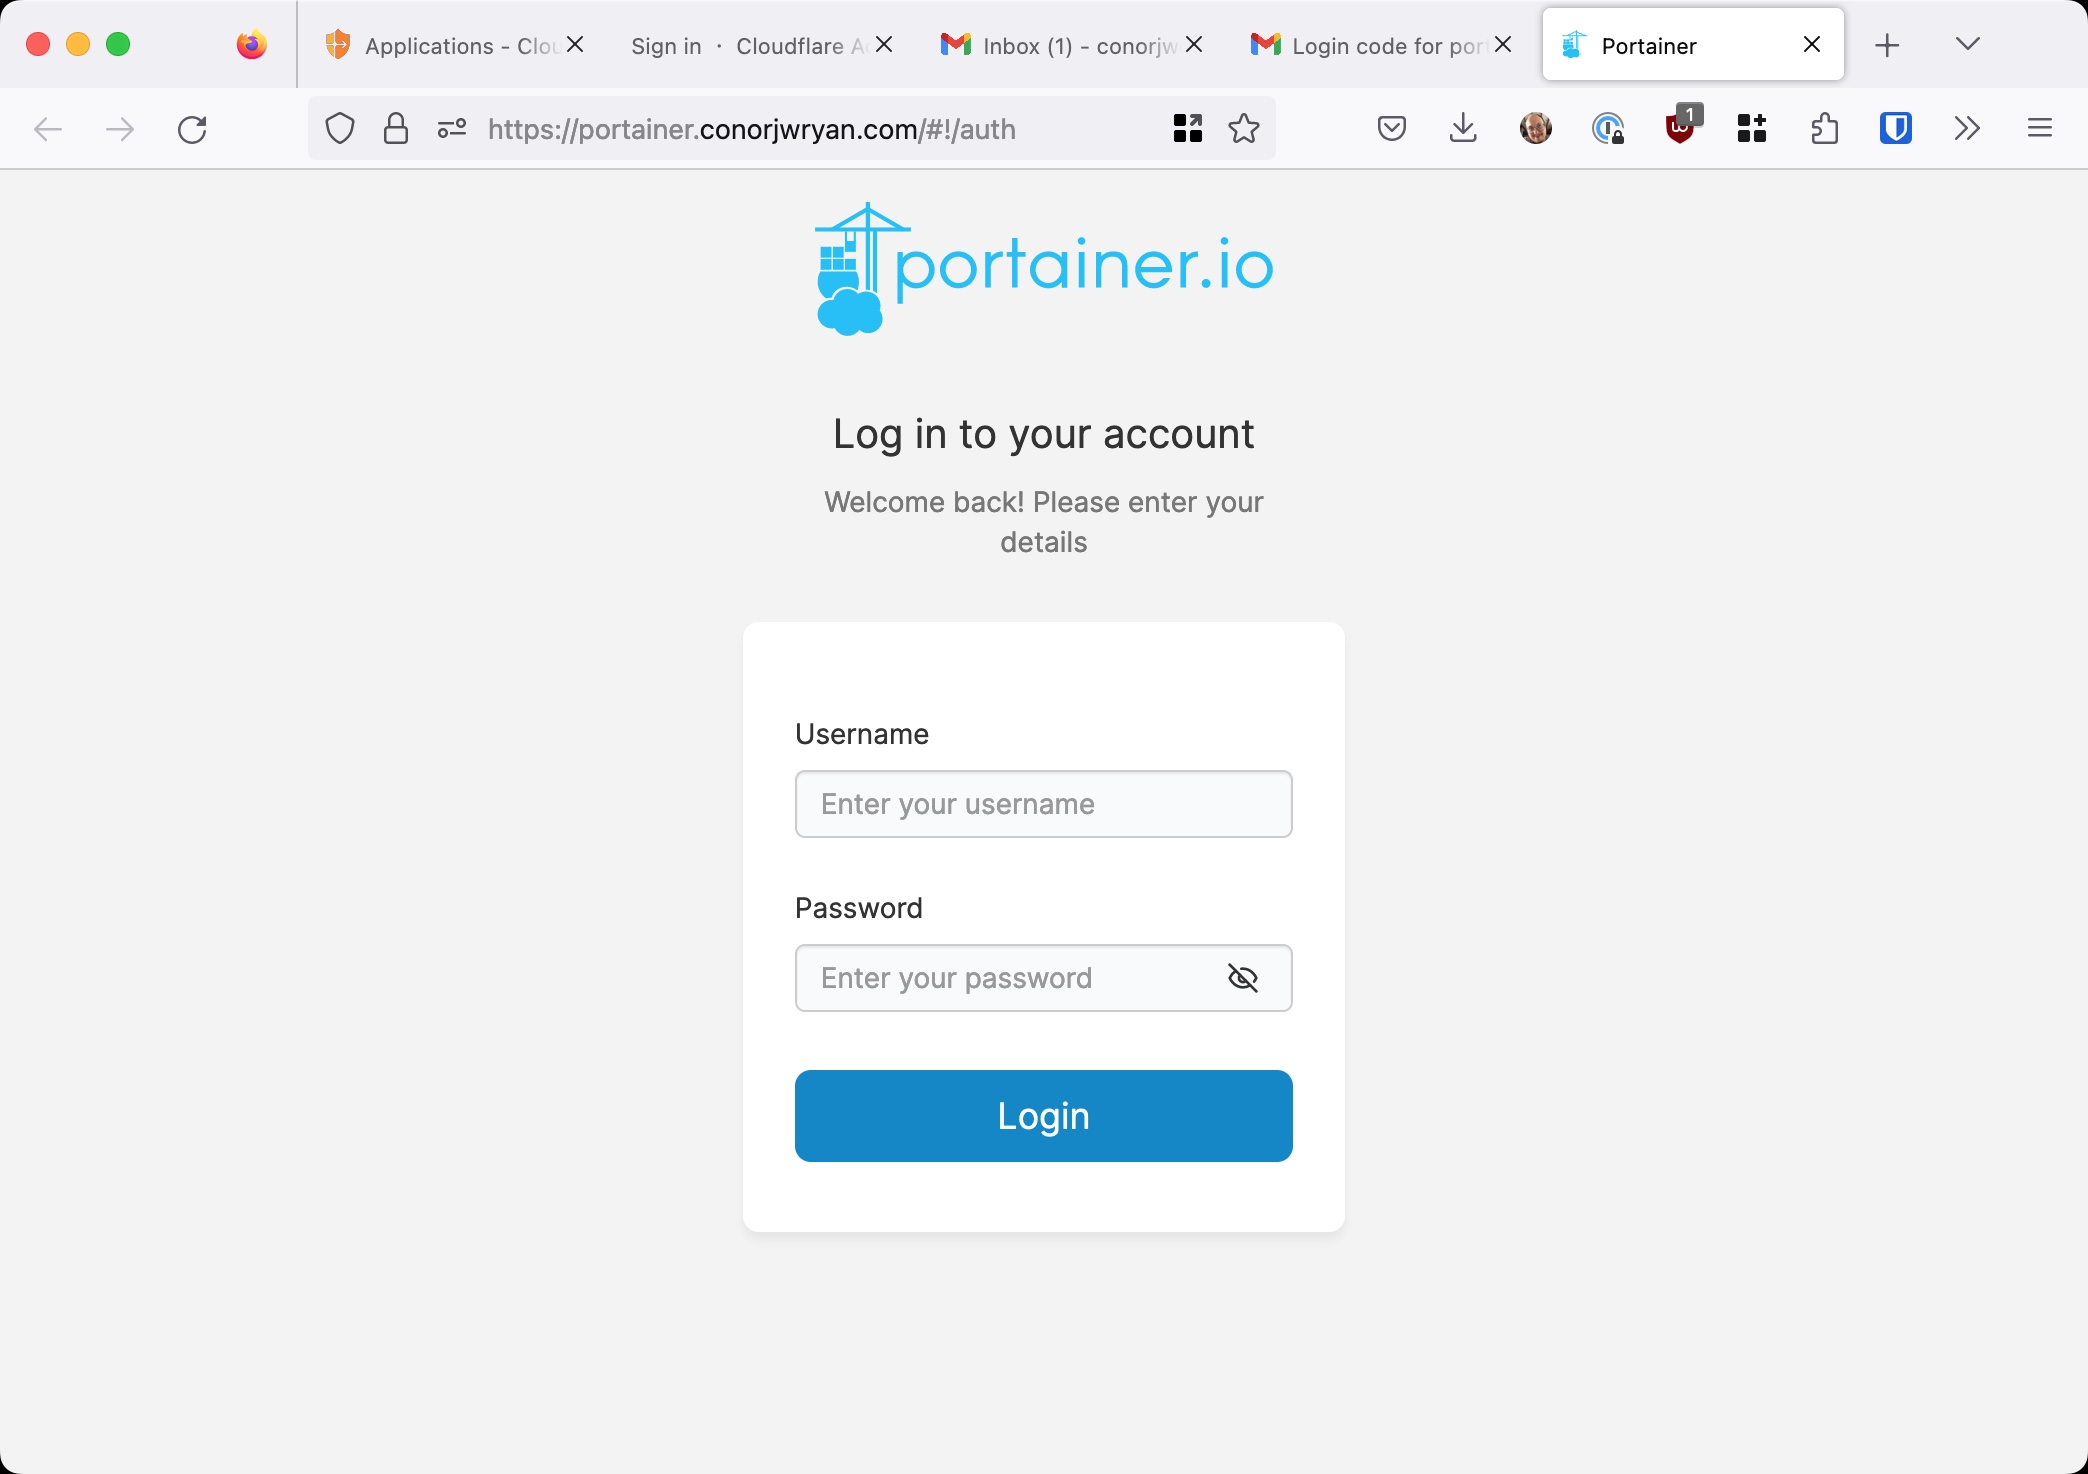
Success! We have correctly configured Cloudflare Access to protect our internal applications from the unauthorised people. Only those authorised can access the tool remotely. We can now do this to any number of tools / websites, we need to.
There is one more thing to consider, however the topic of HTTPS / SSL and secure connections to our Application.
Ensuring Connections are Secure (HTTPS)
As noted previously, while we have a secure connection between the client and Cloudflare Tunnel we do not have a secure connection between Cloudflare Tunnel and our Application. This is because we are using HTTP and not HTTPS.
Theoretically this leaves us vulnerable if someone was to intercept the connection between Cloudflare Tunnel and our Application. They could see the data being sent between the two and potentially steal sensitive information.
We can illustrate the problem by changing our Tunnel Public Hostname portainer.conorjwryan.com settings to use the secure port of our application (9443), from our current insecure port (9000).

If we then go onto portainer.conorjwryan.com we are greeted with the following error:
Our Application Portainer is now telling us that we are using an insecure connection to our secure connection. This is because we are using HTTP and not HTTPS.
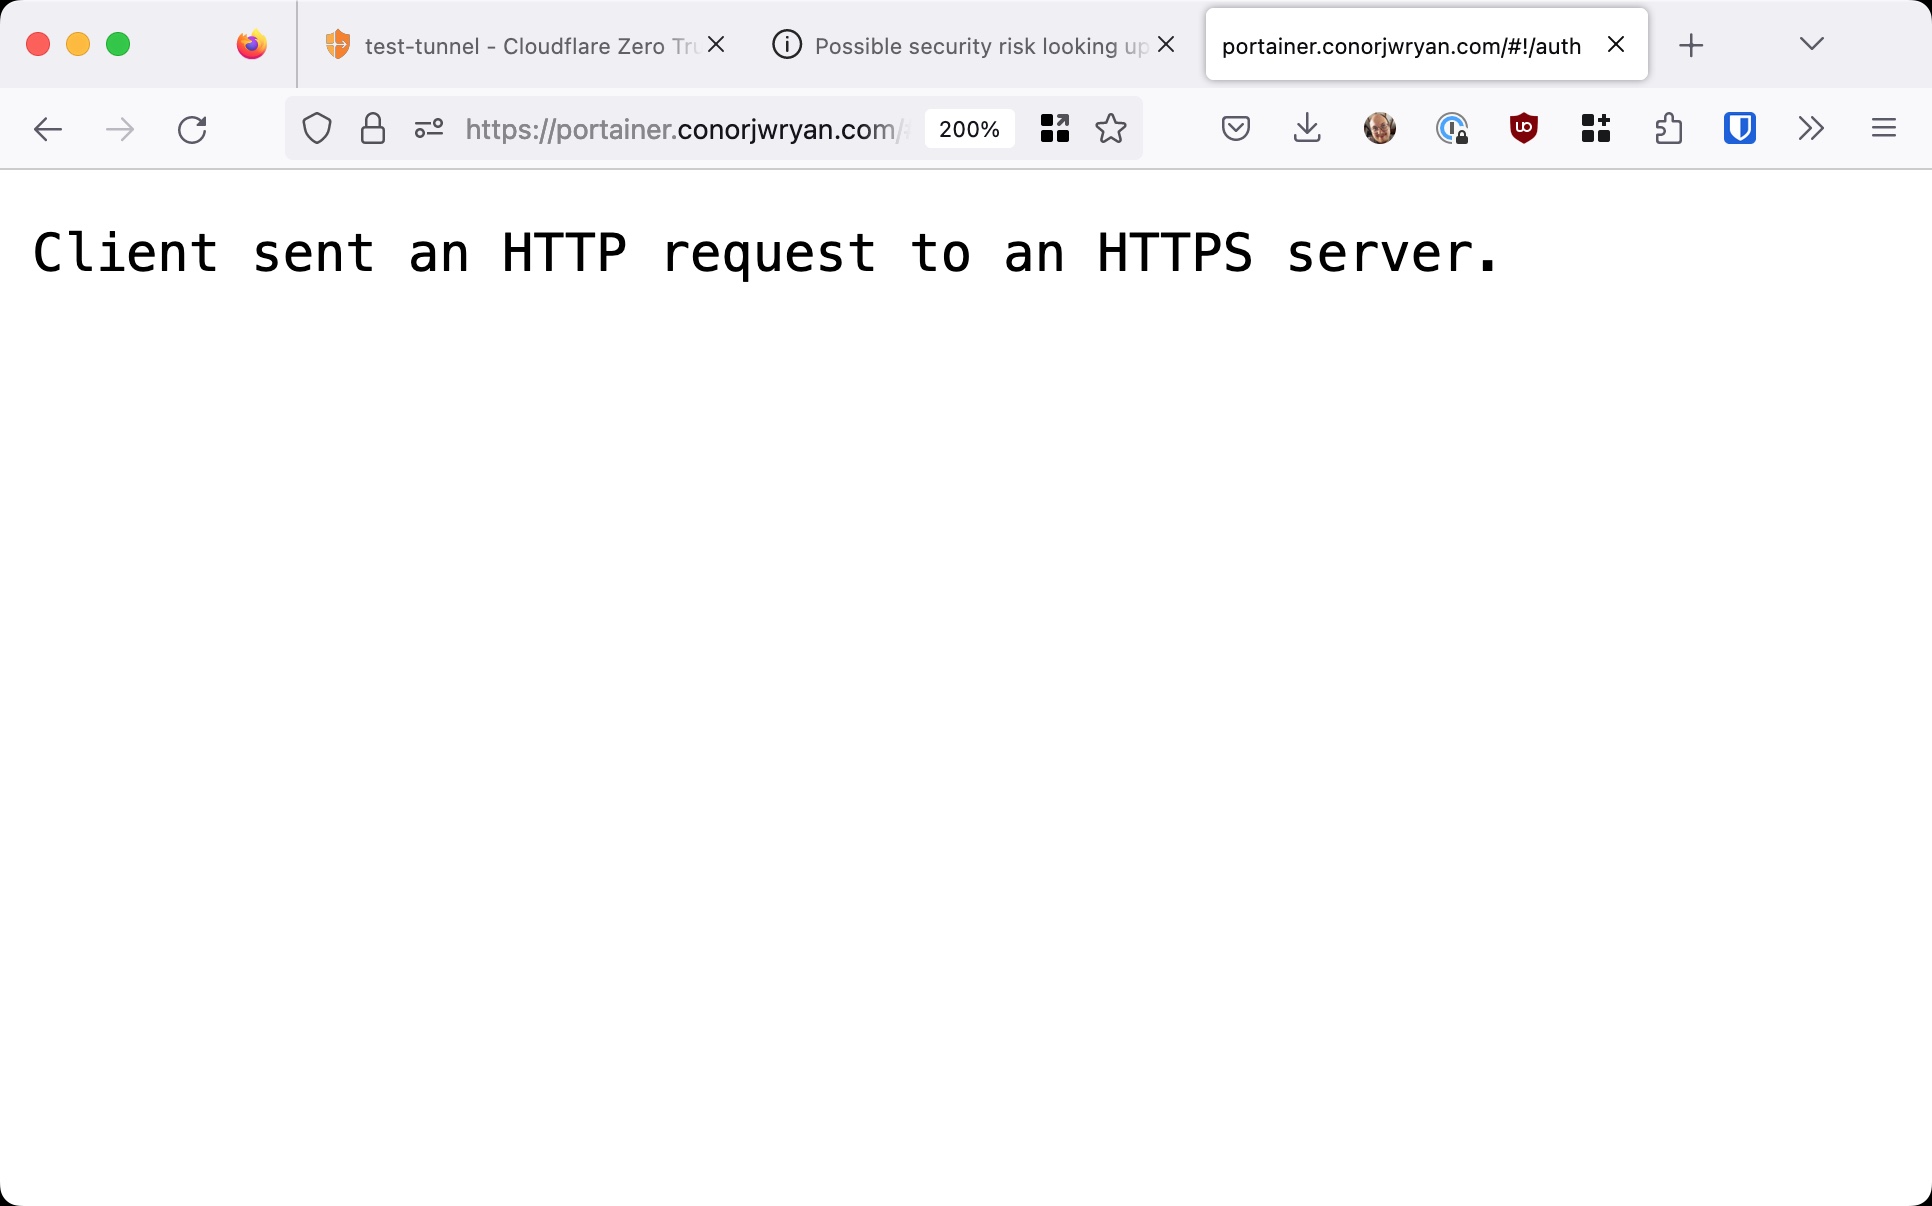
You might say this is a simple fix “We can fix this by changing the Service from HTTP to HTTPS, simple!” This would change our Tunnel connection from to our Application from http://localhost:9000 to https://localhost:9443.

However, if we do this we are greeted with the following error:
How do we fix this? We need to use a valid certificate. We can do this by using Cloudflare Origin Certificates.
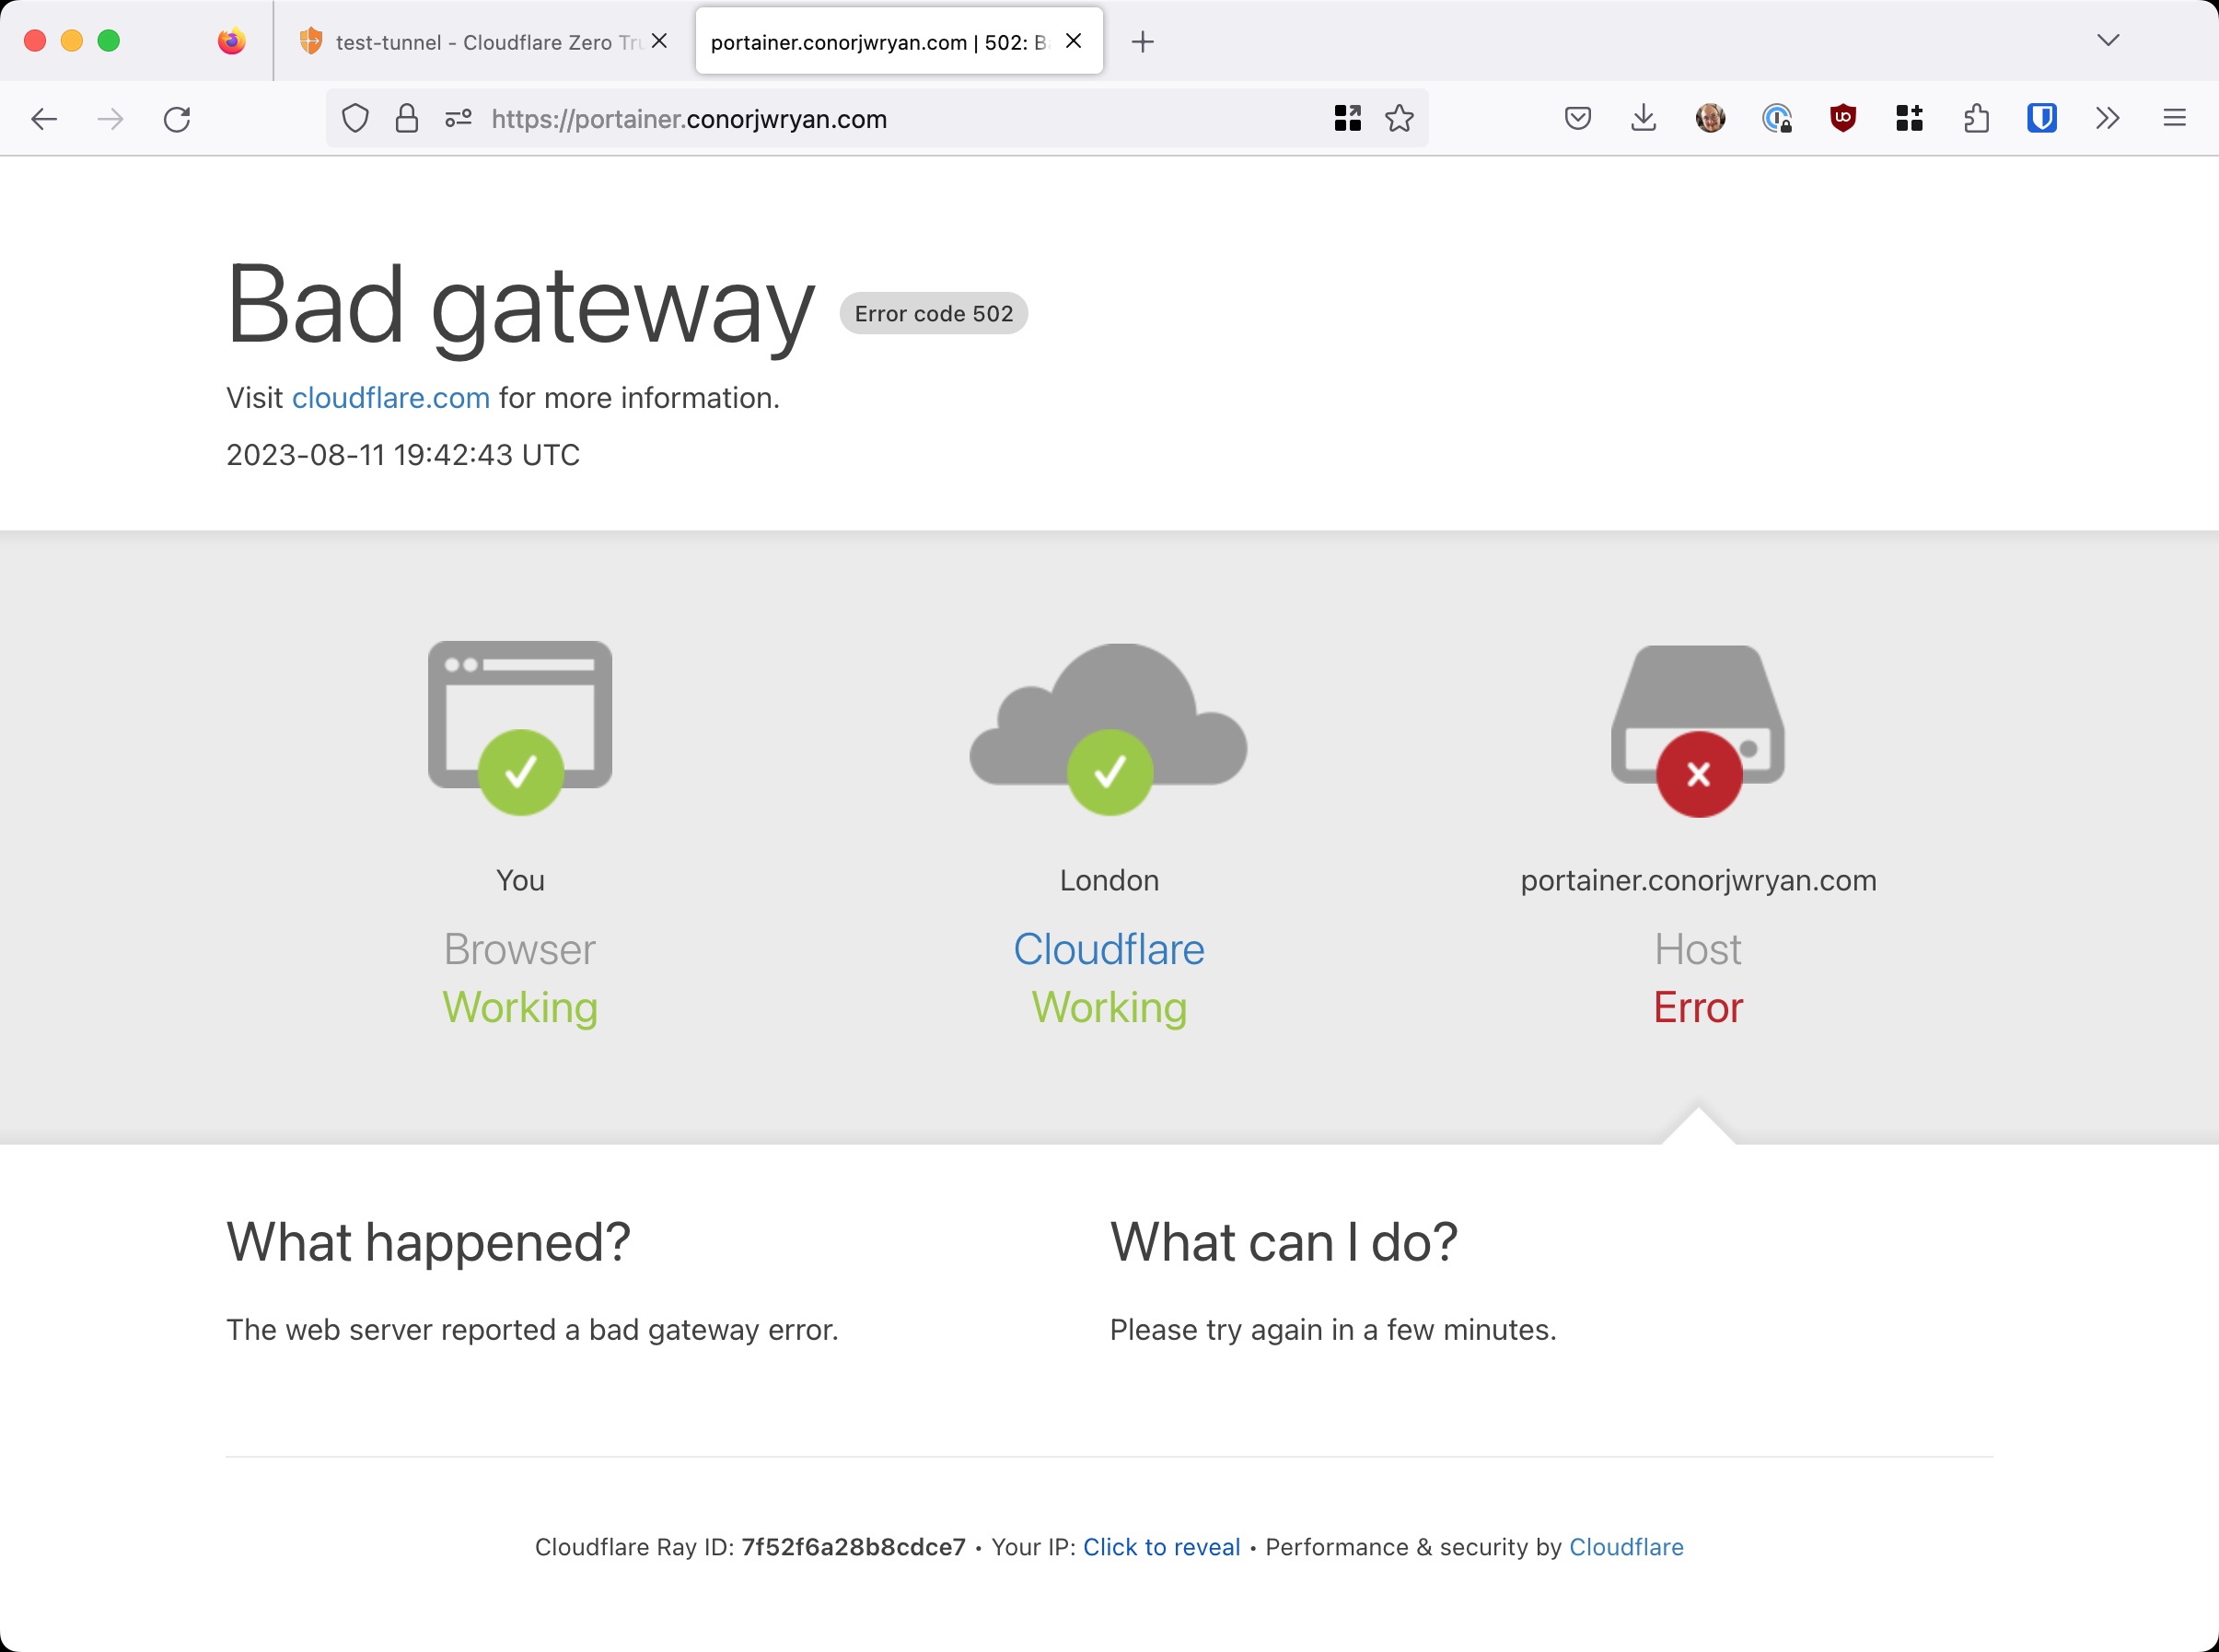
Error 502
We get this error because although we are connecting via HTTPS on a secure port (9443), there is no way that Cloudflare Tunnel can verify that connection. Our application Portainer has a self-signed certificate (created during installation) but this is not legitimate and Cloudflare shows the error as a precautionary measure as there is a high likelihood the connection is compromised / under attack.
This verification is done by the presence of an officially signed certificate for our domain that our Application uses to show the Cloudflare that the connection is legitimate and secure.
There are two ways we can approach this error: Ignore it or fix it.
Ignore 502 Error
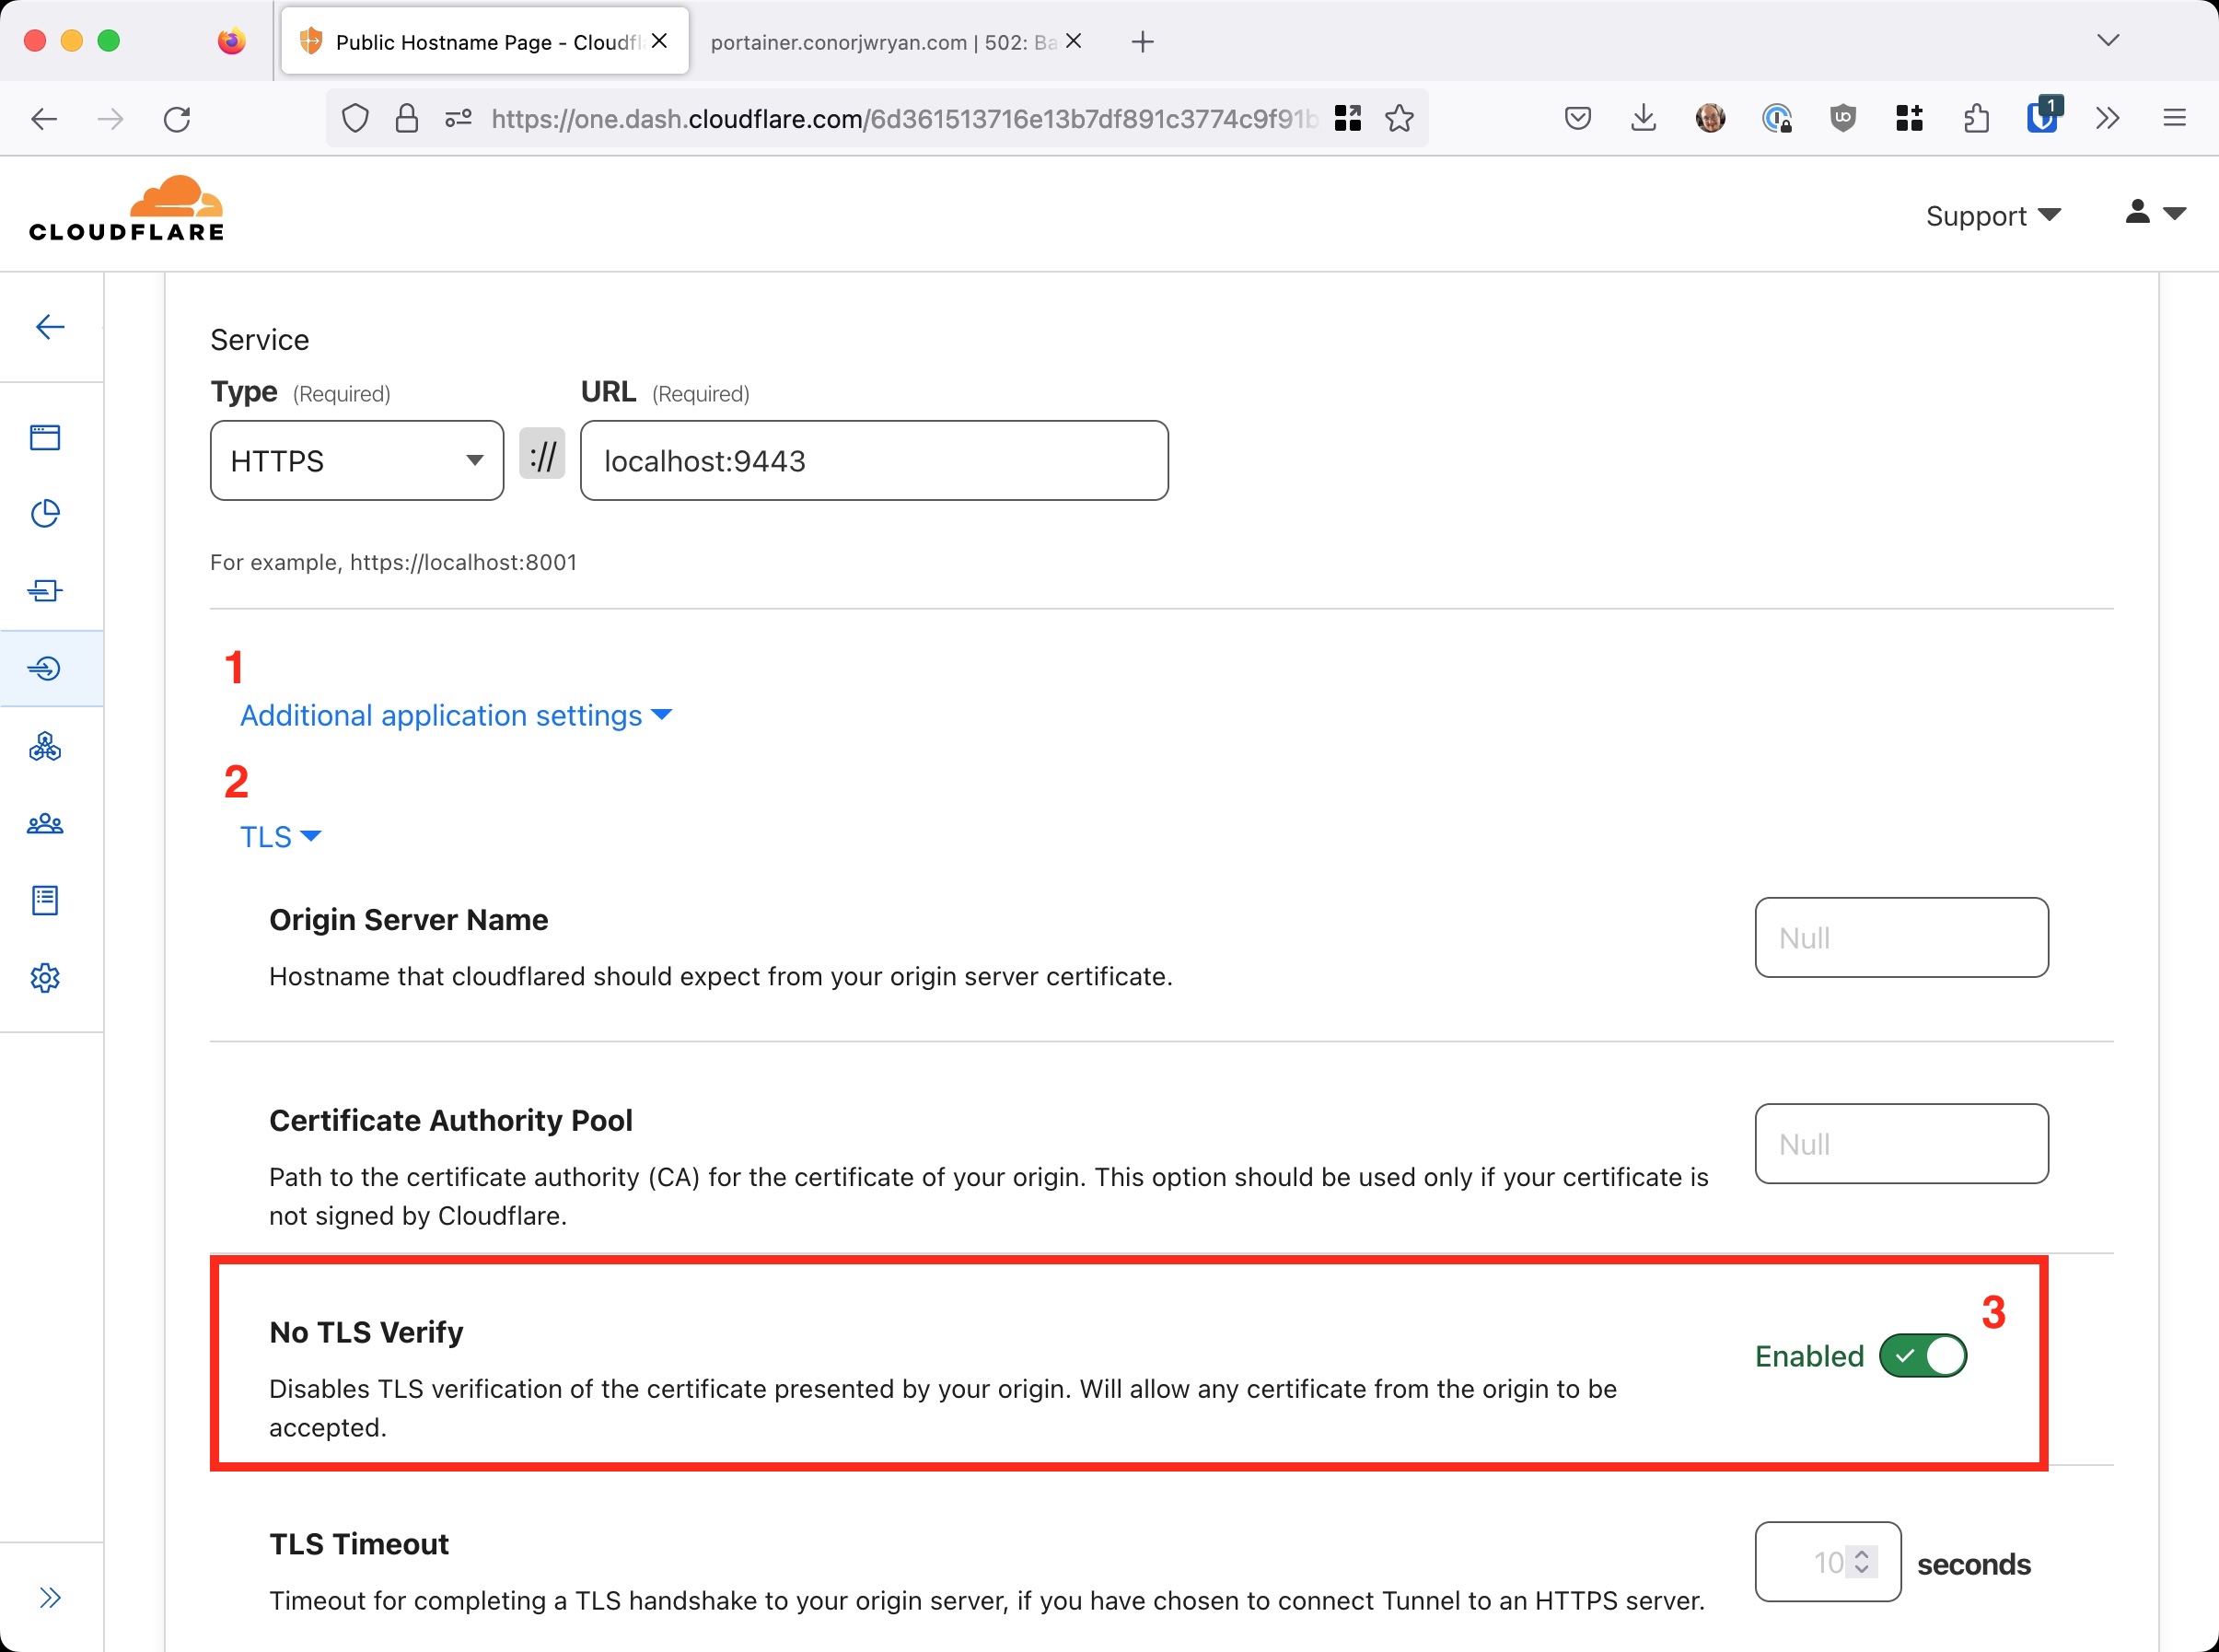
There is no way that we can ignore this error from the client side as it’s a security risk but we can tell Cloudflare Tunnel to ignore the error. This has to be done on the `Public Hostname Page`` settings for our tool.
Underneath where the Service is set there is the Advanced application settings section. Here we go to expand the TLS section. We then turn off can set the TLS Client Authentication to off. This will tell Cloudflare Tunnel to ignore the error and allow the connection to be made.
After we are finished we can press Save hostname in the bottom right of the page.
If we navigate to portainer.conorjwryan.com we see that we can use the site as normal:
It works, the 502 Error is now gone. This again does not mean our Application is fully secure but that we have chosen to ignore the message, our users won’t know any different.
This is not recommended as it leaves our connection vulnerable to attack. Use this at your own risk or only during development, never in production.
In order to fully fix this error we need to use a valid certificate. We can do this by using Cloudflare Origin Certificates.
Proper Configuration of Application HTTPS/TLS Connections
To truly fix this error we need to get the application to present the right certificate to the Cloudflare Tunnel so that it can verify the connection is secure. Each application has a different way of doing this, either it is done during setup of the container/image/configuration file or it is done after the face in the web interface.
In this specific case I am going to show you how to do this with Portainer via the web interface.
Other applications will have different ways of doing this but the principle is the same.
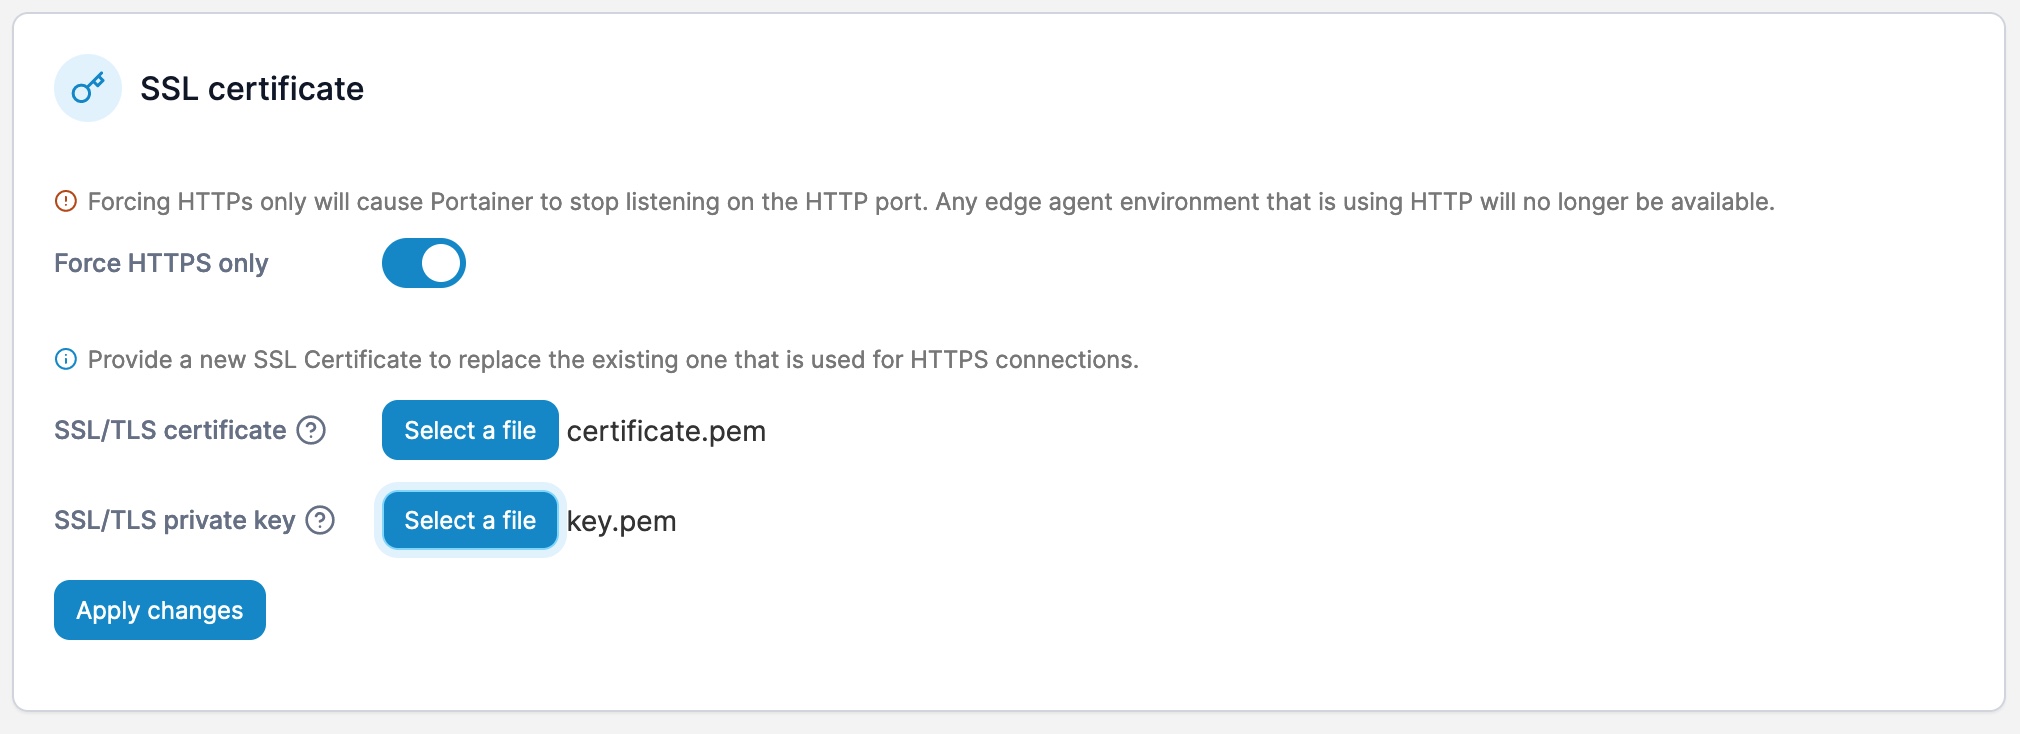
Navigating to the application portainer.conorjwryan.com and logging we need to go to Settings. In the case of Portainer this is on the left-side menu. We scroll down the page until we find the SSL certificate section:
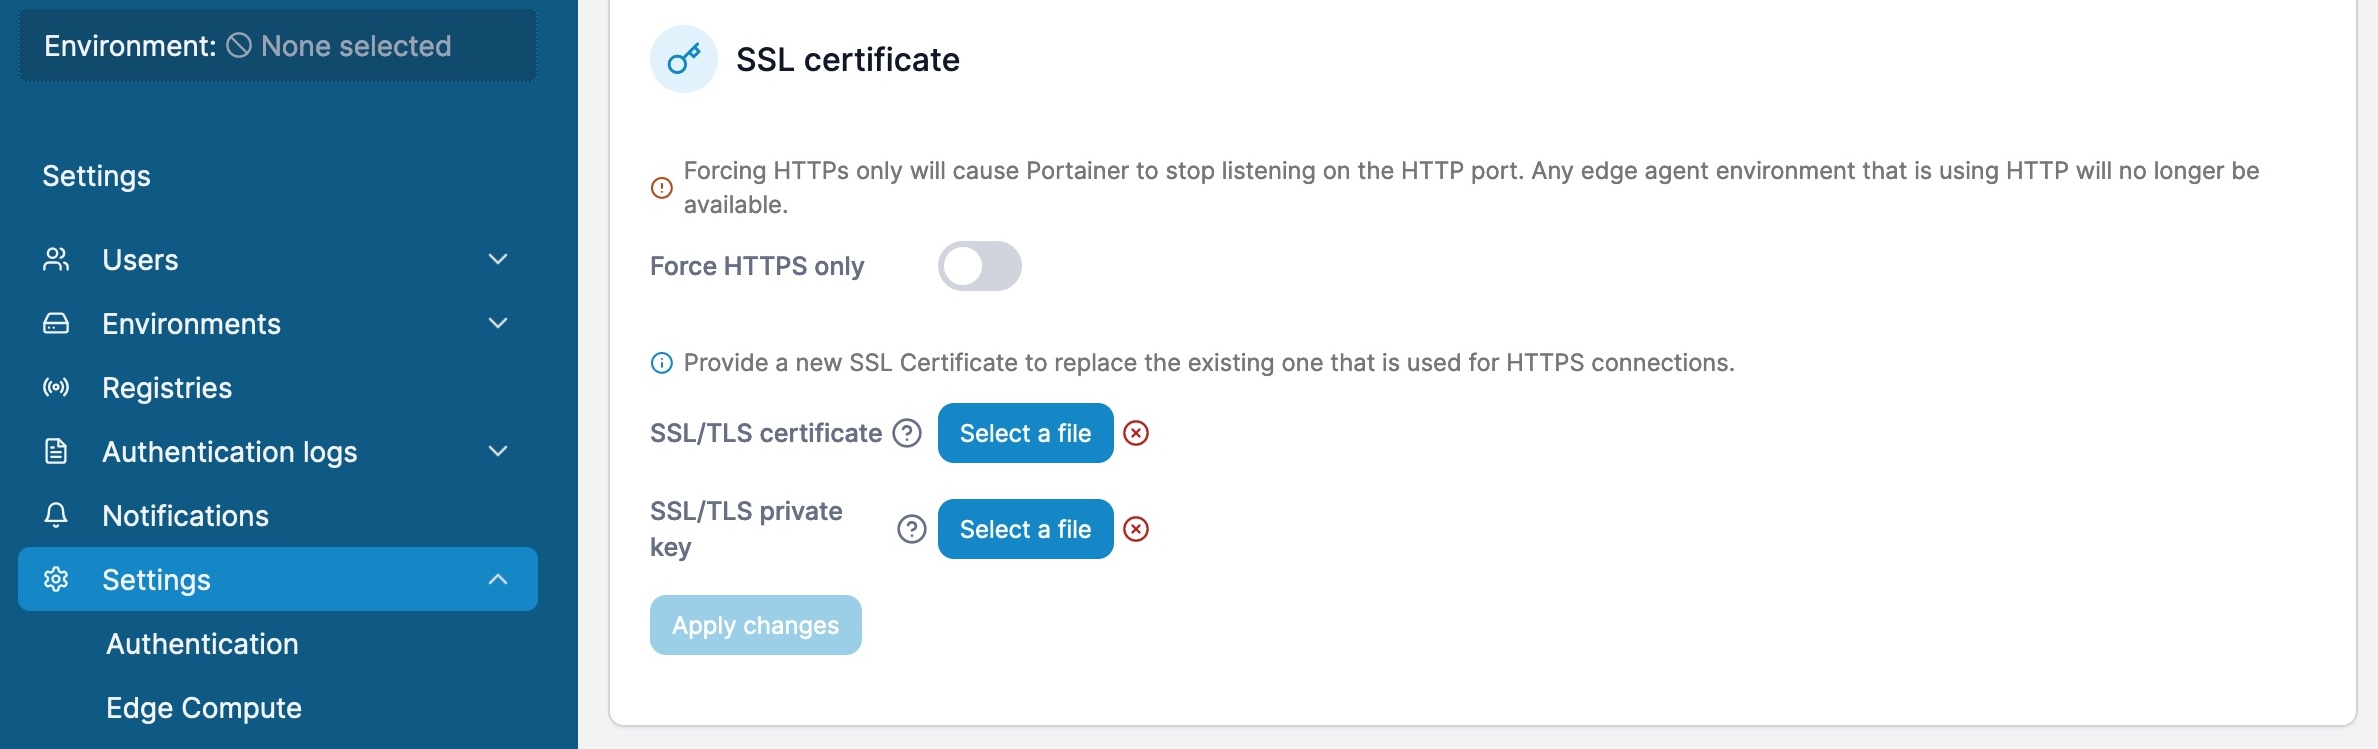
As seen from the image above we need two files in oder for our Application to work with Cloudflare Tunnel:
An SSL Certificate and an SSL Key.
We can get these from Cloudflare they are called Origin Certificates.
First, we need to navigate back to our main Cloudflare Dashboard:
|
|
Once we are there we need to click on our domain, or Zone (as they are called in Cloudflare):
In my case I select conorjwryan.com:
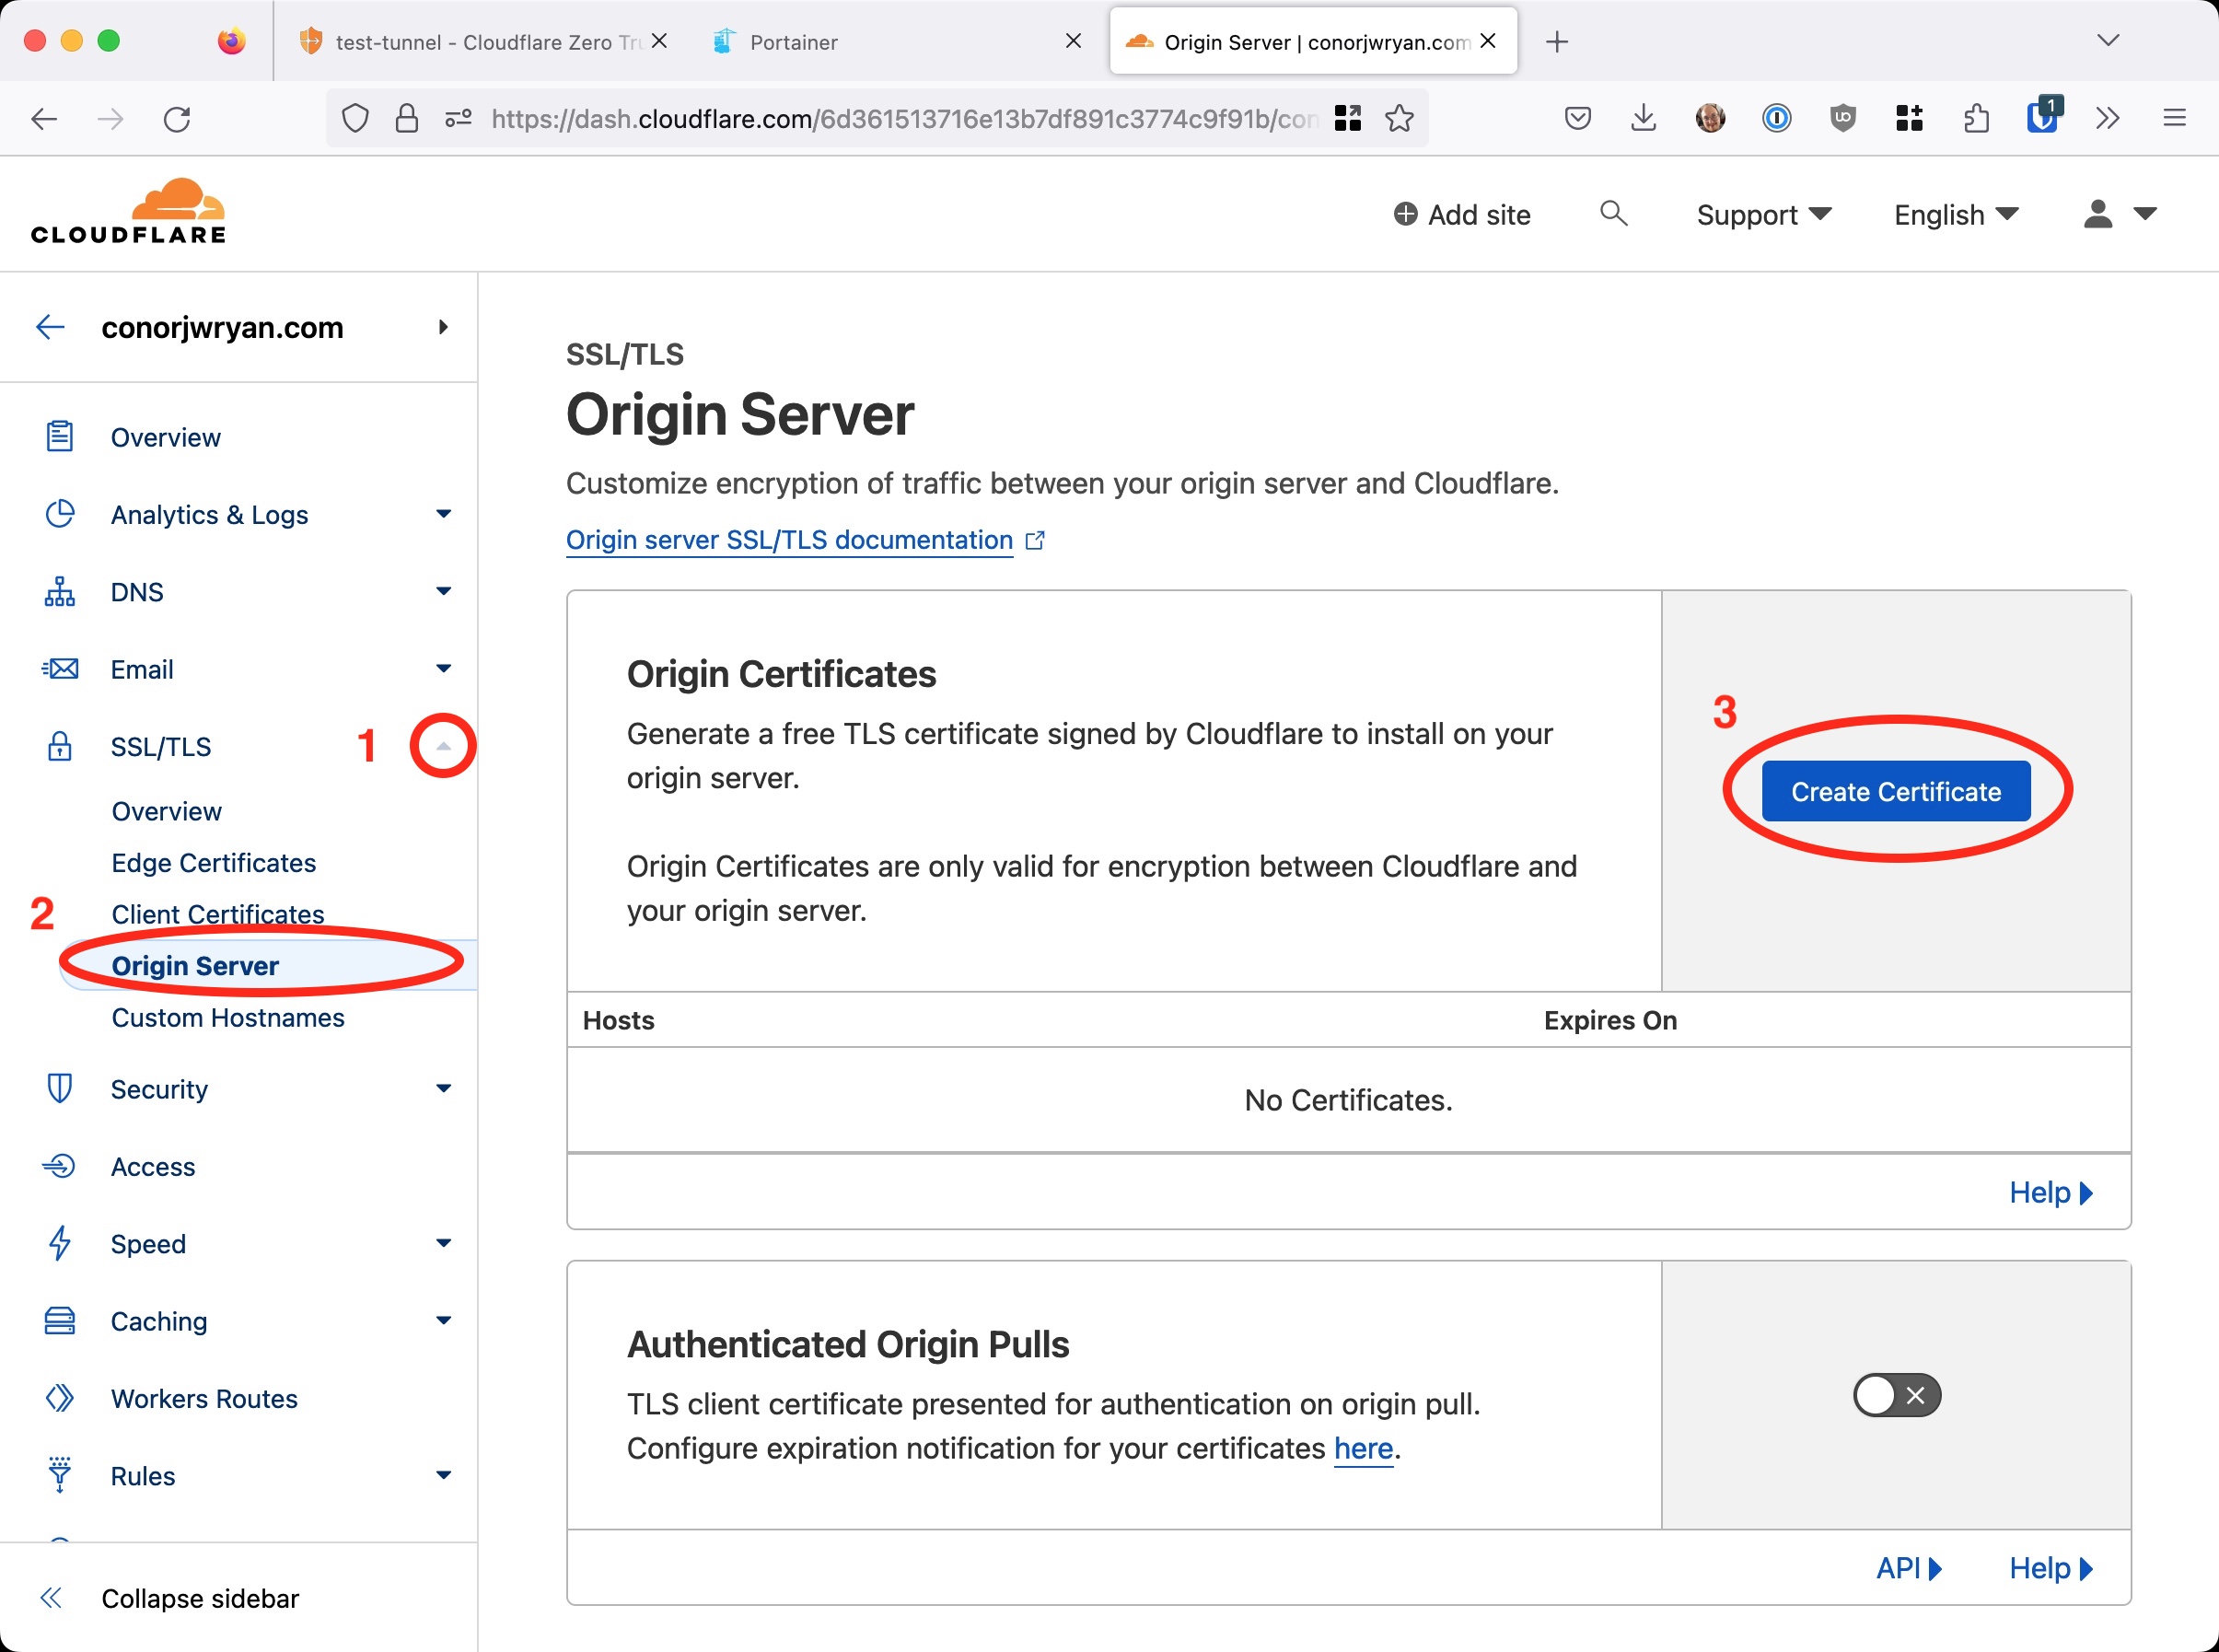
From there we need to go to the SSL/TLS section in the left-hand menu. From there we need to go to the Origin Server section and click Create Certificate:
From there we need to fill out the form:
We need to make sure the Generate private key and CSR with Cloudflare is selected. We also need to make sure that the Private key format is set to RSA (2048).
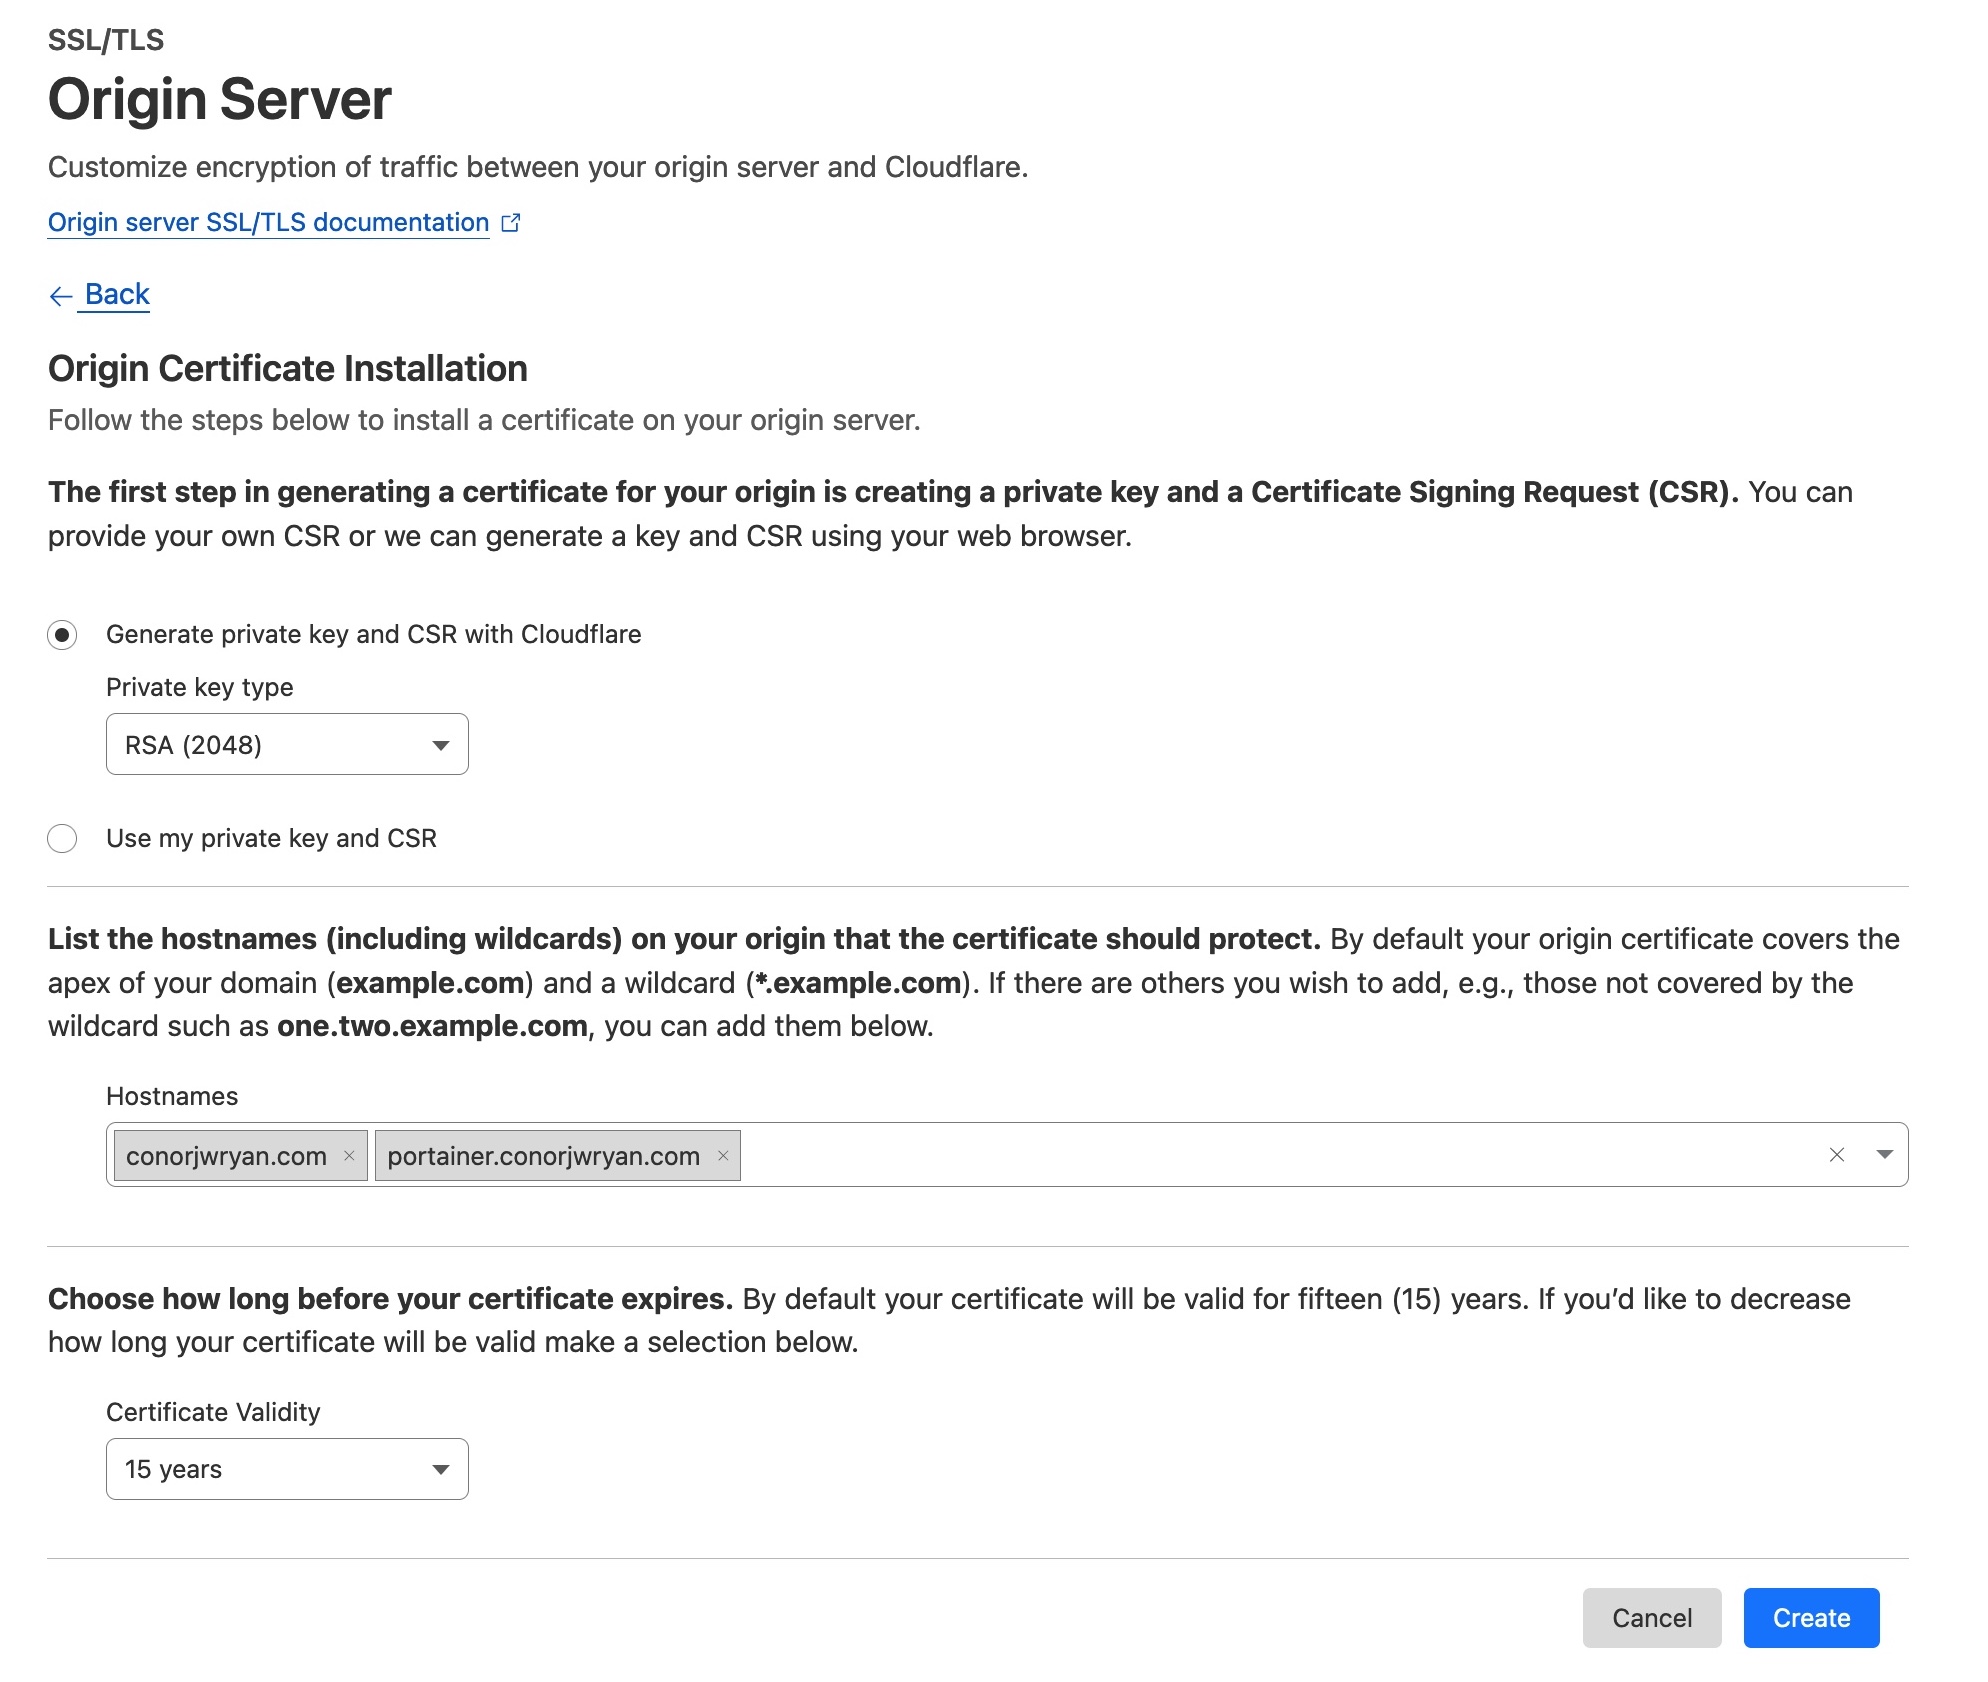
For the list of hostnames we need to add the apex domain and the subdomain we are using for our Application:
If you are using a different subdomain you need to add that instead of portainer.conorjwryan.com.
While the default use of the wildcard domain *.conorjwryan.com would work, it is not recommended as it is less secure and it is harder to differentiate in the list on the dashboard.
15 years is the default certificate validity and is fine for our purposes.
Press Create and you’ll be directed to the following page:
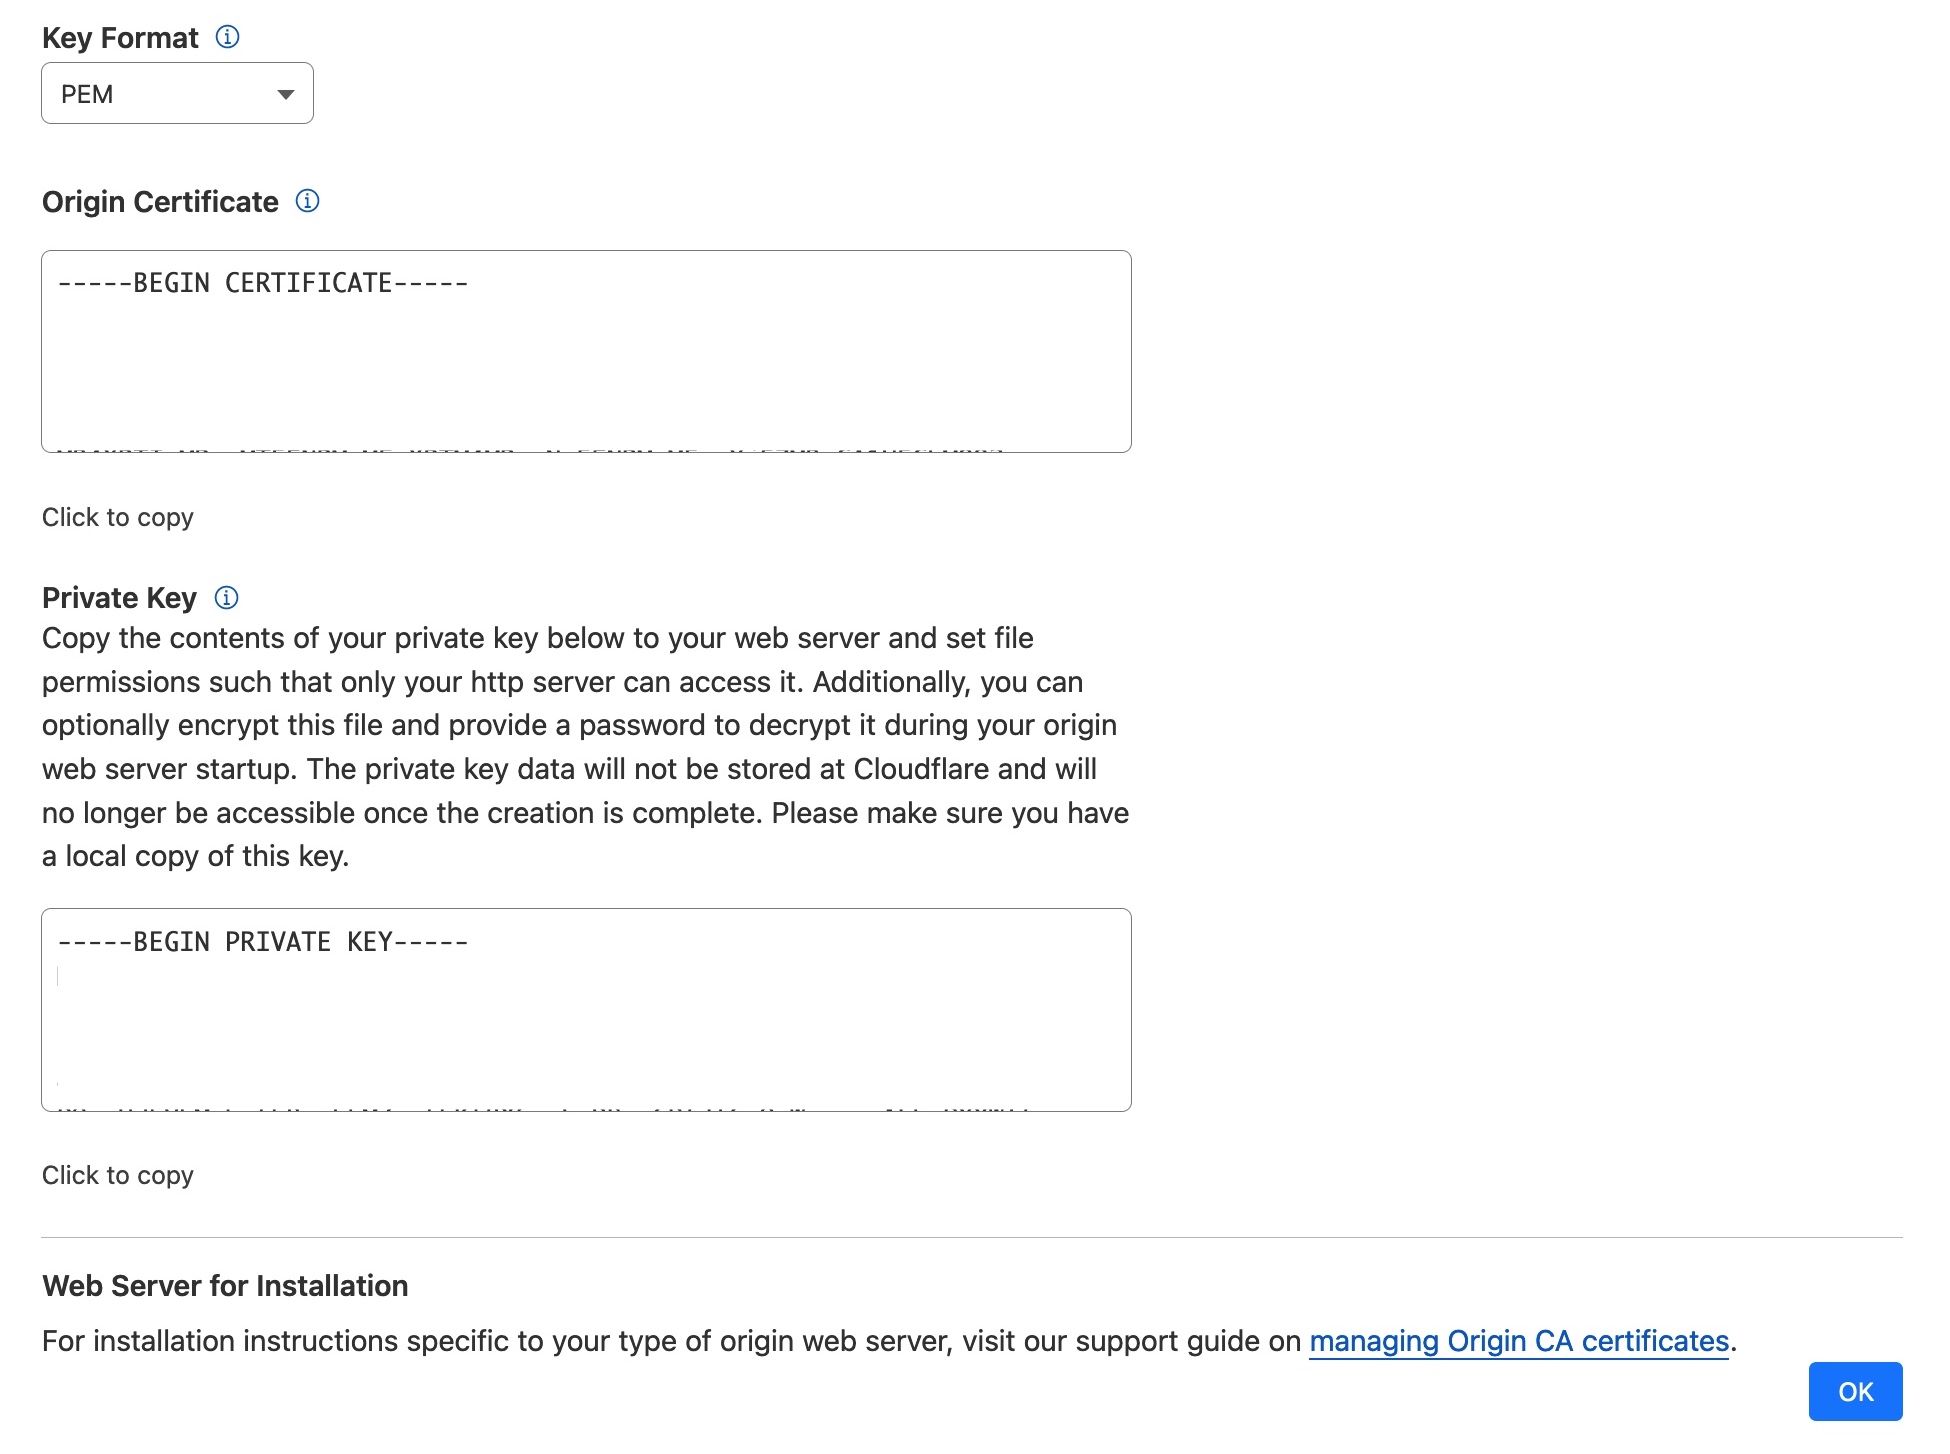
We need to copy the Private Key and the Origin Certificate into separate files. You can use the Copy to clipboard button to copy the certificates into a text editor like notepad, test editor, or nano.
Make sure you copy the Private Key and the Origin Certificate into separate files
Once we have the Private Key and the Origin Certificate we need to go back to our Application web interface and add the files to the correct fields like so:
Now we can press Save and now we can go back to our Cloudflare Tunnel and turn off the No TLS Verify option:
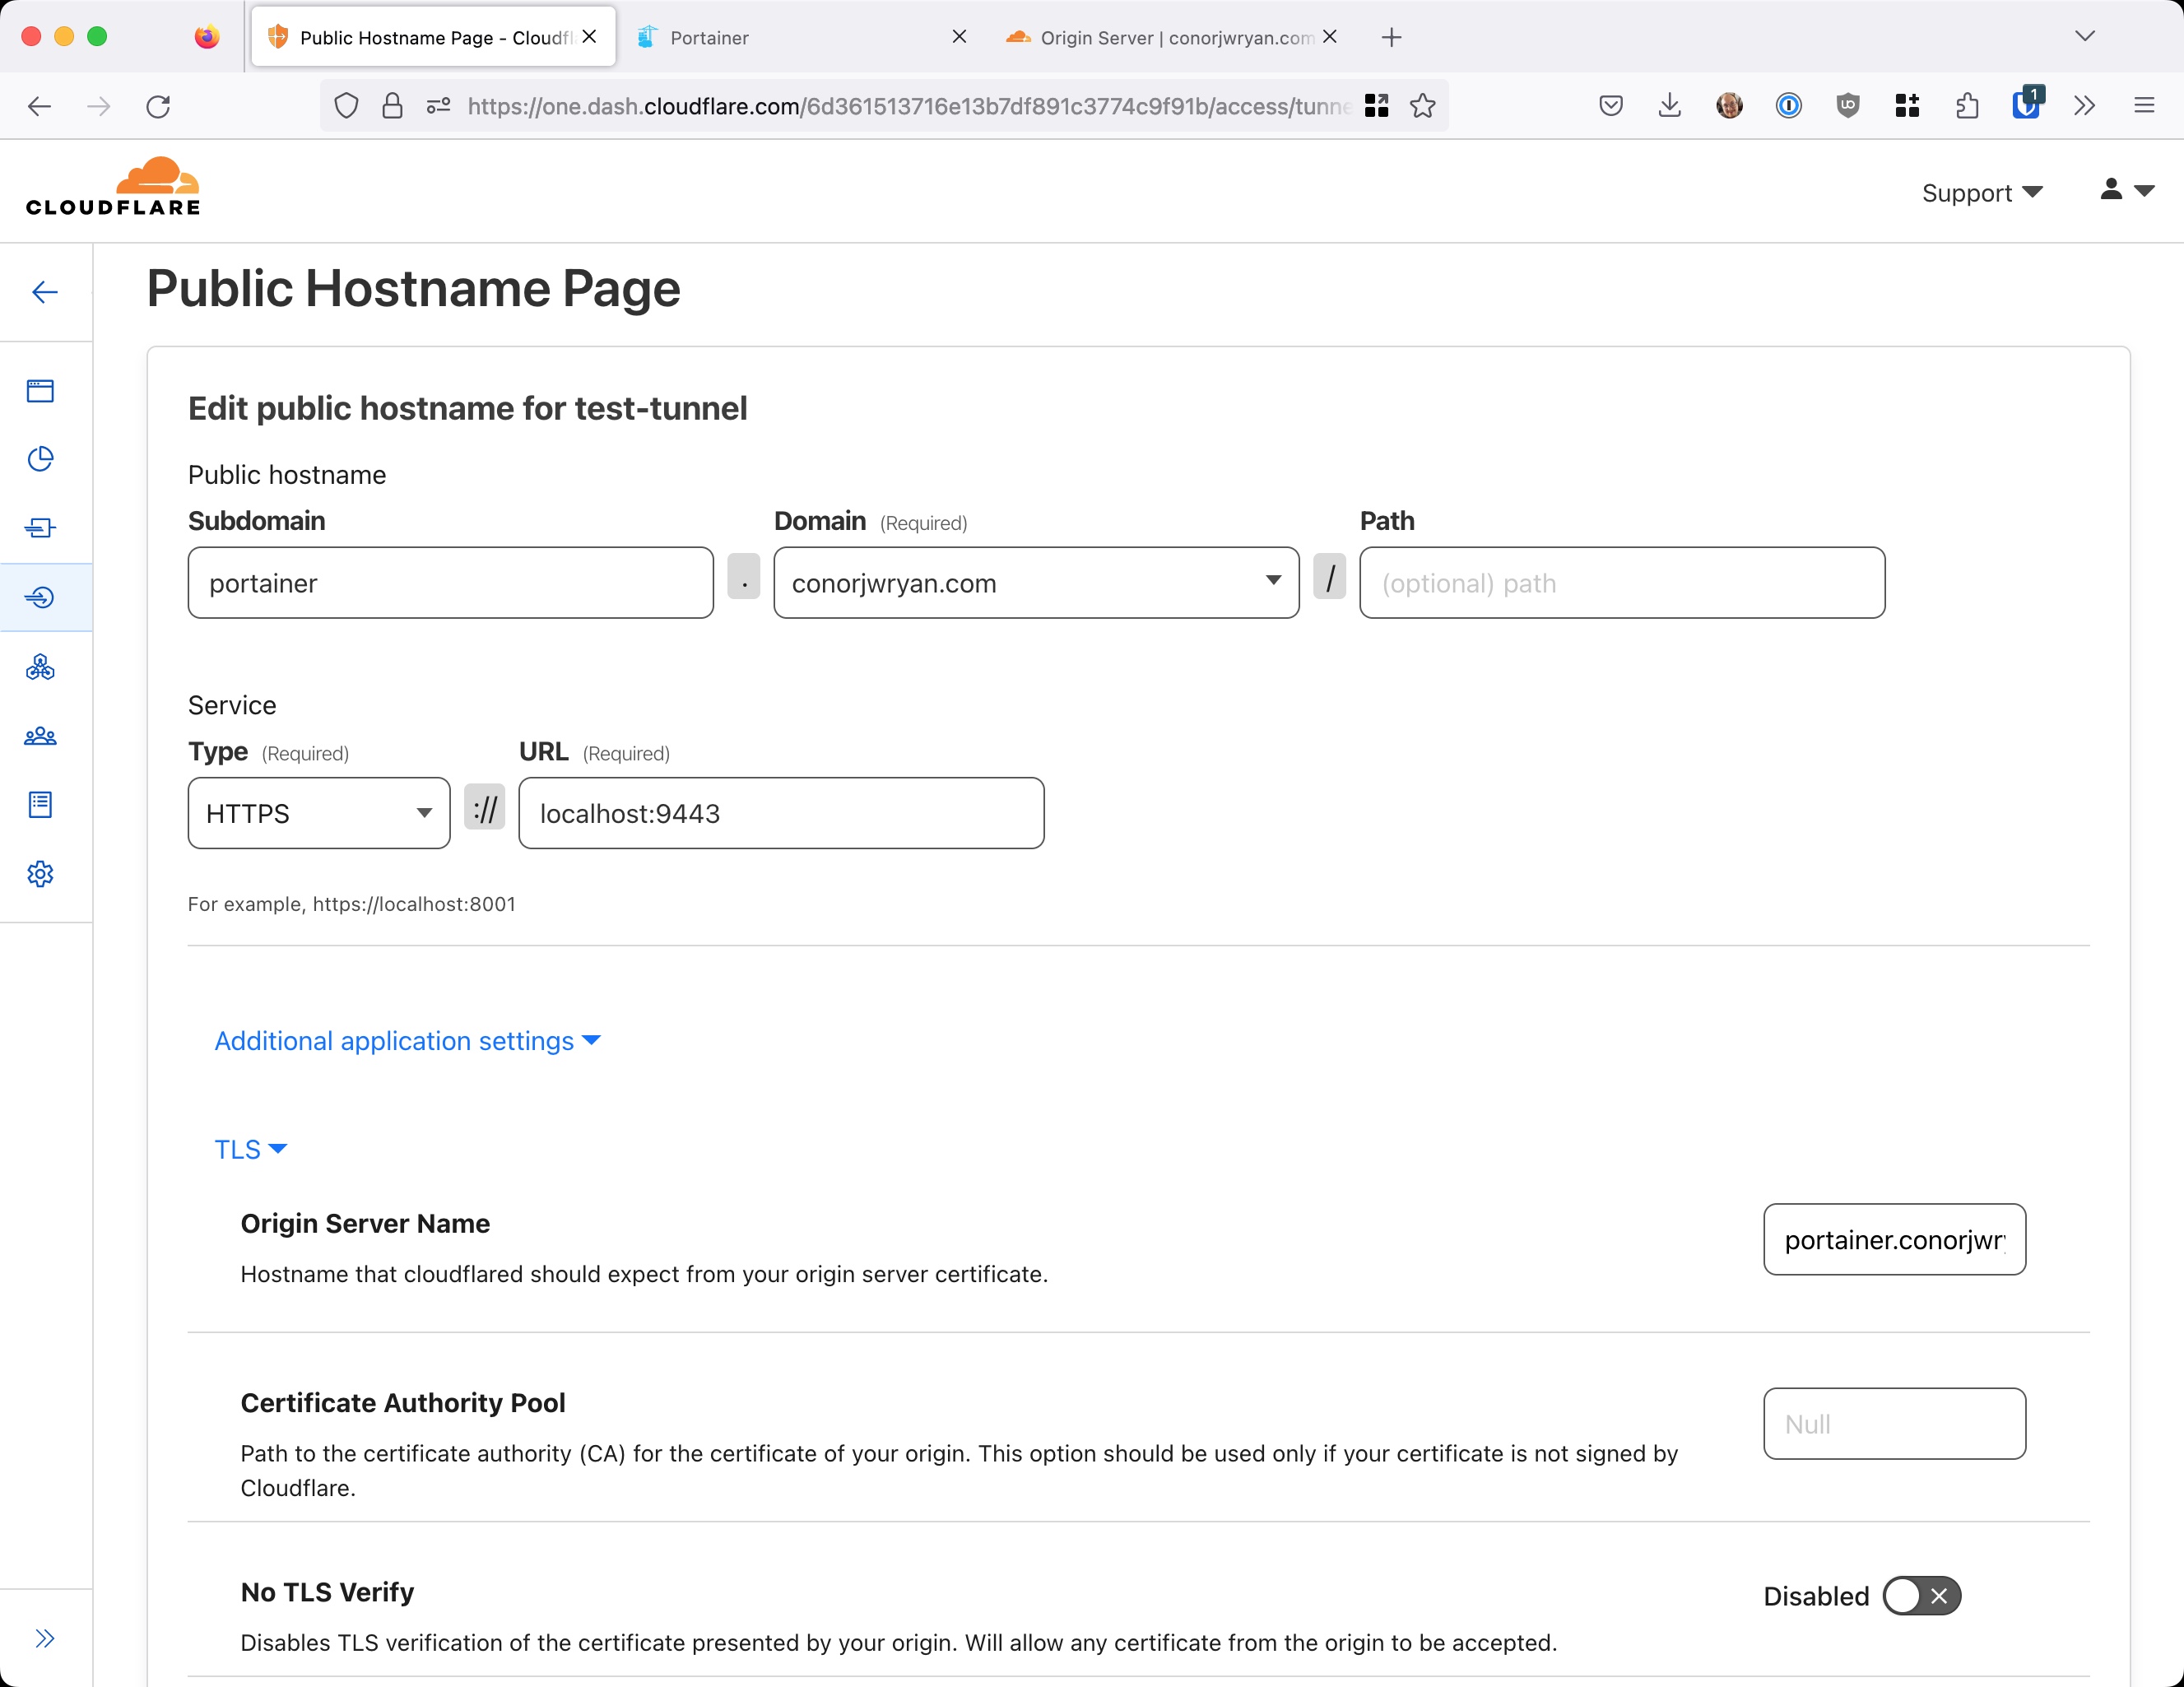
We also need to add the subdomain of our Application to the Origin Server Name field. In my case I put portainer.conorjwryan.com.
We go back to our web browser and refresh the page:

Conclusion
During this tutorial we have learned how to use Cloudflare Tunnel to expose a local Docker container to the internet securely. We have learned how do this specifically with internal tools such as Portainer, which require Cloudflare Access to be configured to allow only authorised people access to the application.
We have also learned how to use Cloudflare to generate Origin Certificates for our Application in order to use a secure HTTPS connection and stop the 502 Error from occurring. Using the lessons learned in this post you can safely and securely expose your containerised applications to the internet.
Until next time,
Conor