What is Ara Dockerised WordPress?
Ara Dockerised WordPress, also known as Project Ara, is a docker-compose based project file that allows you to quickly and easily set up a WordPress site with SSL certificate through a reverse proxy. It is designed to take as much of the work out of setting up a WordPress site as possible.
It is based on the official Docker images for WordPress and MariaDB and is designed to work with Cloudflare Tunnel (a reverse proxy). Find out more about the project here and the source code here
Why Use Project Ara?
I created Project Ara to make my life easier. In my work I often needed to set up WordPress sites for clients and I found that the process was often time consuming and repetitive. I wanted to create a way to automate the process as much as possible. To that end, I based the project on the official Docker Images for WordPress and MariaDB (for architecture compatibility) and added a few extra features to make it easier to use.
Do I have to use Cloudflare?
No. You can use any reverse proxy you like. I use Cloudflare because it is free and easy to set up. I also use it for my DNS so it makes sense to use it for my reverse proxy as well. If you want to use a different reverse proxy like NPM go ahead. The critical thing is that you have a reverse proxy that can handle SSL certificates.
Prerequisites
To use this project you will need:
- A Server with Docker and Git installed (Digital Ocean is a good option - at least 1GB / $6 per month or to test you can test on a Raspberry Pi)
- A Domain Name
- A Cloudflare Account
- A Reverse Proxy (Using Cloudflare Tunnel is recommended)
Make sure you have an idea of what the domain / subdomain is going to be for your site and prepare your ssl certificates for your server.
In this tutorial I will be setting up test.conorjwryan.com as the name of my site. I will also be using Cloudflare Tunnel as my reverse proxy.
Helpful Tutorials
- My tutorial on how to set up Cloudflare Tunnel can be found here
- Configure swap space on Ubuntu 22.04 here
- If you are not familiar with the
nanotext editor you can find a guide on how to use it here
Installation Steps
Before you Begin (Obtaining SSL Origin Certificates - Cloudflare Tunnel Specific)
Because I am using Cloudflare Tunnel to act as a reverse proxy for my site I need an SSL certificate for the connection between my server and the Cloudflare Network (Cloudflare takes care of the SSL certificate between the client and the Cloudflare Network).
If you are not using this stage you can skip this step but remember that you will need to obtain an SSL certificate for your site and configure for use later in the tutorial in order for your site to work.
-
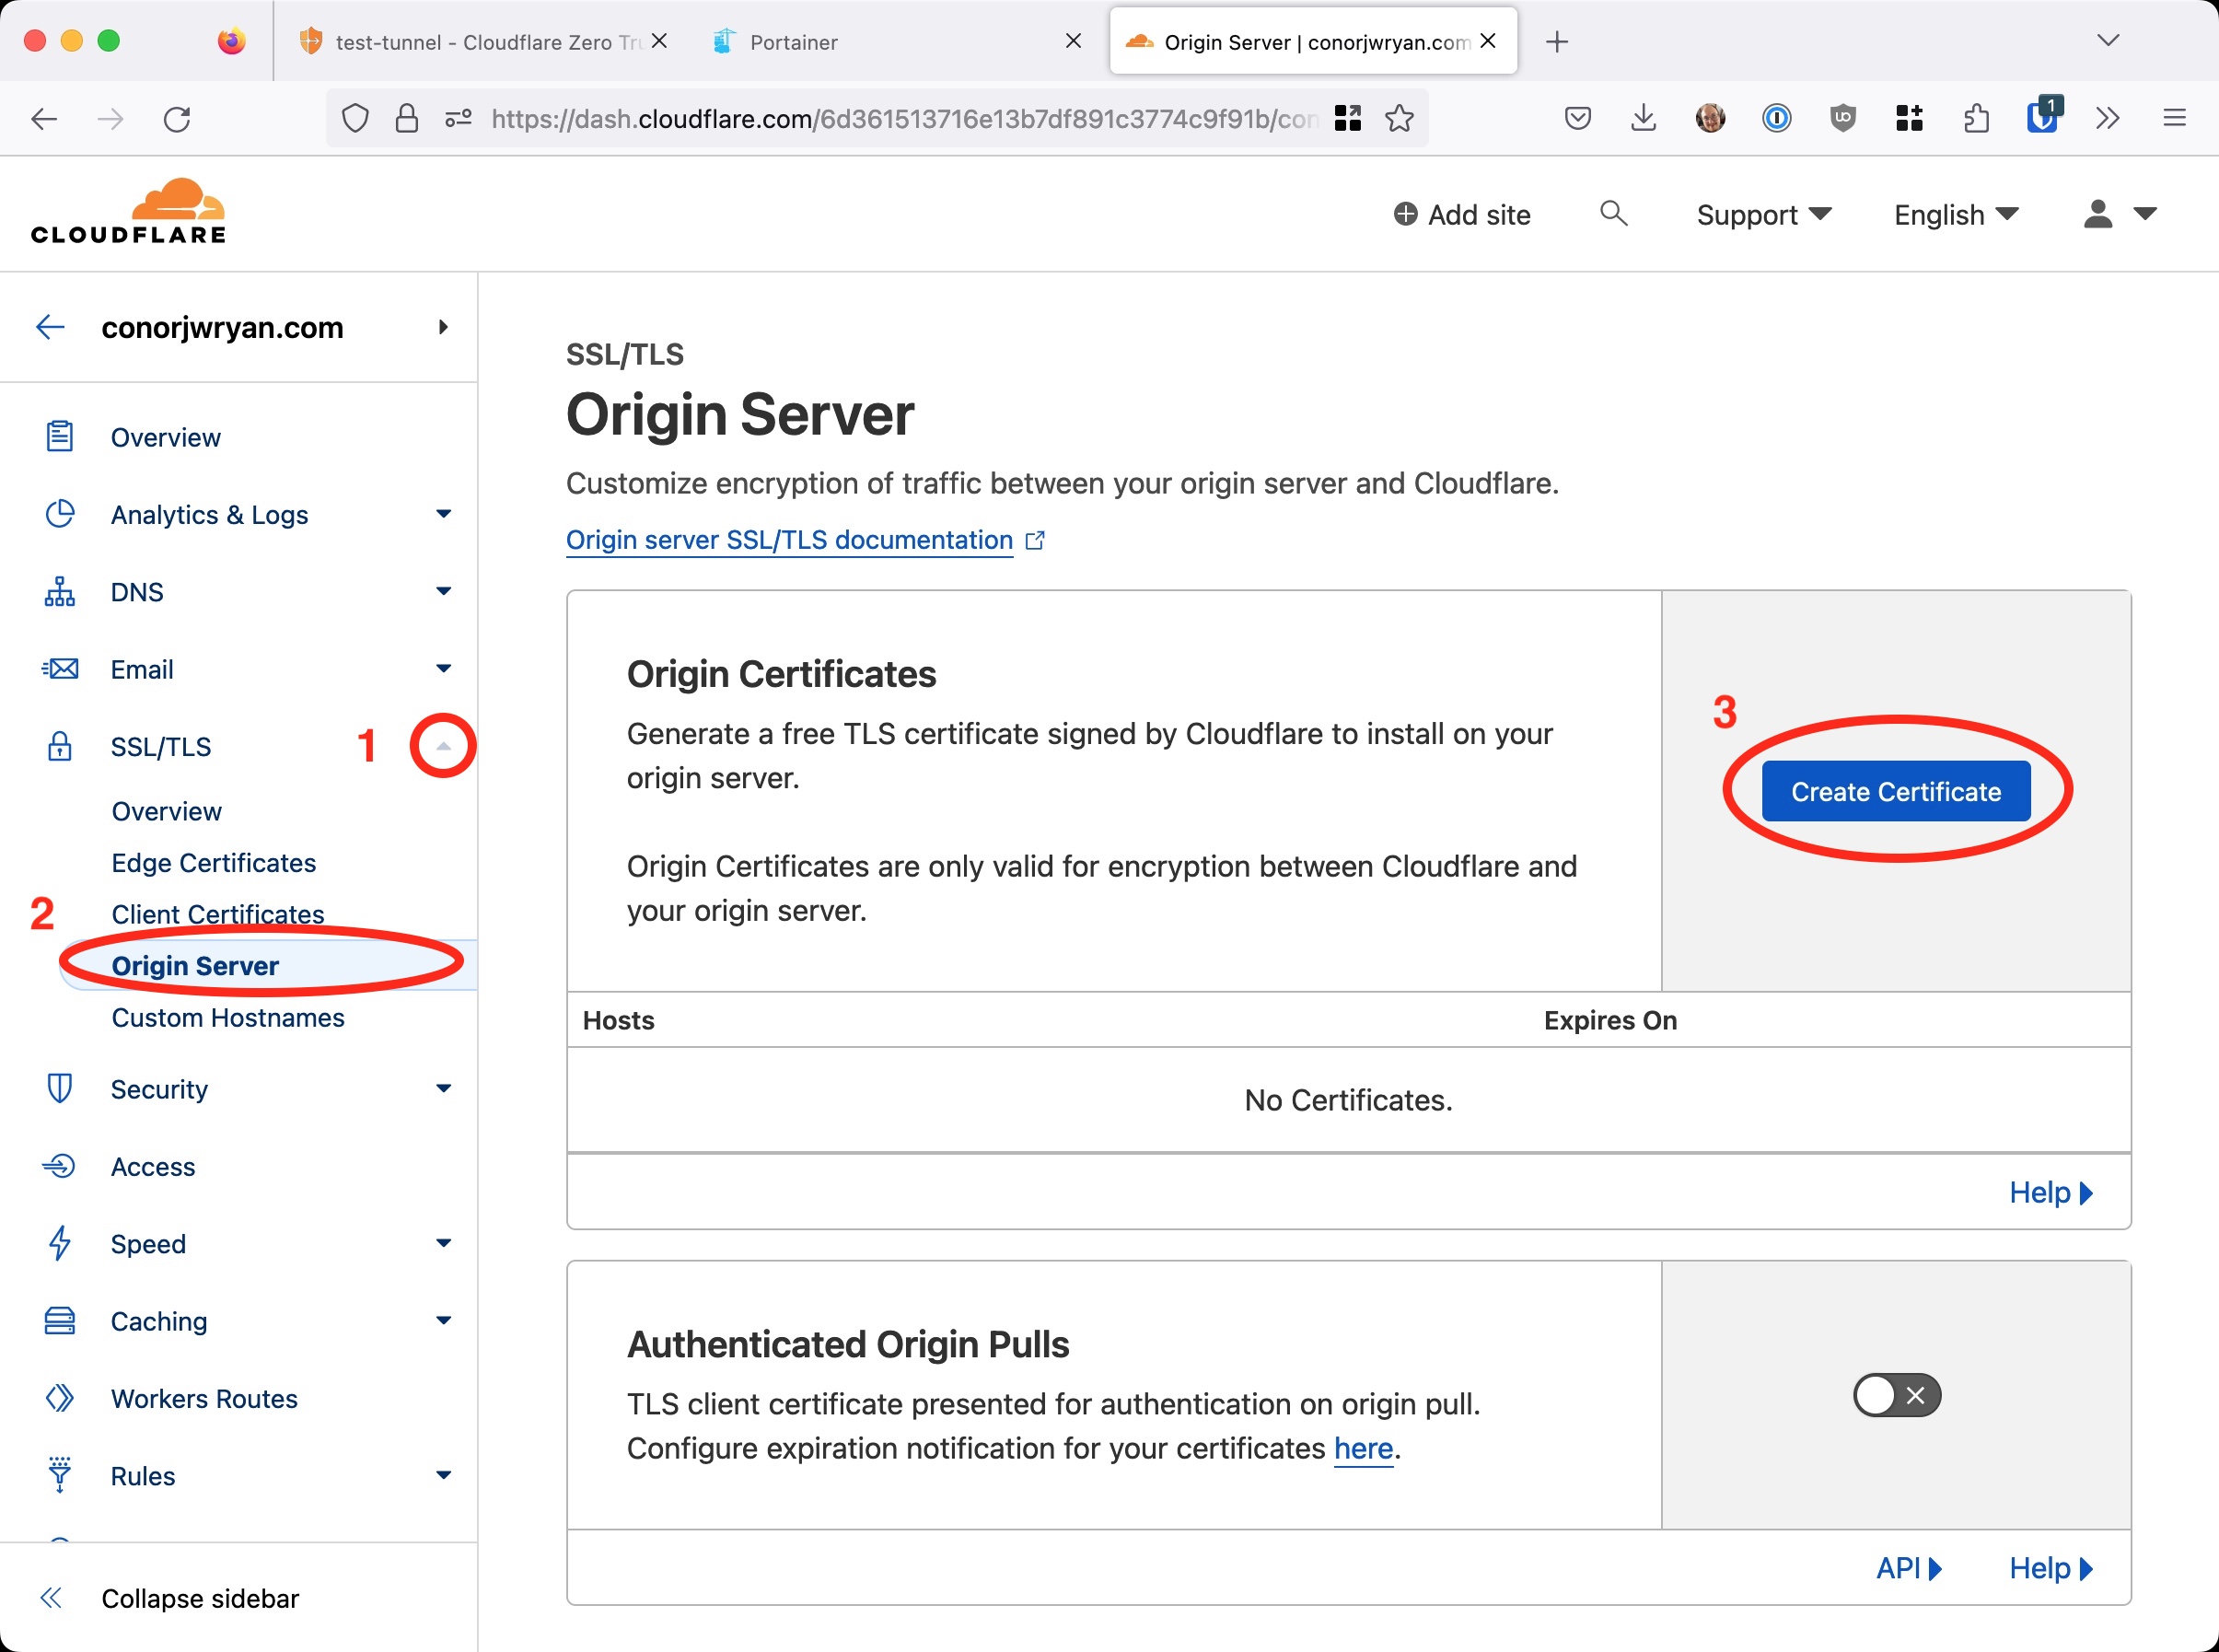
Go to
https://dash.cloudflare.comand select your domain -
Log in to your
Cloudflareaccount and go to theSSL/TLS taband selectOrigin Certificatesand pressCreate Certificate
We are then presented with a screen where we can configure our certificate. By default this is the apex domain and the wildcard subdomain. We can change this to be the subdomain we want to use for our site. In this case I am using test.conorjwryan.com.
Changing the subdomain from a wildcard * to test.conorjwryan.com is more for our benefit as if ever we want to revoke the certificate we can do so without affecting any other subdomains.
We need to make sure the Generate private key and CSR with Cloudflare is selected. We also need to make sure that the Private key format is set to RSA (2048). Afterwards we can press Create
You’ll be presented with a screen that shows the details of your certificate. An Origin Certificate and a Private Key.
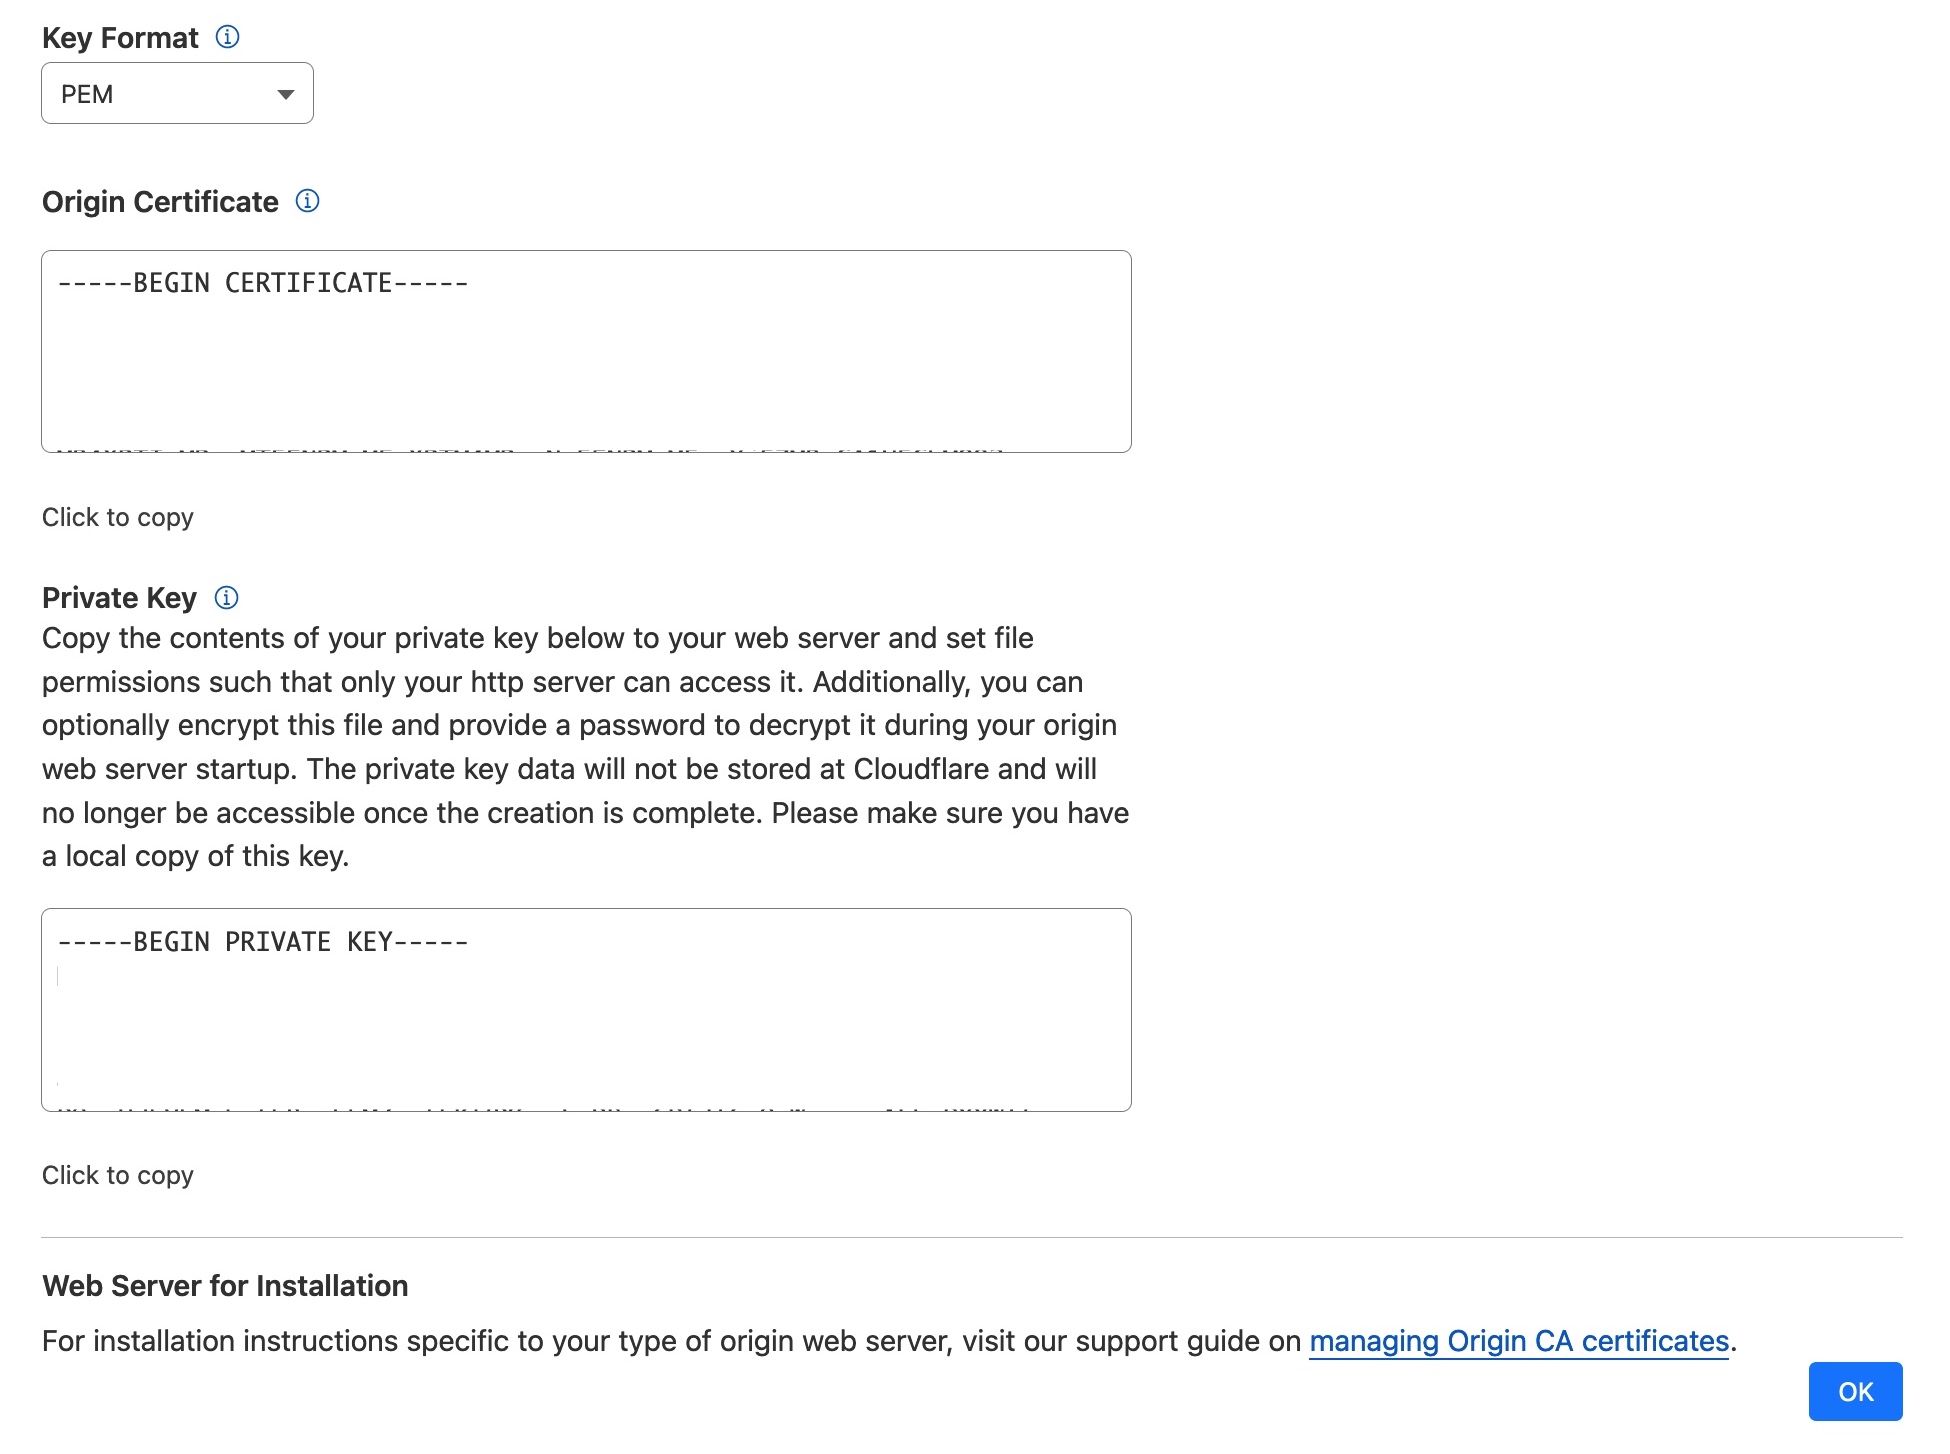
We need to copy the Private Key and the Origin Certificate into separate files. You can use the Click to copy button and copy the certificates into a text editor like nano.
The important thing for Project Ara to work is to make sure the Certificate is copied into a file called <subdomain>.<domain>.<tld>.cert.pem and the Private Key is copied into a file called <subdomain>.<domain>.<tld>.key.pem.
In this case I would use the following create and copy the certificates into the following files:
Doing this will open the nano text editor, all you need to do is copy and paste the certificate into the file and then press ctrl + x to exit and y to save the file.
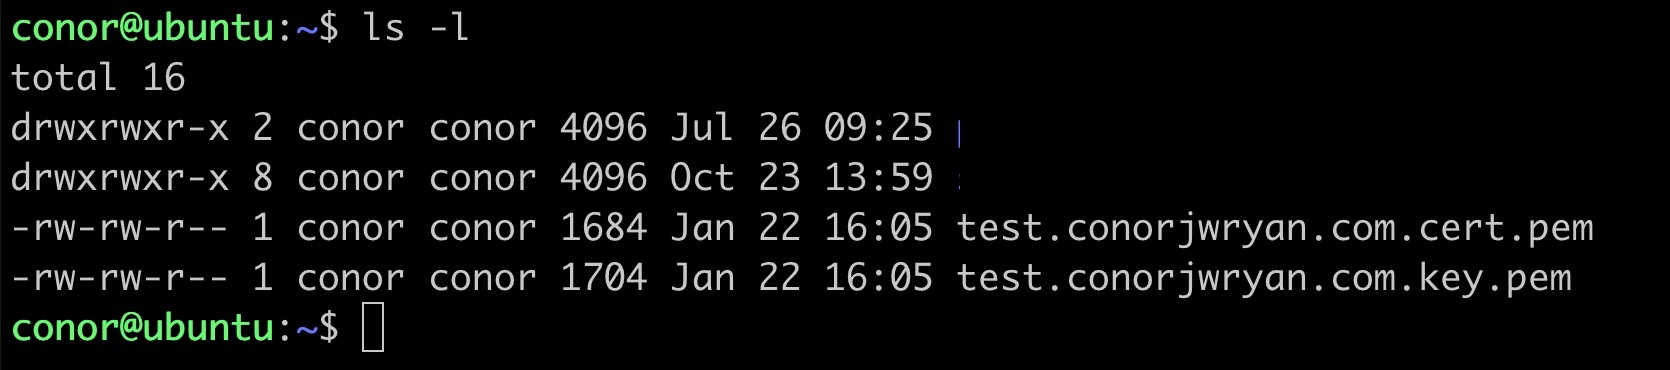
Keep in mind that nano will save the file in the directory you are currently in. In my case I am in the conor home directory so the files will be saved there. Your files should look like this:
Having setup the certificates we can now clone Project Ara onto our system.
Step 1 - Clone the Project
The first step is to clone the project from Gitlab. To do this we need to run the following command:
Navigate to the directory you want to clone the project into and run the following command:
|
|
This will clone the project into a folder called ara. We can then move into the folder by running the following command:
|
|
This should show you the contents of the directory. It should look like this:
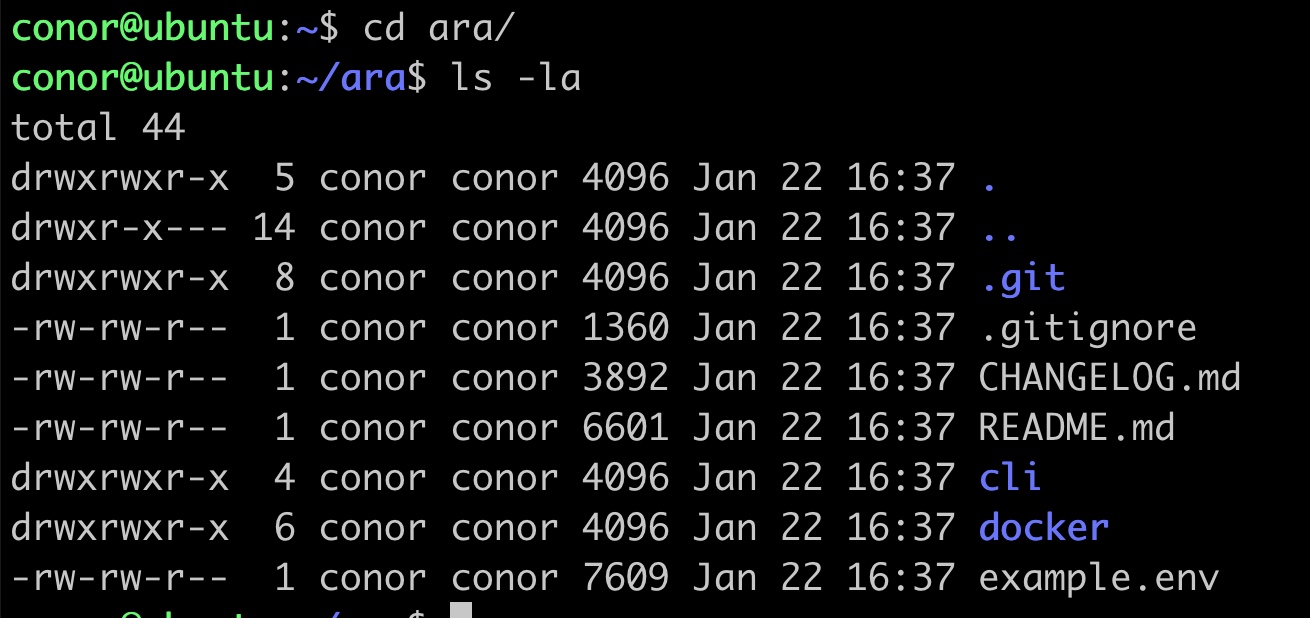
Having successfully cloned the project we can now move on to copying the necessary setup files.
Step 2 - Copying the Setup Files
In the ara directory we need to copy two files from within the contained folders and move them to the root of the repository.
The files we need to copy are:
docker-compose.ymlfromara/docker/compose/single-wp-single-db.yml.envfromara/example.env
We can do this by running the following commands:
This will copy the files into the root of the ara directory. We can then run ls -la to see the contents of the directory. It should look like this:
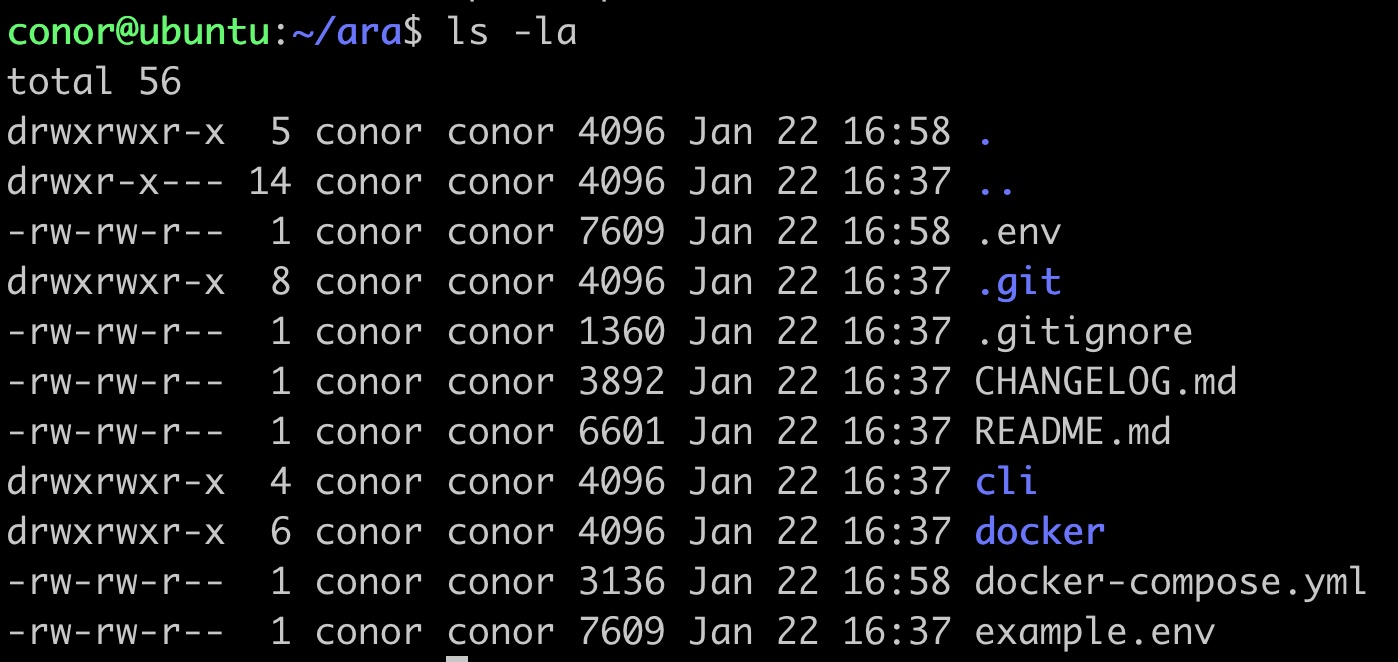
Now we have copied the docker-compose.yml and .env files we can move on to configuring the .env file. For this simple tutorial we do not need to change the docker-compose.yml file as this is already configured for a single WordPress site with a single database.
In the future I will be creating a tutorial on configure Project Ara for multiple sites and databases on one server/computer. For now more information on this can be found on the Project Ara repository here
Step 3 - Configuring the .env file
The .env file contains the configuration for the docker-compose.yml file. We need to edit the .env file to make sure that it is configured correctly for our site.
We can do this by running the following command:
|
|
This will open the .env file in the nano text editor. Whether or not you choose to follow this tutorial keep in mind the guidelines for each of the environment variables above their respective values.
This is a general tutorial serving as a proof of concept for Project Ara. The values I will be using as environment variables are NOT SECURE. For database related variables please use a password generator which creates strong (and single use) passwords (minimum of 20 characters).
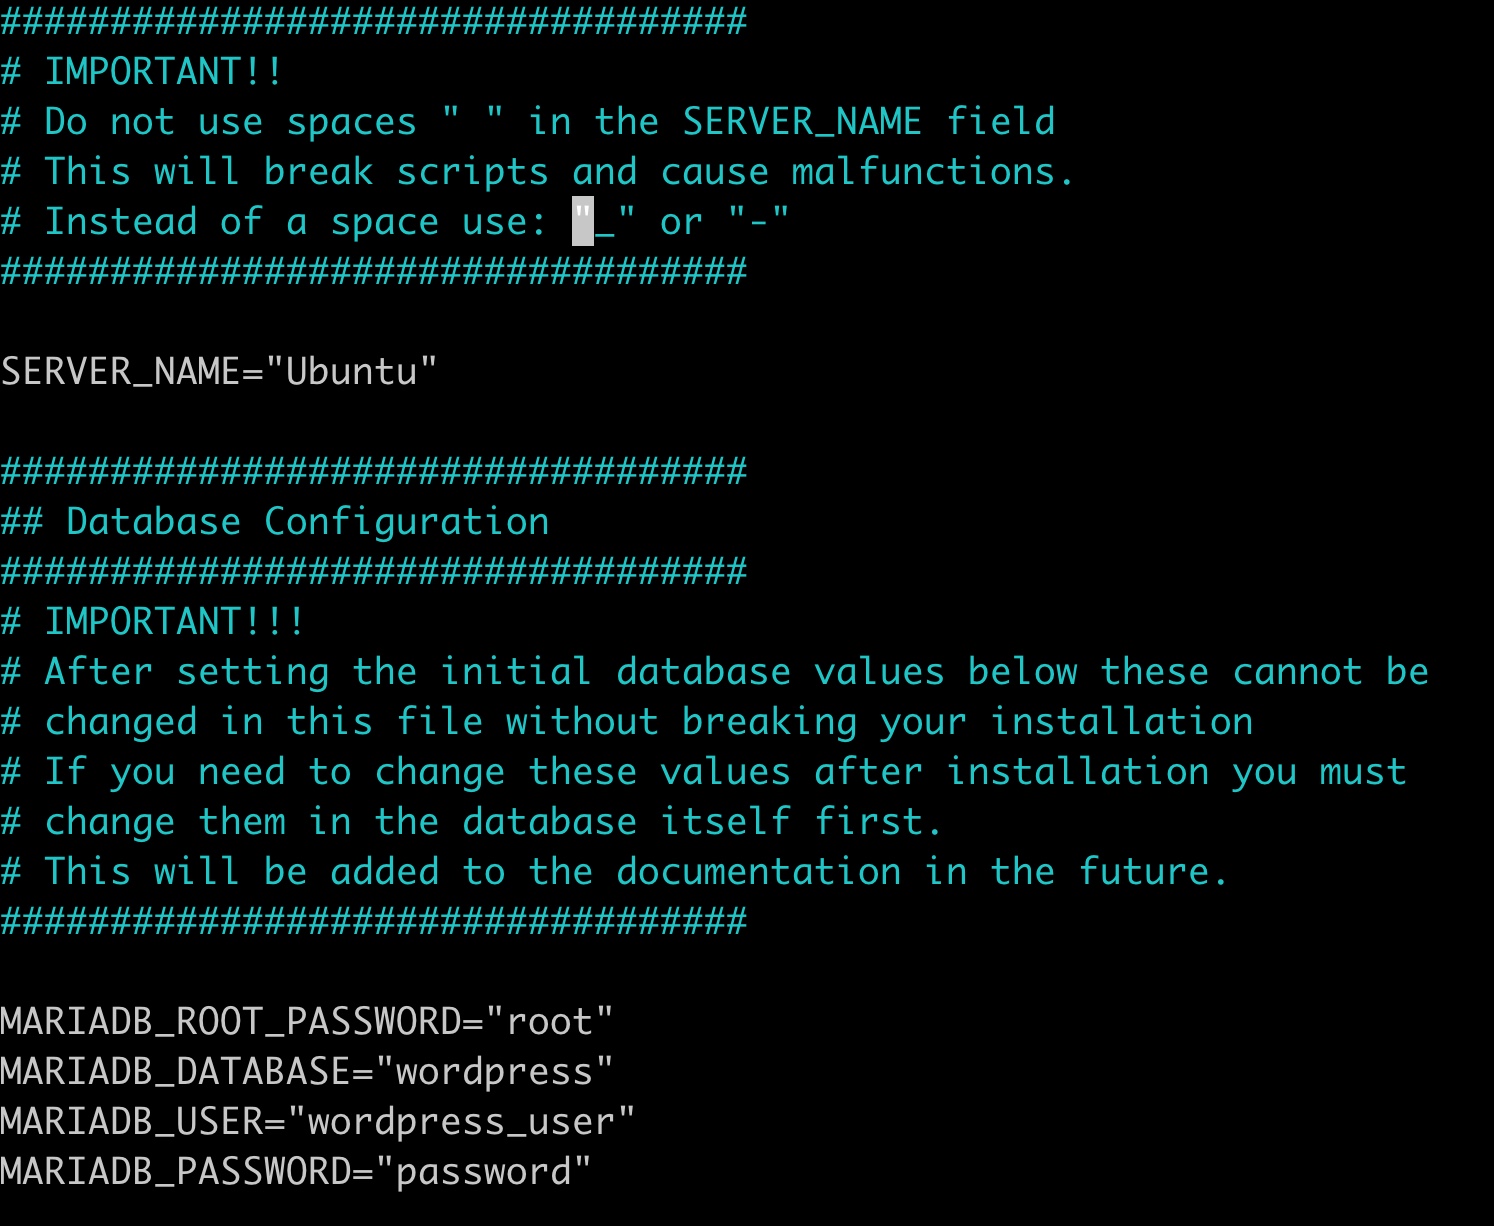
Within the .env file we just need to set the values in the Essential Configuration section (a total of 8 environment variables). We set out values within the double quotes of each variable =""
Database Configuration
The values we need to set are:
SERVER_NAME- This is the name of the server on which the site is hosted. In my case this isUbuntu
Scrolling down to the Database Configuration section we need to set the following values:
MARIADB_ROOT_PASSWORD- Where we put the password for therootuser of the database. This is the user that has access to all databases on the server.MARIADB_DATABASE- This is the name of the database that will be created for the site. Using the name of the site is a good idea but won’t affect the site if you use a different name. I’m usingwordpressMARIADB_USER- This is the database user that WordPress will use to access the database. I’m usingwordpress_useras it distinguishes the user from the name of the database itself.MARIADB_PASSWORD- This is the password for the database user. I’m usingpasswordas it is easy to remember but you should use a password generator to create a strong password.
The passwords created for the database SHOULD NOT be the same as will be used for the administrator user of the WordPress site.
With the database configuration complete we can move on to the next step your environment variables should look like this:
Site Configuration
Scrolling down through Site Configuration we need to set the following values:
SITE_URL- This is the URL of the site. In my case this istest.conorjwryan.com- without thehttps://or the trailing/SITE_NAME- This is the short (one word) name of the site. I’m usingtestas it is short and easy to rememberSITE_HOST_PORT- This is the port which the site will be hosted on. I’m using the default4430but you can use any port you like. If you are using a different reverse proxy you may need to change if something else is using the port you choose.
Your environment variables should look like this:
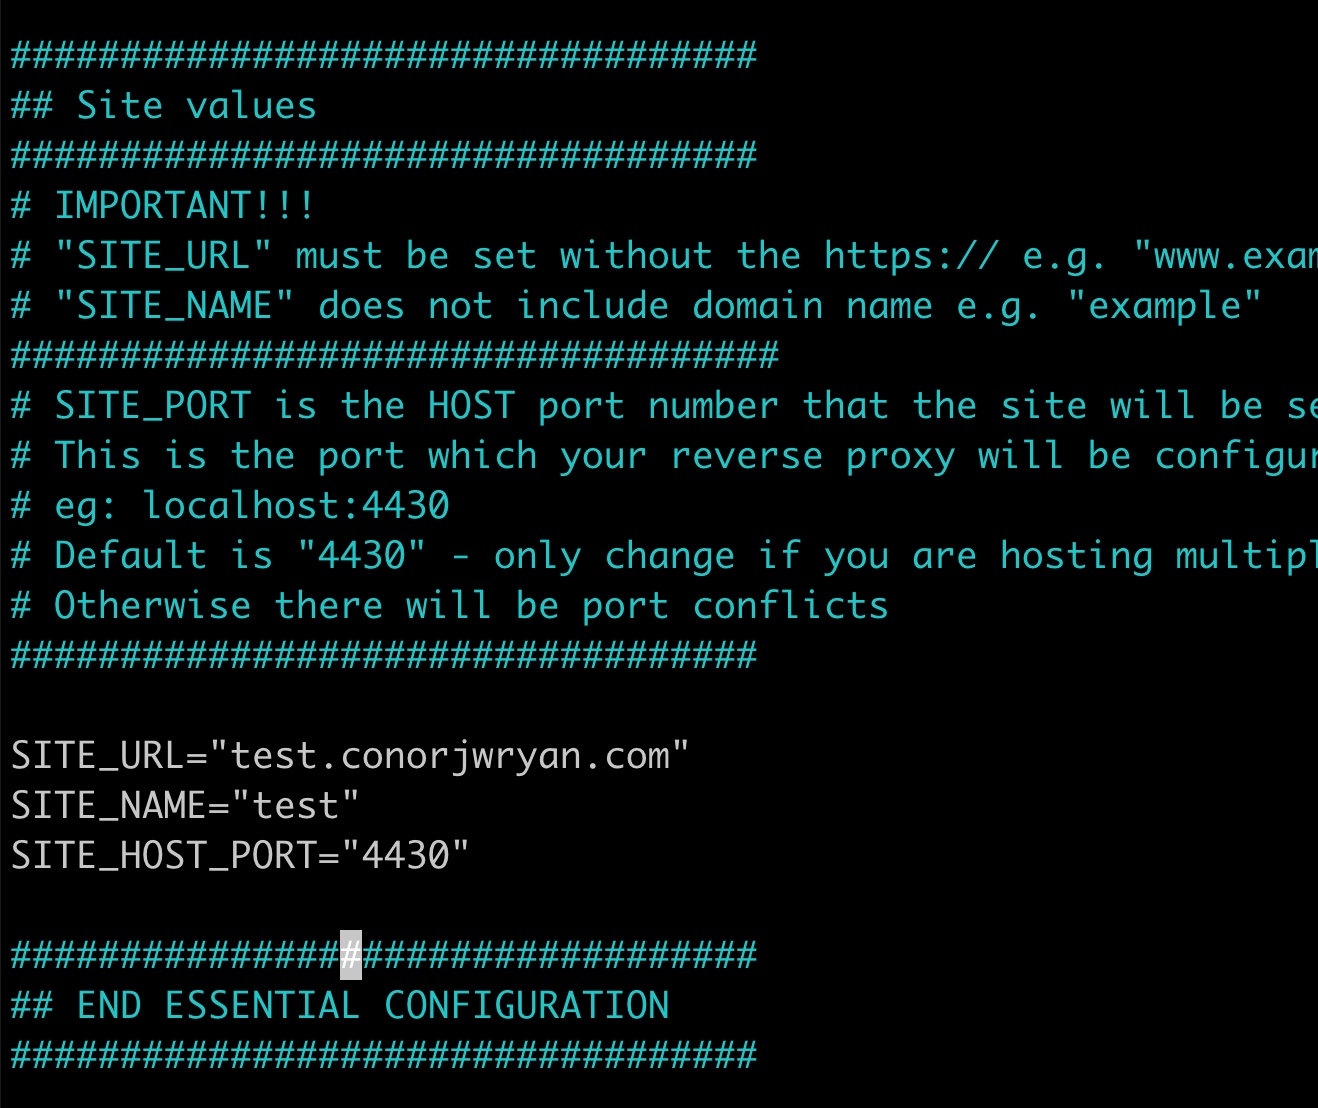
Make note of your SITE_NAME as we will use it in the next step.
With the .env file configured press ctrl + x to exit and y to save the file.
Step 4 - Configure the Site Directory
With the .env file configured we can now prepare the site directory based on the SITE_NAME we chose in the previous step.
We do this by running the following command:
|
|
The html directory contains the plugin, theme, and uploads directories. We can then move into the SITE_NAME directory by running the following command:
In my case I would run:
|
|
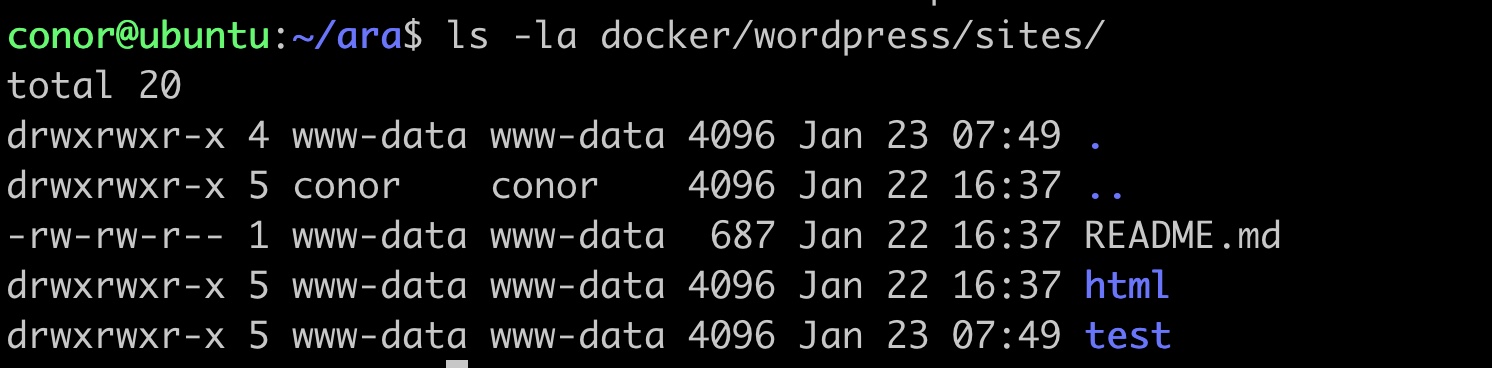
After copying and creating the SITE_NAME directory (test) we need to change the ownership of the sites to the www-data user and group. As it stands currently the directory is owned by your current user and group. In my case this is conor.
In order to change the ownership of the directory you might need to have sudo privileges (admin password).
We can do this by running the following command:
|
|
In my case I would run:
|
|
To then check the ownership of the directory we can run the following command:
|
|
Your output should look like the following:
With the site directory configured we can now move on to placing the SSL certificates in the correct location.
Step 5 - SSL Certificate Configuration
We need to now place the SSL certificates we created earlier in the correct location. From the Ara directory this can be found at:
|
|
The certificates need to be in the format of:
If they are not the correct format the site will not work. Most likely they will be in the format of cert.pem and key.pem. We can rename them by running the following command:
In my case I put them in my home directory (/home/conor/). As such, I need to run the following command:
I am using ../ because I am currently in the ara directory but my certificates are in the home directory. Keep in mind to change this to the correct location of your certificates.
If you are not using Cloudflare Tunnel you will need to obtain an SSL certificate for your site and place it in the correct location.
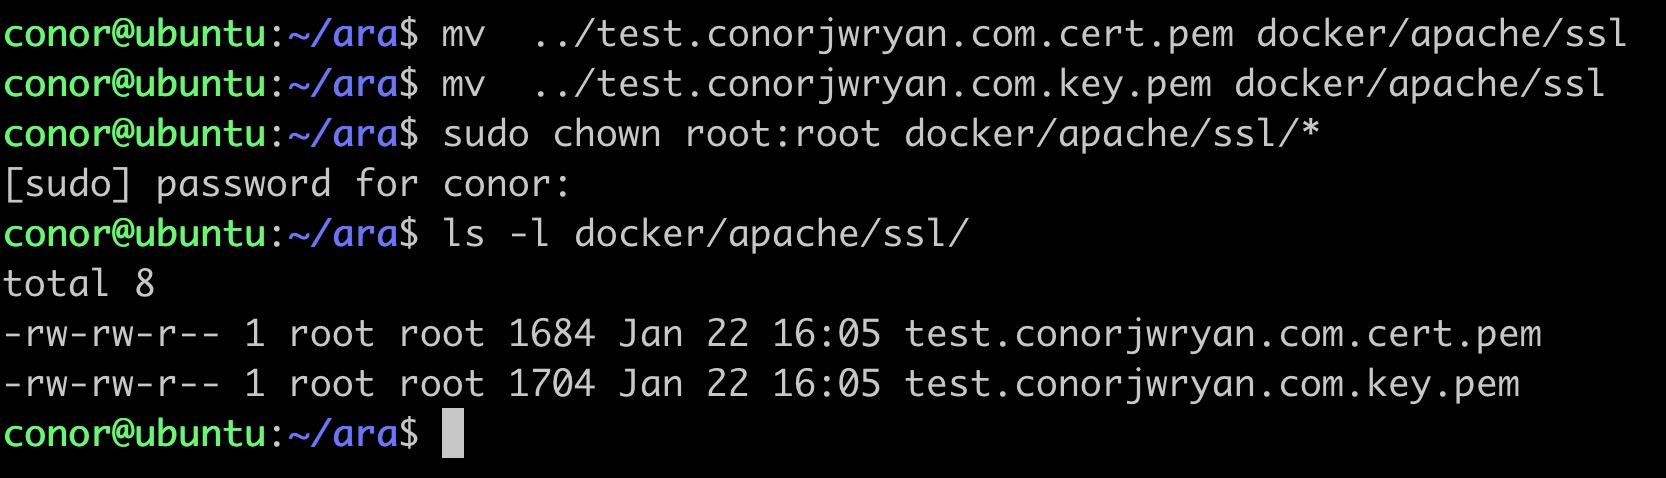
Having moved the certificates into the correct location we need to change the ownership of the certificates to the root user and group. We can do this by running the following command:
|
|
To double check our work we can again confirm the ownership of the certificates by running the following command:
|
|
Your output should look like the following:
With the SSL certificates in the correct location we can now run the docker compose file.
Step 6 - Running the Docker Compose File
We can now run the docker-compose.yml file. We can do this by running the following command:
|
|
Running this command on a fresh server will take a few minutes as it needs to download the images and set up the containers.
For me running this on a Raspberry Pi 4 with 4GB of RAM took about 2.5 minutes to download and process the containers and 30 more seconds for them to build. Running this on a Digital Ocean droplet with 1GB of RAM took about a minute if that.
Once the containers have processed and been created we can check the status of the containers by running the following command:
|
|
Your output should look like the following:

If you see the status of the containers as Up then you have successfully set up Project Ara and can move on to the next step of configuring your reverse proxy.
You should have 2 containers running:
<SITE_NAME>_wpfor the WordPress site<SITE_NAME>_dbfor the database
If you see the status of the containers as Exited then something has gone wrong. You can check the logs of the containers by running the following command:
|
|
More than likely the issue is that the SSL certificates are not in the correct location or are not named correctly.
Step 7 - Configuring the Reverse Proxy
The final step is to configure the Reverse Proxy. I am using Cloudflare Tunnel. If you are using a different Reverse Proxy you will need to configure it to point to the correct port (default is 4430) and to the correct domain name (in my case test.conorjwryan.com).
I will not be showing how to setup and configure Cloudflare Reverse Proxy just the final site setting. If you would like to know how follow my previous tutorial here
Configuring my Cloudflare Tunnel I added the subdomain test.conorjwryan.com, pointed it to https://localhost:4430 and set Origin Server Name to test.conorjwryan.com.
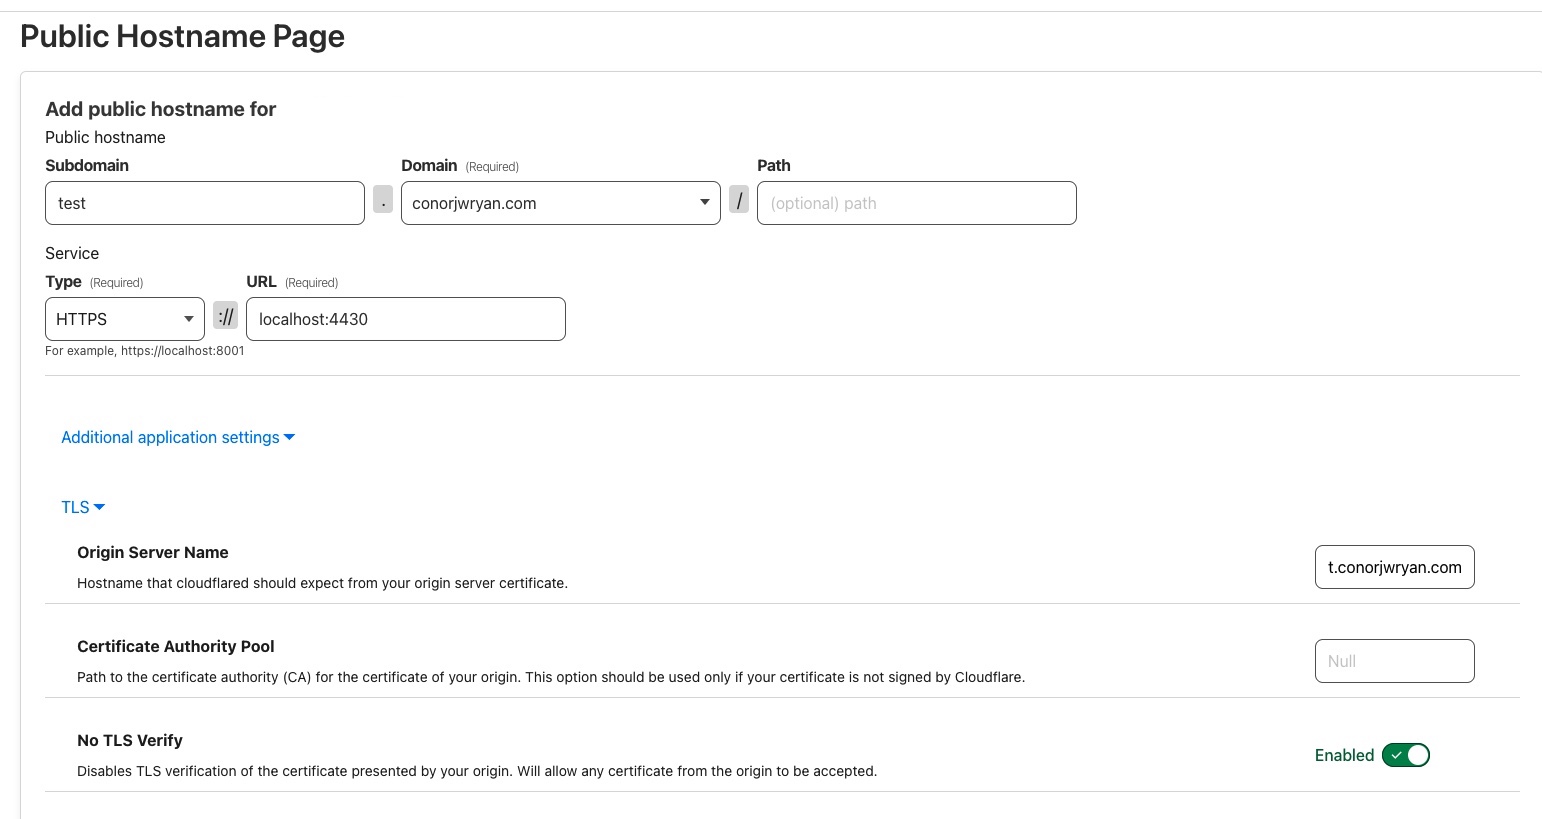
Cloudflare will now be able to route traffic from test.conorjwryan.com to my server and then to the Project Ara containers.
Step 8 - Go to the Site
With the Reverse Proxy and Project Ara configured we can now go to our site https://test.conorjwryan.com and see the following:
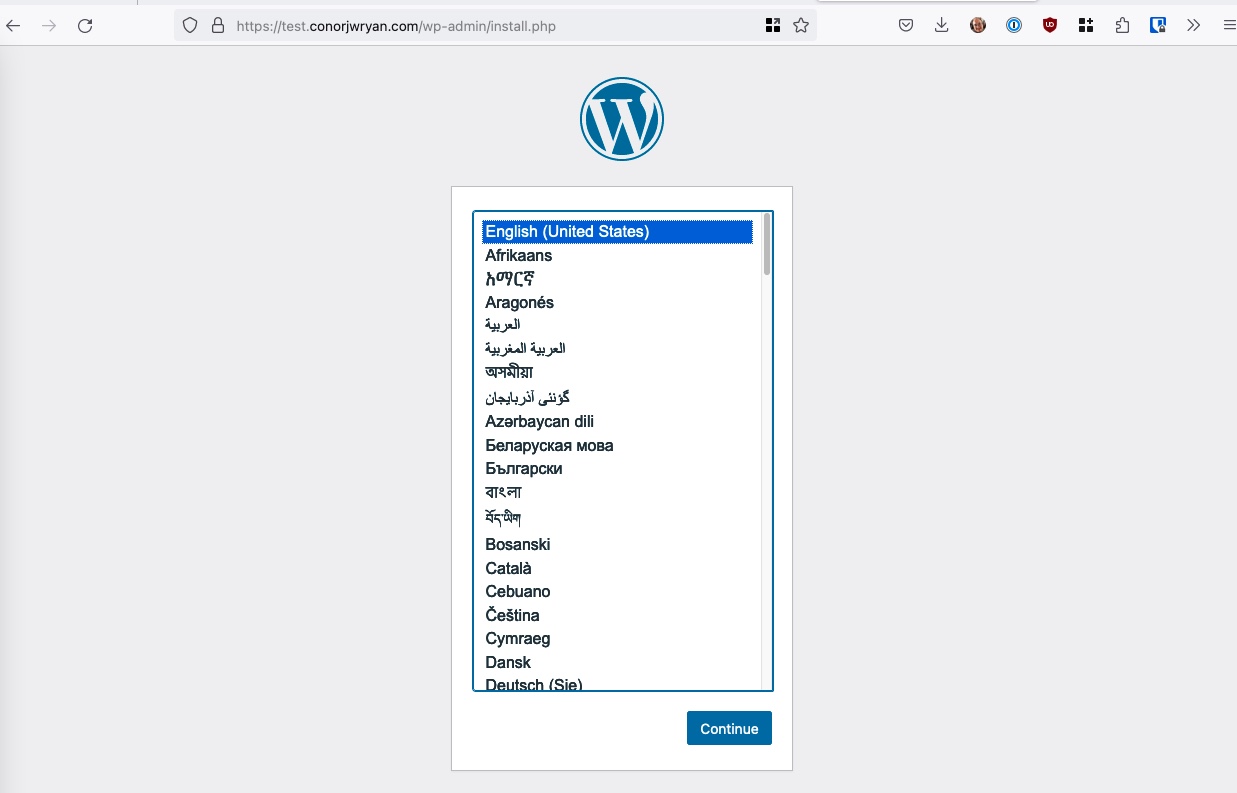
If you see the default WordPress site setup screen then you have successfully set up Project Ara and can now configure your site. You’ll be asked to an administrator account but not the Database as this is already covered in the Docker configuration. Time saved!
Success!
Optional Steps
Set up a Server Cronjob to Run Background WP Tasks
In order for WordPress to run background tasks we need to set up a cronjob on the server. Project Ara includes WP-CLI within the WordPress container. We can use this to run cronjobs by running the following command:
|
|
This will open the crontab file in the nano text editor. We need to add the following line to the bottom of the file:
|
|
Remember to replace the <SITE_NAME> with the name of your site. In my case I would run:
|
|
This will run the cronjob every 5 minutes. You can change this to whatever you like but 5 minutes is a recommended by WordPress.
Conclusion
In this tutorial we have gone through the process of setting up Project Ara on a server. We have configured .env file and the SSL certificates. We have also gone through the process of configuring the reverse proxy and setting up a cronjob to run background tasks. Having done all of this you should now be able to setup a WordPress site in a matter of minutes.
If you have any questions or comments please let me know. If you would like to contribute to the project you can find the source code here.
Until next time,
Conor